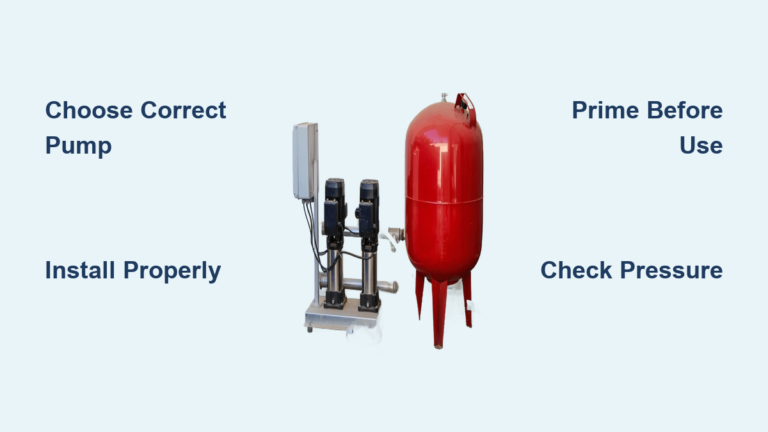
You’ve got a water source, but without a properly installed pump, that water stays out of reach. Setting up a water pump correctly is essential for reliable pressure, long equipment life, and safe operation. Whether you’re boosting low household pressure, drawing from a deep well, or powering an off-grid cabin, the right setup makes all the difference.
This guide walks you through every step of installing a water pump, from choosing the correct type and preparing your site to connecting pipes, wiring, priming, testing, and maintaining your system. By the end, you’ll know exactly how to set up a water pump the right way.
Choose the Right Water Pump for Your Application
Selecting the correct pump type is the foundation of a successful installation. The wrong pump leads to poor performance, frequent repairs, and wasted money.
Match Pump Type to Your Water Source
Your water source determines which pump will work best for your situation:
- Deep wells over 25 feet: Use a submersible pump. These are efficient, self-cooling, and do not require priming.
- Shallow wells under 25 feet: A jet pump or shallow-well submersible works best.
- Rainwater tanks or sump pits: Choose a submersible or external booster pump based on access and pressure needs.
- Municipal supply with low pressure: Install a booster pump to increase flow to upper floors or sprinklers.
- Off-grid or mobile use: A 12V DC RV pump runs on batteries and integrates easily with solar systems.
Pro Tip: Reusing an abandoned well with a new pump can save thousands compared to drilling a new one. Just flush it thoroughly first.
Compare Pump Types by Performance
| Pump Type | Best For | Pressure Output | Power Source |
|---|---|---|---|
| Submersible | Deep wells, tanks | Up to 60 psi | 110V/230V AC |
| Jet Pump | Shallow or deep wells | 40–60 psi | 110V/230V AC |
| Booster Pump | Pressure boosting | 50–80 psi | 110V AC |
| 12V DC RV Pump | Off-grid, campers | ~50 psi max | 12V battery |
Submersible pumps offer the most reliability for permanent installations, while 12V pumps provide simplicity for remote or solar-powered setups.
Calculate Flow Rate and Pressure Requirements
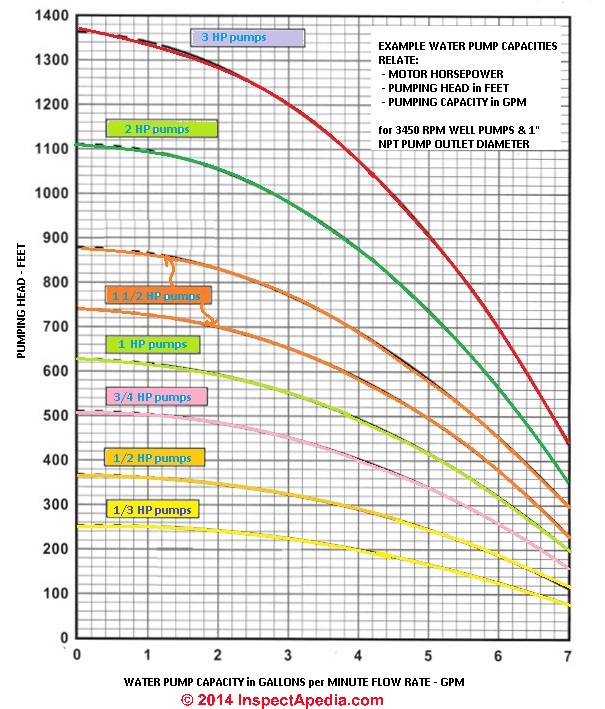
Your pump must deliver enough gallons per minute to handle simultaneous water use throughout your home or property.
Determine Required GPM
Calculate total demand by adding flows from fixtures you might use at once:
- Shower: 2.5 GPM
- Kitchen faucet: 2.2 GPM
- Washing machine: 2–3 GPM
- Dishwasher: 1.5–3 GPM
Aim for 6–12 GPM for a standard home. Larger homes may need up to 11.6 GPM. Use this simple formula: Total GPM equals the sum of all fixture flows used simultaneously.
Warning: Undersized pumps lead to low pressure and premature wear on equipment.
Set Target PSI
Household systems operate best at 40–60 psi. Most pressure switches cut in at 30–40 psi and cut out at 50–60 psi. Below 40 psi, fixtures run weakly. Above 80 psi, you risk pipe damage. If you’re feeding an overhead tank or irrigation system, adjust for elevation and friction loss.
Prepare the Installation Site
A proper site ensures your pump operates efficiently and lasts longer.
Ensure Structural Stability
Install external pumps on a level, vibration-resistant base such as a concrete pad, pavers, or anti-vibration mounts. Bolt the unit down to prevent movement during operation. For submersible pumps, inspect the well casing diameter, depth, and water level to confirm compatibility with your pump model.
Protect Against Environmental Damage
Cold climates require a pitless adapter to route pipes below the frost line. Hot or sunny areas need protection for polyethylene pipe and wiring from UV exposure. Outdoor pumps should be housed in a weatherproof enclosure to prevent rain damage. Keep all electrical components dry and accessible.
Gather Essential Tools and Materials
Having everything ready before starting prevents mid-project trips to the hardware store.
Required Tools
- Pipe wrench and adjustable wrench
- Wire strippers and voltage tester
- Pipe cutter and Teflon tape
- Heat gun or torch for stiff PE pipe
- Shrink tubing iron
- Level
- T-bar or spanner for lowering submersible pumps
Safety First: Wear gloves, goggles, and non-slip footwear during installation.
Required Materials
- Water pump matching your water source and depth
- Pipes: PVC, PE, or copper matching pump specs
- Fittings: NPT adapters, elbows, unions, and nipples
- Hose clamps with two per connection
- Flexible hose for tanks over 1,000 liters to absorb vibration
- Y-strainer for the suction side
- Check valve for the discharge line
- Foot valve if pump sits above water level
- Bladder pressure tank
- Pressure switch set to 30/50 psi typical
- Submersible cable sized appropriately
- Conduit buried below frost line
- Nylon safety rope rated for well use
- RCD or GFCI-protected outlet
Skipping key components like a check valve or pressure tank leads to short cycling and early failure.
Connect Pipes and Valves Correctly
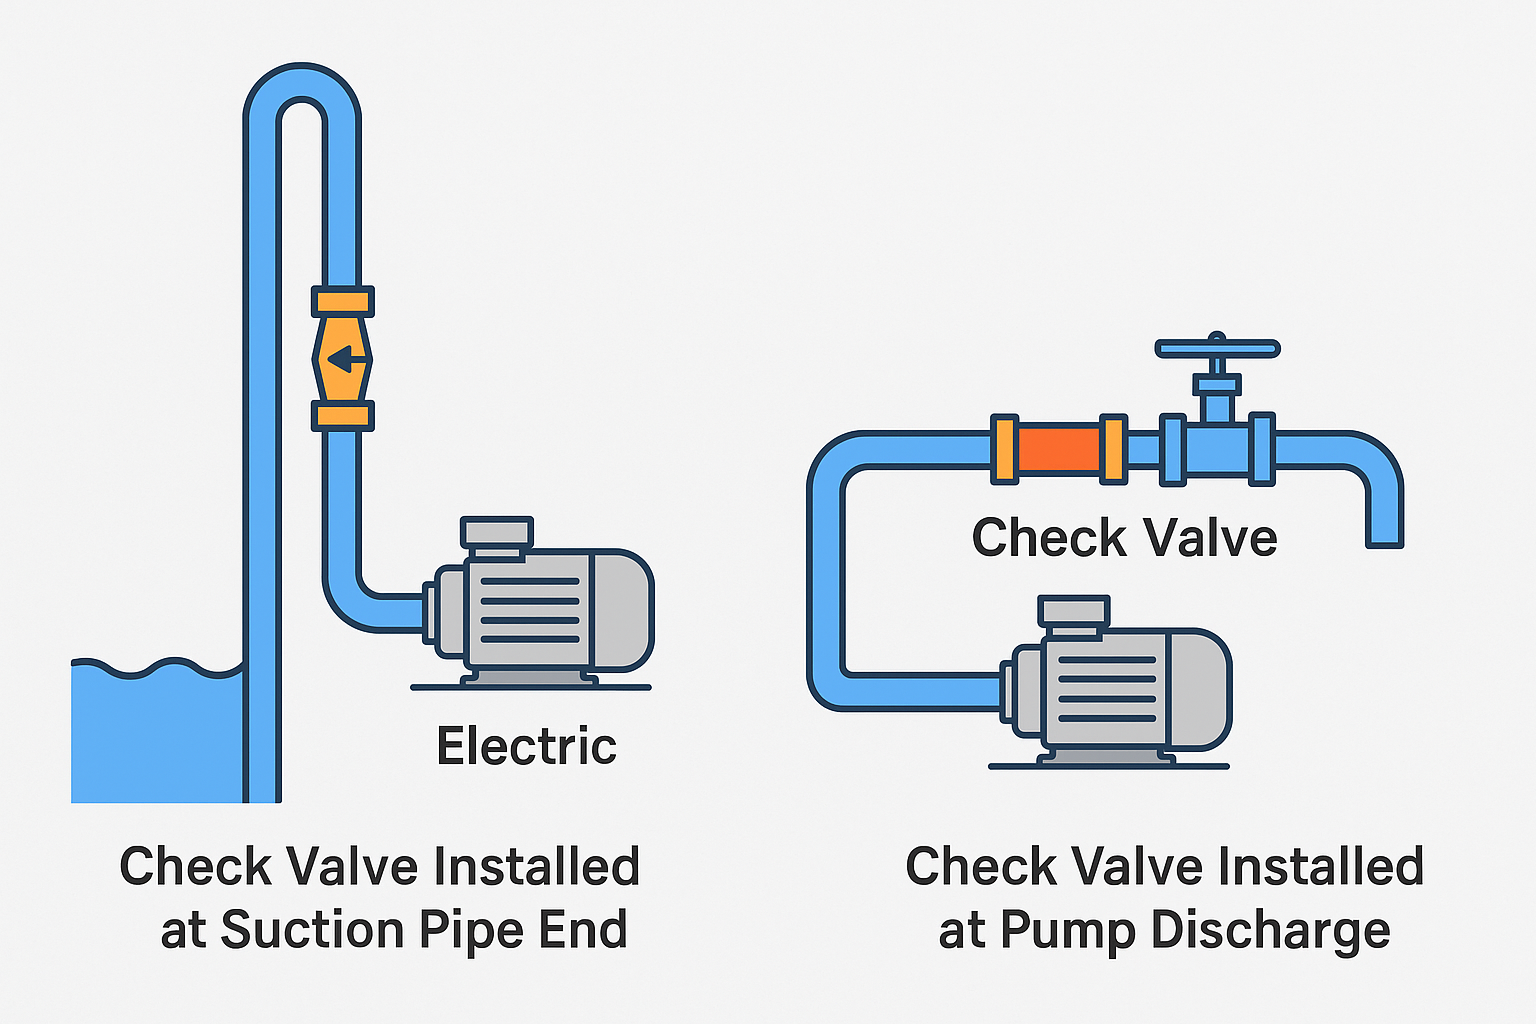
Proper piping ensures your pump maintains prime and delivers water efficiently.
Attach the Suction Line
The inlet side is critical because any air leak breaks prime and stops flow entirely. Use minimum 1-inch diameter pipe. Install a Y-strainer at the water source to catch debris. For tanks over 1,000 liters, use flexible hose between tank and pump to absorb vibrations. Seal all joints with Teflon tape and pipe dope. Avoid sharp bends and use smooth curves to reduce friction loss.
Critical: Suction lines must be airtight. Even a pinhole leak can prevent priming entirely.
Connect the Discharge Line
The outlet side delivers water under pressure to your home or system. Connect to house plumbing, sprinklers, or pressure tank. Use Teflon tape on all threaded fittings. For PVC, apply primer and cement, then allow full cure time. Install a check valve immediately after the pump to prevent backflow and water hammer.
Install Critical Valves
Place a non-return check valve on the discharge line to prevent water from flowing back into the pump, maintain pressure when the pump stops, and reduce startup stress. If your pump sits above water level, install a foot valve at the bottom of the suction pipe. This keeps the pipe full of water when off, maintains prime, and prevents sand intake. Position it at least 10 feet above the well bottom to avoid sediment during droughts.
Wire the Pump Safely
Electrical work requires attention to safety codes and proper grounding.
Follow Electrical Safety Rules
Never use extension cords for pump installations. Plug into a dedicated RCD or GFCI-protected outlet. Use correct wire gauge: 12 AWG for three-quarter HP pumps, 10 AWG for larger units. Ground the system properly. Run power cables through three-quarter-inch conduit buried below frost line.
Legal Requirement: Connecting to mains water via a rain-to-mains valve requires a licensed plumber.
Connect Submersible Pump Wiring
Submersible pumps typically use three-wire 240V connections where the center wire is ground and the outer two wires are hot. Strip 1 inch of insulation from conductors. Crimp metal connectors onto wires and seal with heat shrink tubing for waterproofing. Connect to screw terminals in the control box and secure with wire nuts and electrical tape.
Pro Tip: Label all wires at both ends before lowering the pump into the well.
Install a Submersible Pump in a Well
Submersible pump installation requires careful preparation and systematic steps.
Prepare the Well
Remove the well cap, which usually requires removing four 11mm bolts. Verify well depth, casing depth, static water level, and flow rate. Ensure the casing is clean and undamaged before proceeding.
Assemble Pump and Pipe
Attach a 1-inch NPT barbed adapter to the pump outlet. Wrap threads with Teflon tape clockwise and add pipe dope for extra seal. Tighten with two wrenches to avoid twisting the pump body. Slide hose clamps onto the polyethylene pipe. Heat the PE pipe briefly with a torch if it is stiff. Insert into the barbed fitting and tighten clamps without crushing the pipe.
Lower the Pump Safely
Attach a nylon-braided safety rope to the pump lifting eye. Do not rely on the power cable for support. Install a torque arrester about 6 inches above the pump to absorb startup strain. Use a T-bar drop rod to lower the assembly while a second person guides the pipe to prevent snagging. Stop at the desired depth and hook into the bronze pitless adapter. Secure rope, wire, and pipe together with electrical tape every 20 feet.
Warning: Never let the cable or rope twist during lowering, as this can damage seals.
Seal the Wellhead
Choose based on your climate. Warm climates use a well seal with a rubber gasket that seals the top. Freeze-prone areas use a pitless adapter that routes pipe horizontally underground. Pass wires and rope through the auxiliary hole in the well seal. Connect discharge pipe to thru-plumbing and silicone-seal all well casing openings to prevent contamination.
Prime the Pump Properly
Priming is essential for pumps that require it, but completely unnecessary for others.
Know Which Pumps Need Priming
Must prime: Centrifugal, jet, and booster pumps. No priming needed: Submersible pumps because they are already underwater. May need priming: 12V pumps installed above water level.
Danger: Running a dry centrifugal pump destroys seals and impeller within seconds.
Priming Procedure
Open the priming port on the pump. Fill the pump casing and suction pipe completely with water. Close the port tightly. Check for air leaks and tighten all joints if necessary. Refer to the manual for exact priming volume. Re-prime after maintenance or long shutdowns.
Set Up Pressure Tank and Switch
A pressure tank reduces pump cycling, extends equipment life, and provides steady water flow.
Size the Bladder Tank
Typical home tanks range from 20 to 80 gallons. Pre-charge the bladder to 2–3 psi below cut-in pressure. For example, with a 30/50 psi switch, set tank to 28 psi. Use a tire gauge to check air pressure before filling with water.
Configure the Pressure Switch
Cut-in pressure should be 30–40 psi where the pump turns on. Cut-out pressure should be 50–60 psi where the pump turns off. Adjust screws on the switch if needed and test operation after installation.
Test and Troubleshoot Your System
Testing confirms everything works before relying on the system daily.
Check for Leaks and Noise
Turn on power and start the pump. Watch for steady water flow, leaks at joints, and unusual noises or vibrations. If the pump runs but no water comes out, re-prime and check for air locks.
Verify Pressure and Cycling
Use a gauge to confirm pressure reaches 50–60 psi. After shutdown, pressure should hold. If the pump short-cycles, check for low tank pre-charge, faulty pressure switch, or a waterlogged tank. Ensure the relief valve opens at 100 psi and is installed and functional.
Common Problems and Solutions
No water flow usually means air lock, failed priming, or a clogged filter. Re-prime, bleed air, and clean the strainer. Low pressure indicates an undersized pump, long pipe runs, or leaks. Upgrade the pump, repair leaks, or shorten pipes. Pump short-cycling stems from low tank pressure or a failed bladder. Recharge the tank to 28 psi for a 30/50 switch. Sand in water means a failed foot valve or an unflushed well. Replace the valve and flush the well again. Electrical failure often results from corroded splices or loose wires. Re-crimp with heat-shrink seal.
Maintain Your Water Pump Long-Term
Regular maintenance prevents costly repairs and extends pump life significantly.
Monthly Tasks
Inspect for leaks, corrosion, and loose wires. Listen for abnormal sounds and confirm steady pressure at the gauge.
Quarterly Tasks
Clean the Y-strainer and pre-filter. Flush the system if sand appears in your water.
Annual Tasks
Test the pressure switch and relief valve. Re-pressurize the bladder tank. Inspect all electrical connections and re-prime if suction is lost. Consider professional inspection every one to two years.
Long-Term Tip: Stainless steel pumps last longer in hard water or coastal areas.
Follow Legal and Safety Requirements
Permit requirements vary by location and system complexity. Small above-ground installations often require no permit, while deep wells or mains connections usually do. Check local regulations before starting.
Call a licensed plumber or electrician for mains water connections, deep well installations, complex electrical work, or when you are uncertain about pump sizing. Professional installation ensures safety, compliance, and optimal performance.
Frequently Asked Questions About Setting Up a Water Pump
What type of water pump do I need for a deep well over 100 feet?
For deep wells over 25 feet, use a submersible pump. These pumps sit underwater and are self-cooling, efficient, and do not require priming. Select the horsepower based on your flow rate needs, typically three-quarter HP to 1.5 HP for residential deep wells.
How do I prime a water pump that won’t draw water?
Open the priming port and fill the pump casing and suction pipe completely with water. Close the port tightly and check all suction joints for air leaks. Tighten any loose fittings and re-prime if necessary. Ensure the foot valve is functioning properly if your pump is above water level.
What pressure should my water pump system maintain?
Standard household systems should maintain 40 to 60 psi. Set your pressure switch to cut in at 30 to 40 psi and cut out at 50 to 60 psi. Adjust based on your specific needs, such as irrigation systems or multi-story homes.
Can I install a water pump myself or do I need a professional?
DIY installation is feasible for simple above-ground pumps, shallow wells, and tank installations. However, deep well installations, mains water connections, and complex electrical work require licensed professionals. Always check local permit requirements before starting.
How often should I maintain my water pump system?
Perform monthly visual inspections and leak checks. Clean filters every one to three months. Test pressure switches and relief valves annually. Re-pressurize bladder tanks yearly and schedule professional inspection every one to two years for complex systems.
Why does my pump short-cycle frequently?
Short-cycling usually indicates low tank pre-charge, a faulty pressure switch, or a waterlogged bladder tank. Check the tank air pressure with a tire gauge and recharge to 2 to 3 psi below your cut-in pressure. Replace the bladder if it has failed.
Key Takeaways for Setting Up a Water Pump
A properly set up water pump delivers years of trouble-free service when you follow the right steps. Choose a pump type that matches your water source depth, whether it’s a submersible for deep wells or a booster for low-pressure municipal supply. Calculate your flow and pressure needs accurately to avoid undersizing, which leads to poor performance and early wear.
Install all critical components including a Y-strainer on the suction side, check valve on the discharge line, and a properly sized bladder tank. Ensure every suction connection is airtight because even small air leaks prevent priming. Wire everything safely with GFCI protection and proper grounding.
Whether you’re restoring an old well, boosting home pressure, or going off-grid, attention to detail in selection, installation, and protection pays off. Always follow the manufacturer manual, use quality materials, and don’t skip safety steps. When in doubt, consult a professional because your water supply depends on it.