You turn on the faucet, and nothing happens. No drip, no sputter, just silence. Your well pump isn’t pumping water, and suddenly everyday life comes to a standstill. Showers, laundry, even flushing the toilet become impossible. You’re not alone: well pump not pumping water is one of the most urgent and common household emergencies in rural and suburban areas.
This guide walks you through every possible failure point, step-by-step tests, and proven fixes. By the end, you’ll know exactly how to pinpoint the problem, avoid costly mistakes, and restore water fast.
Check Power and Breaker First
Before diving into complex repairs, confirm the most basic need: power.
Test the Circuit Breaker
Locate the dedicated 240V breaker for your well pump. It’s often labeled “Well” or “Pump” in your electrical panel. If it’s tripped, follow these steps:
• Turn it fully off, wait 5 seconds, then reset
• If it trips again immediately, do not keep resetting
• This indicates a serious fault like a shorted motor or damaged wiring
A repeatedly tripping breaker often means motor burnout or submersible cable damage. Call a professional in this situation.
Verify Voltage at Key Points
Use a multimeter or non-contact voltage tester to check voltage at these points:
• Breaker output
• Disconnect switch
• Pressure switch terminals
You should read 216 to 264V on a 240V system. If voltage drops below 200V, it suggests corroded or undersized wiring, long wire runs without proper gauge, or loose connections. Look for burnt smell or discolored wires as visual cues. Turn off power and replace damaged components if you spot these warning signs.
Diagnose the Pressure Switch
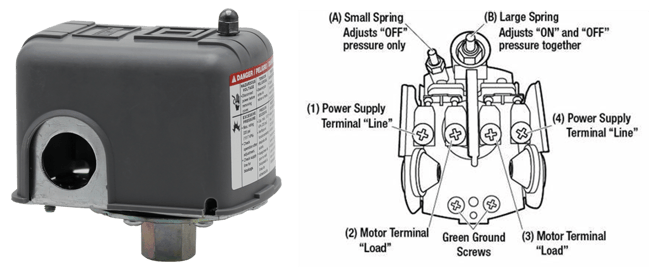
The pressure switch controls when the pump turns on and off. If it fails, the pump will not activate even with power present.
Inspect Contacts and Sensor Nipple
Turn off power and open the switch cover. Look for these issues:
• Pitted or burned contacts indicate the switch needs replacement
• Clogged sensor nipple (small tube) can be cleaned with a wire or small drill bit
Nine times out of ten, a clogged sensor nipple causes no water. Clean it and you’re back online.
Perform Manual Reset
Some switches have a plastic lever on the side that serves as a manual reset. For stuck contacts, gently move the lever to free binding. For low-pressure lockout (common when pressure is below 12 psi), follow this sequence:
- Hold lever at 45 degrees
- Restore power
- Hold until pressure builds above 12 psi
- Release
This bypasses the safety cutoff and often restarts the system.
Test Input vs. Output Voltage
With power on, measure voltage at input (from panel). It should read approximately 240V. Then measure output (to pump). It should match the input. If input has power but output does not, the switch is faulty and needs replacement. Expect to pay $25 to $60 for a new pressure switch.
Test the Pressure Tank
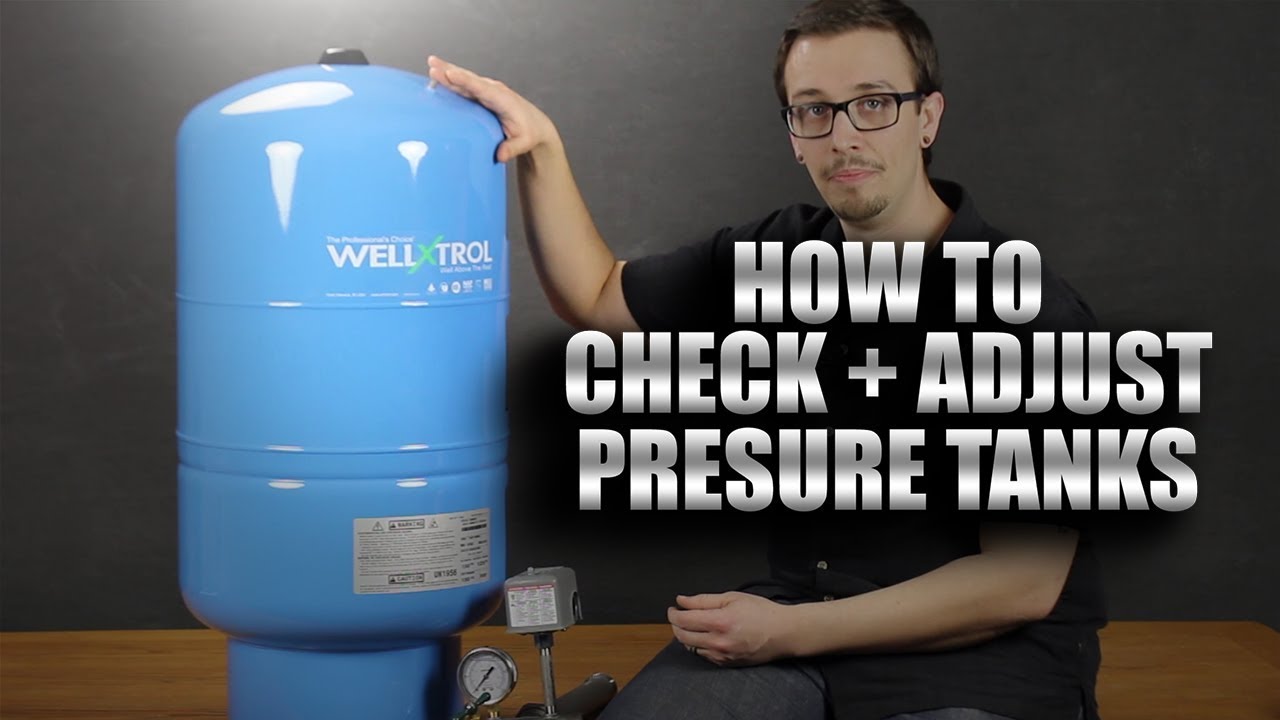
A failed pressure tank can mimic pump failure by causing rapid cycling or no pressure buildup.
Check Air Charge
With the pump off and tank drained, locate the Schrader valve (tire-style valve on top). Press the core to test:
• Water sprays out means the bladder is ruptured. Replace the tank.
• Air escapes normally. Use a tire gauge to check pressure.
The rule is simple: pre-charge should be 2 psi below cut-in pressure. For a 40/60 system, that means 38 psi. Recharge with an air compressor if the reading is low.
Perform Rock and Tap Tests
For the rock test, push gently on the tank’s top. Balanced movement means good condition. Heavy at bottom indicates waterlogging.
For the tap test, tap the side with a screwdriver. Hollow sound near the top means the air cushion is intact. Dull thud throughout means the tank is full of water.
A waterlogged tank causes short cycling (pump turns on and off every few minutes), which wears out the switch and capacitor. Replacement tanks cost $200 to $400 for 30 to 80 gallon models.
Inspect Capacitor and Control Box

For submersible pumps, the capacitor is the number one failure point.
Look for Visual Damage
Open the control box and inspect the capacitor carefully. Look for these warning signs:
• Bulging or domed top
• Leaking oil or residue
• Burn marks or strong burnt smell
Smell the capacitor directly. If it stinks, it’s dead. Even if it looks fine, a capacitor can fail internally. Replace it if you have any doubt.
Match Replacement Specs
Capacitors must match exactly:
• Voltage rating (for example, 230V)
• Capacitance (for example, 20 to 30 µF)
• Physical size and terminal type
Replacement costs $50 to $100. Keep a spare on hand. As a pro tip, swap in a known-good control box. If the pump runs, your original box was faulty.
Rule Out Loss of Prime (Jet Pumps)
If you have a jet pump, loss of prime is a top cause of no water output.
Re-Prime the Pump
Follow these steps to re-prime:
- Shut off power
- Remove priming plug on pump casing
- Pour 4 to 5 gallons of clean water into the pump using a funnel to avoid spills
- Replace plug and restart
The priming math is straightforward: a 1-inch pipe requires approximately 30 feet of water per gallon to prime, while a 1.5-inch pipe requires about 15 feet per gallon. If priming fails repeatedly, look for an air leak or foot valve failure.
Find and Fix Air Leaks
Check these common failure points:
• Suction line fittings
• Casing seals
• Hose clamps
• Foot valve
Tighten connections, replace gaskets, or reseal joints. Foamy or carbonated water is a clear indicator of air in the system.
Investigate Foot Valve and Drop Pipe
A failed foot valve or broken drop pipe lets water drain back into the well, forcing the pump to re-prime every cycle.
Listen for Gurgling
After shutdown, listen carefully for gurgling in the pipes. This sound means water is flowing back, and the foot valve is likely stuck open or clogged.
Check for Wet Spots
Inspect the trench between the well and house. Wet ground indicates a leak in the buried pipe. Foamy water at fixtures means air is entering via a crack.
Common failure points include threaded steel joints, brittle black polyethylene, and loose hose clamps. For cracked poly pipe, cut out the damaged section and use sharkbite-style couplings or compression fittings.
Confirm Water Level in the Well
Your well might be dry or low, especially during drought conditions.
Test Water Depth
Turn off the pump and remove the well cap. Tie a small weight (like a bolt) to a string and lower it until you hear a splash, which indicates the water level. Continue lowering to the bottom, then measure:
• Total depth of the well
• Depth to water
• Height of the water column
If water is within 1 to 2 feet of the pump intake, do not run the pump. There’s a risk of overheating.
Respond to Low Water
When water levels are low, you have several options:
• Stop using water temporarily
• Bring in water via tanker
• Lower the pump deeper (if the casing allows)
• Install a VFD (Variable Frequency Drive) to adapt to low yield
• Drill a new well
Most pumps have a no-load sensor that cuts off when no water is moving.
Detect Air in the System
Air causes sputtering, erratic pressure, and water hammer.
Bleed Air from Lines
Follow these steps:
- Shut off the pump
- Open the highest faucet in the house (second-floor shower, for example)
- Slowly open the lowest faucet (basement or outdoor spigot)
- Let water flow until the stream is steady and air-free
Also inspect all fittings and unions for leaks. Retighten or replace gaskets as needed. Re-prime the pump if necessary.
Check for Frozen or Clogged Pipes
Cold weather or mineral buildup can block flow entirely.
Diagnose Frozen Lines
Pipes in uninsulated basements, crawl spaces, or outside walls are vulnerable. Use an infrared thermometer or warm towel to test temperature. Thaw with heat tape or a hair dryer. Never use open flame.
One user reported a freeze just underground after the wellhead. The system tested fine electrically, and thawing restored pressure.
Bypass Water Treatment Systems
Mineral scale, sediment, or biofilm in sediment filters, water softeners, iron filters, or UV systems can block flow. Perform a bypass test by isolating each unit, opening the bypass valve, and testing water flow. If water returns, the filter or softener is clogged.
Diagnose Submersible Pump Failure
If power reaches the wellhead but no water flows, the pump itself may be dead.
Test Continuity and Resistance
At the wellhead splice, use a multimeter to check for continuity between leads and resistance. It should match specifications, usually 1 to 5 ohms per horsepower. An open circuit or high resistance indicates motor failure.
Also listen for grinding or rattling after startup. Check for low voltage at pump leads, which indicates wiring issues.
When to Pull the Pump
If you suspect a broken impeller, damaged pipe, or failed foot valve, you’ll need to pull the pump and drop pipe.
Know When It’s Necessary
Pull the pump if the impeller is disconnected, drop pipe is cracked, foot valve needs replacement, or the pump is over 10 to 15 years old and failing.
Use Proper Tools and Safety
Use a pipe hitch knot to secure the pipe. For black poly, add extra turns because rope can slip. For deep wells over 300 feet, use a front-end loader with two hitches. Always wear gloves and eye protection.
A half-horsepower submersible weighs about 80 pounds. Add the weight of the pipe over the depth.
Decide: Repair or Replace?
Age and cost determine whether to fix or replace your well pump.
Pump Lifespan by Type
Submersible pumps typically last 8 to 15 years, extending to 15 to 25 years with good maintenance. Jet pumps last 8 to 10 years, extending to about 12 years with care.
A 30-year-old pump is far past its life expectancy. Replace it rather than pouring money into repairs.
Repair vs. Replacement Costs
Here is a cost breakdown:
• Pressure switch: $25 to $60 (easy DIY)
• Capacitor: $50 to $100 (most common fix)
• Pressure tank: $200 to $400 (prevents short cycling)
• Submersible pump unit: $400 to $1,200 (varies by horsepower and depth)
• Installation labor: $500 to $2,000 (deep wells cost more)
• Full system replacement: $2,000 to $5,000 (pump, tank, switch)
• Emergency service call: add 50 to 100 percent
An emergency Saturday call leads to very high labor charges. Avoid this by maintaining your system and keeping spare parts on hand.
Call a Professional When
Some jobs demand expertise. Call a pro if the breaker trips repeatedly, you see burnt wires or melting, there’s low voltage at pump leads, you suspect well casing damage, the pump must be pulled, or you experience unexplained pressure loss.
Professionals bring safety (high-voltage systems and heavy lifting), specialized tools (megohmmeters and insulation testers), accuracy (correct diagnosis), warranty coverage, and efficiency to the job.
Prevent Future Failures
Routine maintenance beats emergency repairs every time.
Annual Maintenance Checklist
Perform these tasks regularly:
• Check tank air charge yearly to prevent short cycling
• Inspect pressure switch yearly to avoid sticking
• Test pump start/stop every 6 months to confirm function
• Clean inlet screen as needed to stop clogs
• Monitor water level during droughts to catch low yield
• Keep backup supply ready for emergency preparedness
Keep a spare pressure switch and capacitor on hand. This simple preparation can cut downtime to minutes.
Frequently Asked Questions About Well Pump Not Pumping Water
Why does my well pump run but not deliver water?
This indicates the pump is receiving power but cannot move water. Common causes include loss of prime (jet pumps), a broken foot valve, cracked drop pipe, or a failed impeller. Check the pressure switch and tank first, then investigate the drop pipe and well level.
How do I know if my pressure switch is bad?
Signs of a faulty pressure switch include the pump not starting, not stopping, or rapid cycling. Inspect the contacts for pitting or burning. Test input versus output voltage. A faulty switch shows voltage on input but not output.
Can a dry well cause pump damage?
Yes. Running a pump when the well is dry can cause overheating, impeller damage, and motor burnout. Most modern pumps have no-load protection that shuts off the motor when water flow stops. If your water level is within 1 to 2 feet of the pump intake, do not run the pump.
How often should I replace my well pump?
Submersible pumps last 8 to 15 years with proper maintenance. Jet pumps last 8 to 10 years. If your pump is over 15 years old and showing signs of failure, replacement is often more cost-effective than repeated repairs.
What is the most common cause of well pump failure?
The capacitor is the most common failure point for submersible pumps. For jet pumps, loss of prime is the top issue. Pressure switch failure affects both types. Keeping spare capacitors and switches on hand can restore water in minutes.
Should I attempt well pump repairs myself?
Simple repairs like resetting the pressure switch, re-priming a jet pump, checking air charge, or replacing a capacitor are feasible for DIYers. However, pulling a submersible pump, diagnosing motor failure, or working with high-voltage electrical systems requires professional help.
Key Takeaways for Fixing Your Well Pump Not Pumping Water
A well pump not pumping water is stressful, but it’s rarely hopeless. Start with the basics: power, breaker, and pressure switch. These components cause the majority of no-water problems and are the easiest to fix. Rule out simple fixes before tackling deep well repairs.
Most issues resolve in under an hour. A clogged sensor nipple, tripped breaker, or failed capacitor can be addressed quickly with basic tools. Keep spare parts on hand to minimize downtime during emergencies.
If your pump is old, replacement now saves headaches later. A 30-year-old pump is far past its lifespan, and repair costs add up quickly. Invest in annual maintenance to extend pump life and catch problems early.
Stay safe, stay dry, and keep the water flowing.