Knowing how to use a water pump can save you from costly damage when flooding strikes, help you maintain water pressure in an RV, or enable efficient drainage around your property. Whether you are dealing with a flooded basement, need to transfer water from a tank to a pressure washer, or are setting up a private well system, understanding the correct operation procedures ensures safety and optimal performance. This guide covers every major pump type, from small 12V transfer pumps to gas-powered dewatering units, with step-by-step instructions for setup, operation, and maintenance.
Choose the Right Pump for Your Specific Task
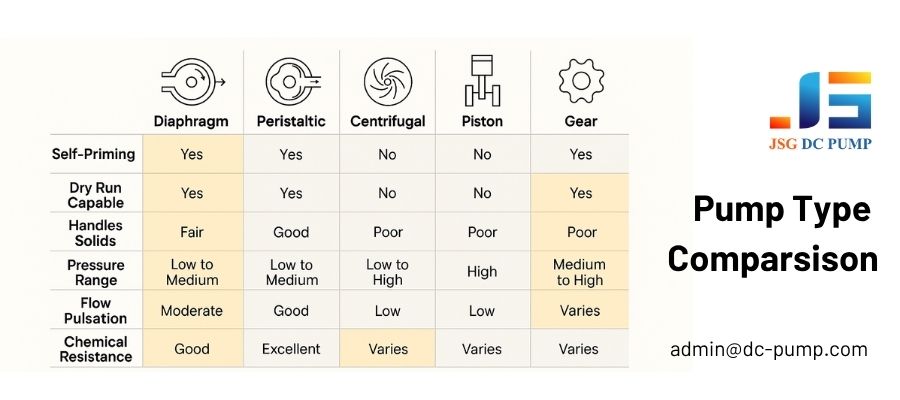
Selecting the correct pump type is the foundation of successful water moving. Using the wrong pump can lead to equipment damage, inefficiency, or complete failure to move water.
Match Pump Type to Water Quality
Your water source determines which pump will perform best. Clean water applications like pool drainage or tank transfer call for centrifugal or submersible pumps designed for clear fluids. Dirty water containing debris, sludge, or solids requires a diaphragm pump (often called a “mud hog”) or a semi-trash pump built to handle solids without clogging. Sewage or slurry applications demand a solids-handling pump equipped with a macerating impeller that can process thicker materials without damage.
Calculate Flow Rate and Head Pressure Requirements
Understanding your flow needs and elevation challenges prevents undersizing or oversizing your equipment. Flow rate is measured in gallons per minute (GPM) or liters per minute (LPM), with small puddles typically requiring 1-3 GPM while flooded basements may need 10 GPM or more. Total dynamic head combines vertical lift plus friction loss from hoses, and every 10 feet of vertical rise reduces flow by 20-40 percent. Using larger diameter hoses (minimum 1.5 inches) significantly reduces friction and maintains flow efficiency.
Select Appropriate Power Source
Your available power source dictates which pump options are practical. Standard electric pumps (110V/240V) work best for permanent installations like sump pumps or well systems. Twelve-volt DC pumps are ideal for RVs, boats, or solar-powered setups where grid electricity is unavailable. Gasoline or diesel-powered pumps are necessary for remote locations or high-volume dewatering jobs where no electrical power exists.
Set Up the Pump in the Correct Position
Proper placement directly affects suction performance and prevents equipment damage during operation.
Position Submersible Pumps Correctly
Submersible pumps must be lowered into the deepest part of the water source to ensure consistent intake. If the bottom is muddy or uneven, place the pump on a brick or platform to keep the intake opening above sediment that could cause clogging. Always use a rope or lifting strap to lower and raise the pump never pull on the power cord, which can damage internal connections and create electrical hazards.
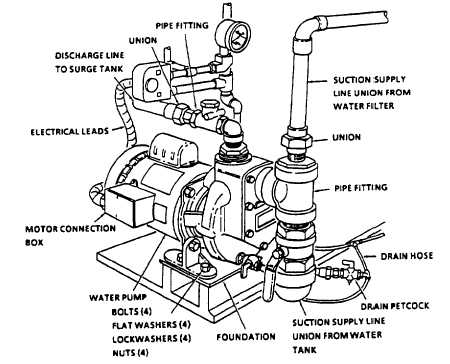
Place Surface Pumps on Stable Ground
Surface pumps require a level, dry, stable surface positioned as close to the water source as possible. Keep these units away from splashing water unless specifically rated for wet environments. Protect the pump from rain, debris, and direct sunlight to extend motor life and prevent electrical issues.
Connect Hoses and Intake Components Properly
A secure, leak-free system is critical for maintaining prime and achieving efficient water transfer.
Use Non-Collapsible Suction Hoses
The suction hose must be rigid enough to resist collapsing under vacuum pressure. Test any hose by squeezing it firmly if it collapses or kinks easily, it will suck air instead of water, breaking the prime and reducing performance. Always attach a strainer basket to the intake end to block debris like sticks, leaves, and sediment from entering and damaging the impeller or internal components.
Seal All Threaded Connections
Apply Teflon tape to all male threaded connections before joining hoses and fittings. Wrap the tape clockwise (2-3 layers) following the thread direction to prevent unraveling during assembly. Properly sealed threads prevent air leaks that destroy prime and maintain the vacuum needed for effective suction.
Choose Proper Discharge Hose Diameter
Select discharge hoses with a minimum 1.5-inch diameter for efficient flow. Larger diameters reduce friction losses and increase total output capacity, especially important when pumping over long distances or significant vertical lift. Avoid kinks, sharp bends, or crushing points in the discharge line that restrict flow.
Prime the Pump Before Starting
Priming introduces water into the pump chamber to create the necessary vacuum for suction. This step is essential for centrifugal and surface pumps but unnecessary for self-priming diaphragm and peristaltic models.
Fill the Priming Chamber Manually
Remove the top cover or priming plug from the pump. Pour 4-5 liters (approximately one gallon) of clean water directly into the priming port and allow it to fill the suction line. Replace the gasket and cover tightly any air leak will break the prime immediately. Close the discharge valve slightly during startup to help build pressure, then open gradually once steady water flow is established.
Verify Successful Priming
After starting the pump, watch for consistent water flow from the discharge outlet. Gurgling sounds, sputtering, or air bubbles in the discharge hose indicate air locks that require re-priming and inspection of all connections for leaks.
Start Electric and 12V Pumps Safely
Following proper electrical procedures prevents shock hazards and protects both equipment and users.
Use GFCI Protection for Electric Pumps
Always plug electric pumps into a Ground Fault Circuit Interrupter (GFCI)-protected outlet when operating in damp environments. GFCI outlets shut off power instantly if a ground fault is detected, preventing potentially lethal shocks. Avoid extension cords when possible; if necessary, use heavy-duty outdoor-rated cords with at least 14 AWG wire gauge to prevent voltage drop and overheating.
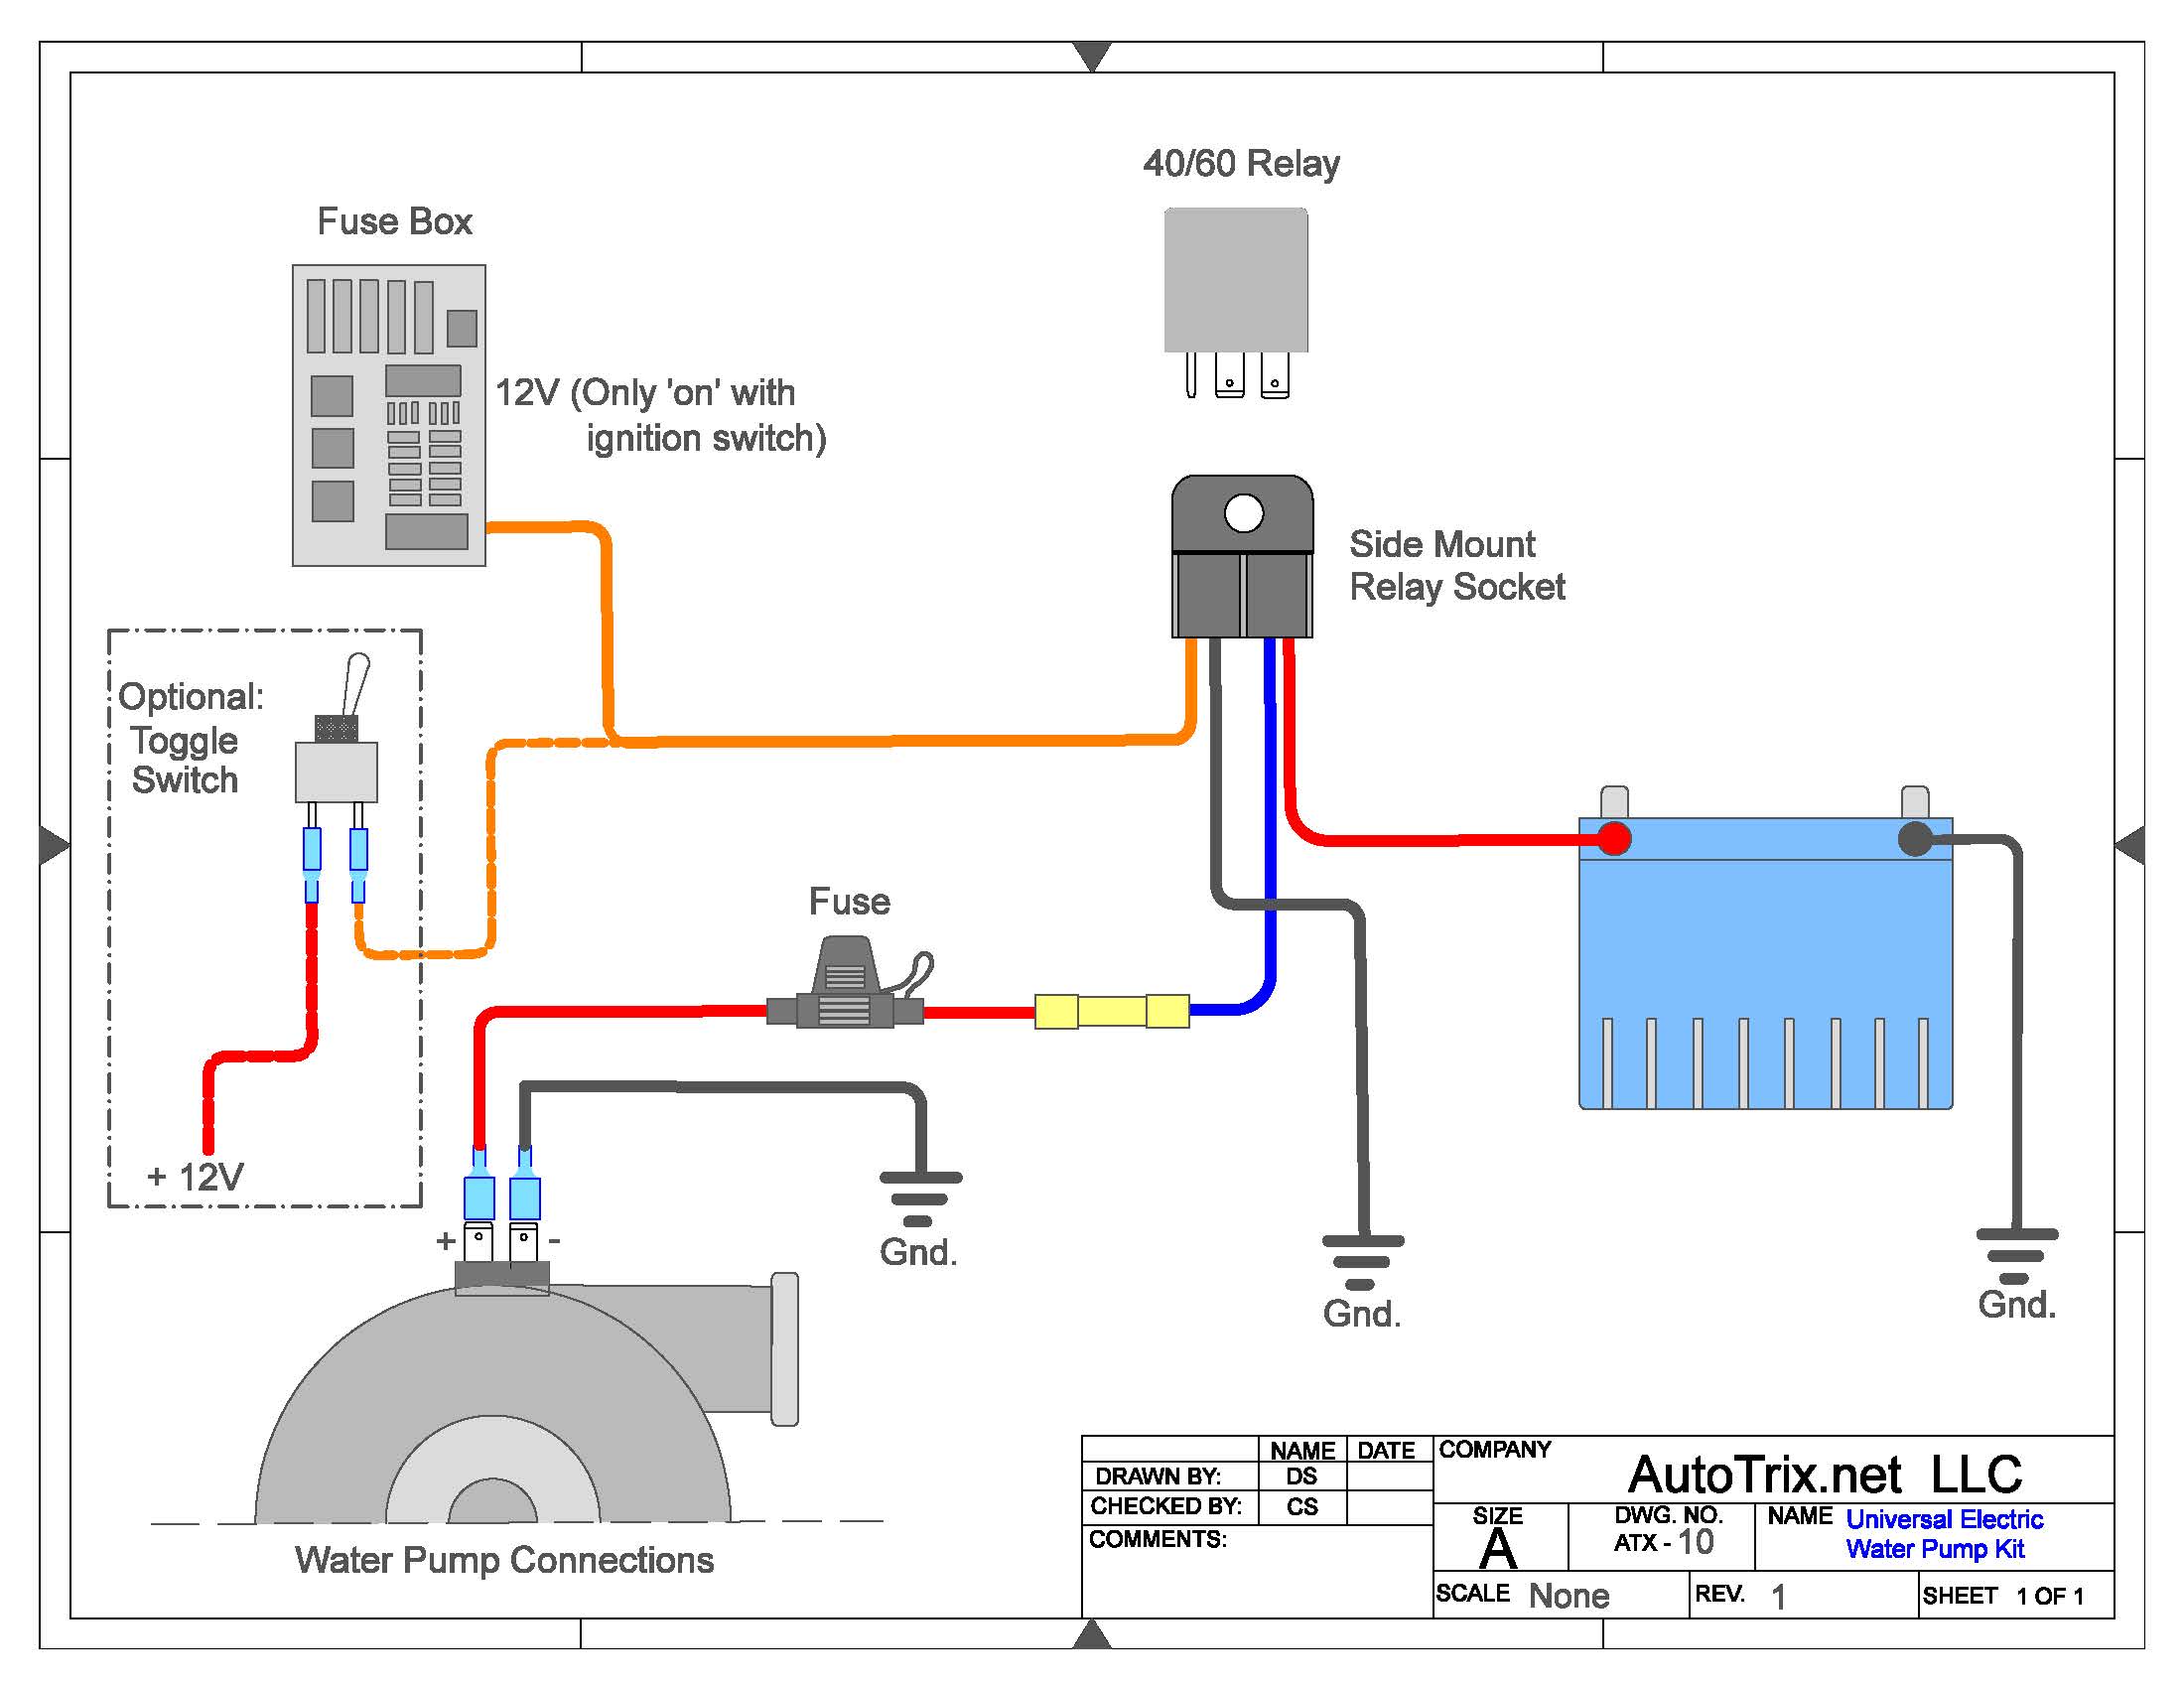
Wire 12V Systems Correctly
For 12V DC pumps common in RVs and marine applications, install a 5-10 amp fuse on the positive wire near the battery to protect against short circuits and overloads. Use a relay if your manual switch cannot handle the pump’s inrush current, which prevents switch failure over time. Connect the positive terminal first when wiring, then attach the negative terminal. Reverse this order when disconnecting to prevent electrical shorts.
Operate Gas-Powered Pumps Correctly
Gas pumps require specific startup procedures and careful fuel handling for safe, reliable operation.
Set Controls Before Starting the Engine
Turn the fuel valve to the “On” position. Set the choke to “Off” for cold engine starts, then move it to “On” after the engine fires and runs smoothly. Set the throttle to approximately one-third open for starting. Pull the starter cord firmly to ignite the engine, then allow it to warm up at low speed for 2-3 minutes before adjusting to full operation.
Monitor for Proper Priming
Watch for bubbles appearing in the discharge hose, which confirms water is being moved and the system is properly primed. If no water flows after startup, re-prime the pump and check all connections for air leaks. Adjust the throttle gently if the engine runs roughly during warm-up.
Handle Fuel Safely
Never refuel a hot engine wait at least 15 minutes after shutdown to prevent fuel vapor ignition. Operate gas pumps only in well-ventilated areas to avoid carbon monoxide buildup, which is invisible and deadly. Keep the exhaust pipe clear of people, pets, and flammable materials as it reaches extremely high temperatures during operation.
Monitor Performance During Operation
Staying attentive during pump operation lets you catch problems early before they cause damage or equipment failure.
Watch for Warning Signs
Reduced flow typically indicates a clogged intake strainer or kinked hose. Gurgling or sputtering sounds suggest air leaks or a low water level at the intake. Engine strain or stalling may signal fuel problems, carburetor issues, or insufficient ventilation. Stop the pump immediately if you notice any of these symptoms and investigate the cause before continuing.
Prevent Discharge Overflow
Monitor the discharge area and redirect the hose if flooding begins at the destination point. Use a splash block or direct water into a dry well to prevent soil erosion at the discharge location. Never leave a running pump unattended, especially during extended dewatering jobs where water levels change rapidly or blockages can develop.
Stop and Store the Pump Properly
Proper post-use care extends equipment life and ensures reliable performance for future jobs.
Drain All Water Immediately
Open the bottom drain plug and empty the pump completely after every use. Residual water left inside can freeze in cold temperatures and crack the pump housing, causing irreversible damage. This step is critical for all pump types and especially important before winter storage or in freezing climates.
Flush After Dirty Water Use
Run clean water through the system if you used the pump with dirty, silty, or debris-laden water. This clears the impeller, internal passages, and discharge hose of sediment that could cause corrosion or clogging during future use. Wipe the exterior clean of mud, salt, or grime before storing.
Store in Appropriate Conditions
Keep pumps in a dry, frost-free area away from moisture and temperature extremes. For gas models, either drain the fuel tank completely or add fuel stabilizer to prevent varnish buildup in the carburetor. Run the engine briefly to burn off any remaining fuel before long-term storage. Cover the pump or place it in a protective case to prevent dust accumulation and physical damage.
Troubleshoot Common Problems Quickly
Understanding common issues helps you diagnose and fix problems without unnecessary service calls.
Pump Fails to Start
For electric pumps, check the GFCI outlet, circuit breaker, and fuse. Test battery voltage and connections for 12V systems. On gas pumps, inspect the fuel level, spark plug condition, and carburetor for clogs or contamination.
No Water Output
Re-prime centrifugal pumps, as broken prime is the most common cause. Clean the intake strainer and inspect all hoses for blockages. Verify the water source has not run dry or been depleted.
Low Flow Rate
Upgrade to a larger diameter hose to reduce friction losses. Reduce vertical lift or horizontal distance between source and discharge. Clean internal components like the impeller or check valves that may be worn or clogged.
Engine Overheating
Stop immediately and allow the engine to cool. Check for blocked ventilation around the motor and ensure the pump is not running dry due to insufficient water at the intake.
Apply Advanced Tips for Real-World Applications
These specialized techniques improve performance for common scenarios.
Feed a Pressure Washer from a Bucket
Connect the pump inlet to a water container (bucket, tank, or pool) and attach the outlet directly to the pressure washer’s inlet hose. Many 12V transfer pumps deliver sufficient flow (up to 264 GPH at 5 feet of head) to operate residential pressure washers effectively.
Remove Final Puddle Layers Completely
Use a flat suction tip or floor-level adapter to reach the last 3 millimeters of water in van interiors, showers, or basement corners. Puddle sucker pumps excel at this task, leaving surfaces nearly dry.
Prevent Dry Running in Tanks
Install an automated float switch that turns the pump off when water levels drop below safe thresholds. This prevents motor burnout and extends pump life in sump pits, holding tanks, and RV freshwater systems.
Filter Intake Water in RVs and Boats
Attach a sponge filter or mesh screen to the suction line when pumping non-potable or debris-laden water. This protects diaphragm pumps from sand, silt, and small solids that cause premature wear.
Split Output for Hot and Cold Faucets
Use a Y-fitting to connect a single pump outlet to both hot and cold water lines in RV or van conversions. Install shut-off valves to control flow independently to each faucet.
Follow Critical Safety Rules at All Times
Protecting yourself and others should never be compromised.
Wear Appropriate PPE
Always wear waterproof boots, sturdy gloves, safety goggles, and high-visibility clothing, especially in work zones or near traffic areas. Additional respiratory protection may be needed when pumping contaminated water or operating in dusty environments.
Avoid Electrical Hazards
Never operate electric pumps in standing water unless specifically rated for submersion. Use RCD/GFCI protection on all electrical connections. Keep power cords away from sharp objects, heat sources, and water.
Handle Fuel and Exhaust with Care
Operate gas pumps in well-ventilated areas only exhaust contains deadly carbon monoxide. Store fuel in approved containers away from heat sources and open flames. Allow engines to cool before refueling.
Keep Non-Operators Away
Maintain a safe distance between running equipment and children, pets, and bystanders. Moving parts and hot surfaces pose burn and injury risks. Always turn off and unplug equipment before performing any maintenance or adjustment.
Know When to Upgrade to More Powerful Equipment
Recognizing the signs of insufficient pump capacity helps you avoid equipment strain and job delays.
Signs You Need a Bigger Pump
Your current pump may be undersized if dewatering takes excessively long, the unit struggles with elevation or distance requirements, or it overheats during moderate use. Frequent trips to empty the pump or inability to keep up with incoming water also indicate capacity limitations.
Recommended Upgrades for Demanding Jobs
For large basement flooding, consider a 4-inch submersible pump with higher GPM rating. Construction site dewatering typically requires a 5-7 HP gas-powered unit, with Honda GX200-based models offering proven reliability. Rent industrial-grade pumps from equipment suppliers for one-time heavy-duty jobs to avoid the cost of permanent ownership.
Key Takeaways for Using Water Pumps Effectively
Successfully operating a water pump requires matching the right pump type to your specific task, setting it up correctly with proper hoses and seals, and following correct startup and priming procedures. Always use GFCI protection for electric pumps, install fuses and relays in 12V systems, and never leave equipment unattended during operation. After use, drain all water, flush internal components, and store in dry conditions to extend equipment life. By following these procedures, you can confidently handle any water-moving task from simple transfer jobs to demanding dewatering projects while maintaining safety and equipment reliability.