A failing water pump can lead to engine overheating, costly repairs, and even catastrophic engine failure. As the heart of your car’s cooling system, the water pump circulates coolant through the engine block, radiator, and hoses to maintain safe operating temperatures. When it fails, heat builds up fast, sometimes within minutes. Knowing how to fix a water pump in a car is essential for any DIY mechanic looking to save hundreds of dollars in repair bills. This guide walks you through every step, from spotting early warning signs to installing a new pump and bleeding the system like a pro.
Recognize Water Pump Failure Signs
Catching water pump problems early saves engines. Most failures start small but escalate quickly. Watch for these telltale symptoms before heat damage occurs.
Spot Coolant Leaks at the Weep Hole
Look for wetness or puddles under the front center of the engine. A steady drip near the timing cover or a crusty residue around the pump housing often means the internal seal has failed. The weep hole, a small vent on the pump body, is designed to leak coolant externally when the seal breaks, acting as an early warning. While minor seepage after startup may evaporate, persistent dripping means replacement is due.
Monitor for Engine Overheating
If your temperature gauge climbs into the red zone, especially during idling or low-speed driving, poor coolant flow could be the cause. Overheating is not always instant; it may begin intermittently under load. In interference engines, just a few minutes of overheating can bend valves or crack the cylinder head. Do not ignore even brief spikes in temperature.
Listen for Bearing Whine or Grinding
Noise from the front of the engine, especially a high-pitched whine or grinding sound that increases with RPM, usually points to worn bearings inside the pump. Use a mechanic’s stethoscope or a long screwdriver against the pump housing to isolate the noise. If the sound persists after replacing belts, the pump itself is likely failing.
Check for Pulley Wobble or Shaft Play
With the drive belt removed, grab the water pump pulley and wiggle it side-to-side or up and down. Any noticeable movement indicates bearing wear or shaft damage. Even slight play means the pump must be replaced, as continued use risks impeller contact with the housing and sudden failure.
Diagnose the Problem Accurately

Misdiagnosing a water pump issue wastes time and money. Confirm the source before removing parts.
Perform Visual Leak Inspection
Park on a clean surface overnight and check for fresh coolant stains. Place cardboard beneath the engine to catch slow drips. Shine a flashlight around the pump, hoses, and radiator. Green, orange, pink, or yellow fluid points to a leak. Focus on the weep hole and mounting surface.
Pressure Test the Cooling System
Use a cooling system pressure tester to pressurize the radiator without running the engine. Pump to the cap’s rated pressure, usually 13 to 18 psi. A drop in pressure indicates a leak. Watch the weep hole; if it starts dripping under pressure, the pump seal is compromised.
Rule Out Other Cooling Issues
Overheating can stem from a stuck thermostat, clogged radiator, failed electric fan, or collapsed hose. Test the thermostat in boiling water, inspect airflow through the radiator, and verify fan operation. Only conclude the water pump is faulty if multiple signs align.
Can You Repair a Water Pump
Water pumps are sealed units, and attempting to repair one risks imbalance, leaks, and rapid failure. Here is what you need to know about fixing versus replacing.
Why Replacement Is Required
Internal components like the impeller, shaft, and mechanical seal are integrated into the housing. There are no serviceable parts. Manufacturers do not sell rebuild kits, and disassembling the unit destroys its integrity. Even if the leak seems minor, internal corrosion or bearing wear makes full replacement the only reliable fix.
When Sealants Might Help Temporarily
Products such as K-Seal can temporarily seal micro-cracks in metal housings by circulating ceramic and metallic particles through the cooling system. However, they only work on small leaks in hard components, not on failed mechanical seals, bearing noise, or physical damage. This is not a permanent solution and should only be used to limp the vehicle to a repair shop.
Emergency Fixes for Broken Water Pumps
If the pump fails while driving, act fast to avoid engine damage.
Immediate Actions to Prevent Damage
- Pull over safely and turn off the engine.
- Wait for the engine to cool completely before opening the radiator cap.
- Inspect for coolant loss and visible leaks.
- Do not continue driving, even short distances can warp cylinder heads.
Using an External Electric Water Pump
A remote-mounted electric water pump can maintain coolant flow in emergencies. These are commonly used in LS swaps and performance builds. Install using AN lines or rubber hoses to bypass the failed mechanical pump. Wire it to a fused 12V circuit, ideally controlled by a thermostat switch or manual override.
Tools and Parts Needed for Replacement
Gather everything before starting to avoid mid-job delays.
Essential Tools List
- Socket set, typically 8mm for pulley and mounting bolts
- Torque wrench critical for proper bolt tension, typically 8 to 12 ft-lb
- Gasket scraper, preferably plastic, protects aluminum surfaces
- Scouring pad removes old sealant without gouging
- Drain pan holds up to 1 gallon of coolant
- No-spill funnel aids in refill and bleeding
- Wrenches for belt tensioner and pulley removal
- Flathead screwdriver helps pry stubborn pumps loose
Required Replacement Parts
- New water pump, OEM or high-quality aftermarket, $40 to $150
- New gasket or RTV silicone, use only if no gasket is included
- Threadlocker prevents bolt loosening
- Correct coolant type, never mix OAT, HOAT, or IAT formulas
- New mounting bolts, old bolts can fracture due to thermal cycling
Safety First: Pre-Work Precautions
Skip safety steps, and you risk injury or engine damage.
Work on a Cold Engine Only
Never open the cooling system when hot. Pressure can blast scalding coolant out, causing serious burns. Wait at least 2 to 3 hours after shutdown, or overnight if possible.
Disconnect the Battery
Remove the negative terminal first, then positive, to prevent electrical shorts during disassembly. This is especially important near belts and pulleys.
Wear Protective Gear
Put on gloves and safety glasses. Coolant is toxic and can irritate skin or eyes. Also, use a fume-free workspace when draining fluids.
Never Rotate a Dry Pump
Turning the shaft of a new water pump before installing it destroys the mechanical seal. Always pre-lubricate in coolant first.
Remove the Old Water Pump
Access varies by vehicle, but the process follows a standard sequence.
Drain the Coolant
Place a drain pan under the radiator or engine block plug. Open the valve or remove the plug to let coolant flow out. Close securely after draining.
Remove the Drive Belt
If the pump is belt-driven, locate the tensioner pulley. Use a wrench to release tension. Slide the serpentine or timing belt off the pump pulley.
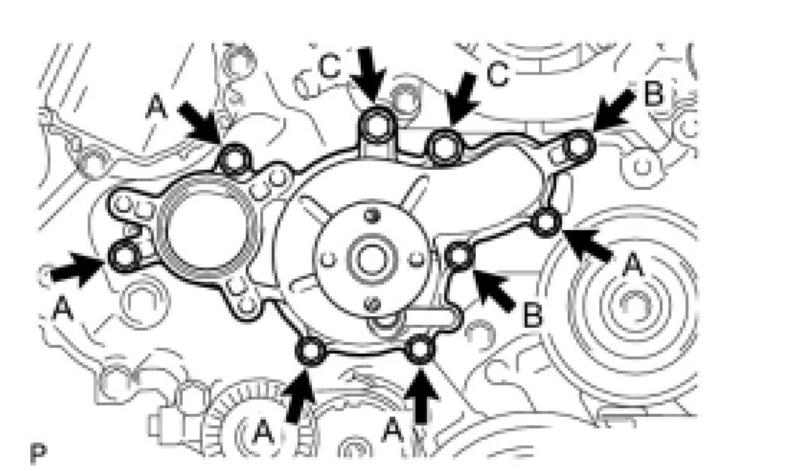
Unbolt the Pulley and Housing
Remove the three 8mm pulley bolts if applicable. Unscrew all mounting bolts, typically eight but varies by model. Gently pry the pump from the block using a plastic scraper, avoiding metal tools that scratch aluminum.
Install the New Water Pump
Precision installation ensures long life and leak-free operation.
Clean the Mounting Surface
Use a plastic scraper and scouring pad to remove all old gasket material, RTV, and corrosion from both the engine block and new pump. Wipe clean with a dry cloth. Even tiny debris can cause leaks.
Pre-Lubricate the Mechanical Seal
This step is non-negotiable. Before mounting, submerge the new pump in clean coolant. Rotate the pulley shaft by hand 10 times. This forms a coolant film between the seal faces, just like oil protects piston rings. Skipping this causes dry-start failure, a leading reason for new pump leaks.
Position and Secure the Pump
Align the new pump with the mounting holes. Start with the longest bolts to hold alignment. Apply medium-strength threadlocker to all bolt threads. Tighten in a star pattern to ensure even pressure. Torque to 8 ft-lb or as specified by manufacturer.
Reinstall Pulley and Belt
Reattach the pulley and tighten bolts securely. Route the drive belt correctly and release the tensioner. Verify proper belt alignment and tension.
Refill and Bleed the Cooling System
Air pockets cause false overheating and inaccurate gauge readings.
Refill Using No-Spill Funnel
Use a no-spill funnel inserted into the reservoir or radiator neck. Add the correct coolant type in a 50/50 mix with distilled water. Avoid tap water, as it contains minerals that promote corrosion.
Bleed Air from the System
With the funnel attached, start the engine. Raise RPM to approximately 2,000 for 20 minutes. Watch for bubbles rising into the funnel. Continue until flow is bubble-free. Some vehicles have bleed screws; open them slightly until coolant flows steadily, then close.
Final Leak and Temperature Check
Run the engine and inspect all connections. Look for leaks at the pump, hoses, and radiator. Monitor the temperature gauge; it should stabilize in the normal range.
Post-Replacement Checks
Finish strong to ensure long-term reliability.
Reconnect the Battery
Attach the positive terminal first, then negative. Clean terminals if corroded and tighten securely.
Dispose of Old Coolant Properly
Pour used coolant into a labeled waste coolant container. Most auto parts stores accept it for free recycling. Never dump it down drains or on the ground.
Test Drive and Monitor
Drive under various conditions: idle in park, city traffic, and highway speeds. Watch for overheating, new noises, warning lights, and coolant loss. Recheck coolant level after the first heat cycle and top off if needed.
Cost and Time Savings of DIY
Doing it yourself slashes repair bills dramatically.
Replacement Cost Comparison
| Option | Cost Range | Notes |
|---|---|---|
| DIY | $40 to $100 | Pump and coolant only |
| Independent Mechanic | $160 to $500 | Labor-intensive on timing-belt-driven models |
| Dealer Service | Approximately $843 | High markup on OEM parts and labor |
| With Timing Belt | $500 to $1,000+ | Recommended combo on interference engines |
Extend Water Pump Life with Maintenance
Prevent future failures with simple upkeep.
Follow Coolant Change Intervals
Replace coolant every 30,000 to 100,000 miles, depending on type. Old coolant becomes acidic and eats seals.
Flush System During Replacement
Never install a new pump without flushing the system. Debris and gel can clog the impeller and cause early failure.
Replace Thermostat and Hoses
Since the thermostat is often located nearby, replace it at the same time. Also, inspect hoses for cracks or soft spots.
Use OEM-Spec Coolant Only
Mixing coolant types creates sludge. Always refer to your owner’s manual for the correct formula.
Frequently Asked Questions About Fixing a Water Pump in a Car
How do I know if my water pump is failing
Look for coolant leaks near the pump, engine overheating, unusual noises like grinding or whining, and visible wobble in the pulley. The weep hole leaking is one of the most reliable early warning signs.
Can I drive my car with a bad water pump
No. Driving with a failing water pump risks severe engine damage from overheating. If you must move the vehicle, do so only short distances and monitor the temperature gauge closely.
How long does it take to replace a water pump yourself
On accessible vehicles,Plan for 2 to 4 hours including preparation and bleeding. Timing belt-driven engines may take 4 to 6 hours due to increased complexity.
What happens if I skip pre-lubricating the new water pump
Without pre-lubrication, the mechanical seal runs dry during first startup, causing immediate leakage and premature failure. This is one of the most common DIY mistakes.
Should I replace the timing belt when replacing the water pump
If the water pump is driven by the timing belt, replacing both simultaneously is highly recommended. The labor overlap makes it cost-effective and prevents future breakdowns.
Why is my car still overheating after water pump replacement
Air pockets in the cooling system are the most common cause. Run the engine at 2,000 RPM for 20 minutes with the funnel attached to bleed all air. Also verify the thermostat is functioning properly.
Key Takeaways for Fixing Your Car’s Water Pump
Fixing a water pump in a car is not just about swapping parts, it requires precision, cleanliness, and following proven steps. By diagnosing early using symptoms like weep hole leaks, unusual noises, and temperature spikes, you prevent catastrophic engine damage. The critical steps include pre-lubricating the new pump in coolant, torquing bolts in a star pattern, and thoroughly bleeding air from the system after installation. Using the correct tools, new bolts with threadlocker, and OEM-spec coolant ensures long-term reliability. Whether you are saving money or mastering auto repair, this job delivers big rewards for the informed DIYer. Always monitor temperature closely after replacement and dispose of old coolant responsibly at recycling centers.