Replacing an aging unit requires precision to avoid dangerous leaks or electrical hazards. Learning how to install a water heater tank ensures your home receives reliable hot water while meeting strict safety codes.
This guide details every step from shutting off utilities to final testing for both gas and electric models. You will discover essential tools, proper venting techniques, and critical checks to prevent system failure.
Evaluate Your Current System and Space Requirements
Assessing your existing setup prevents compatibility issues before you begin work. Matching the new unit to your home’s infrastructure is the first step in a successful installation.
Confirm Tank Size and Fuel Source
Check the data label on your current heater for gallon capacity and energy ratings. Households with high demand typically require 50 gallons or more to maintain consistent supply. Ensure the new model uses the same fuel type as your current infrastructure. Switching from electric to gas requires new gas lines and venting that only licensed professionals should handle.
Verify Electrical and Venting Capacity
Electric units need a circuit panel supporting 30 to 50 amps at 240 volts to function safely. Gas models require inspection of the flue pipe to ensure it matches the new heater’s venting category. Upgrading an outdated electrical panel or venting system may be necessary to prevent overloads or carbon monoxide risks.
Measure Installation Clearance Areas
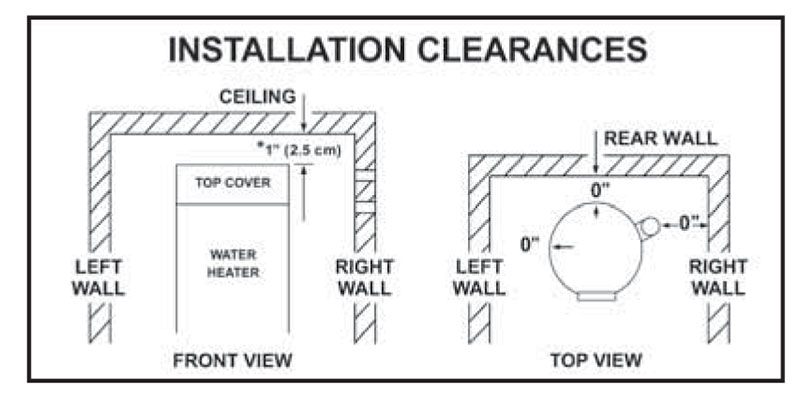
Precise measurements of height, width, and surrounding space are vital for code compliance. Most regulations mandate specific clearances including:
* 12 inches in front for service access
* 6 inches on sides and back
* 18 inches above for combustion air on gas models
Ensure your floor is level and strong enough to support over 500 pounds when the tank is full.
Gather Essential Tools and Safety Materials
Having the correct equipment ready prevents delays and ensures secure connections throughout the process.
Required Tools for Installation
You need specific instruments to cut, seal, and test your plumbing connections effectively.
* Two pipe wrenches
* Tubing cutter or PEX cutter
* De-burring tool
* Voltage tester
* Garden hose
* Adjustable pliers
* Flashlight
Necessary Supplies and Components
Purchase high-quality materials to guarantee a leak-free and code-compliant setup.
* Flexible water supply hoses with dielectric fittings
* Thermal expansion tank for closed systems
* CPVC drain pan piping
* Gas-rated Teflon tape (yellow)
* Standard Teflon tape and pipe dope
* New ¾-inch discharge pipe for T&P valve
* Seismic straps for earthquake zones
Pro Tip: Buying a complete installation kit often includes heat traps and model-specific hardware that saves time.
Shut Off Utilities and Drain the Old Tank
Safety begins by disconnecting all power sources before touching any part of the water heater.
Cut Power and Gas Supply
Electric: Switch off the 240-volt breaker at your main panel immediately. Remove the access panel and use a voltage tester to confirm no current remains before touching wires.
Gas: Turn the gas control knob to “Off” then close the main gas supply valve. Use two wrenches to disconnect the union to prevent twisting the pipe.
Close Water Inlet and Relieve Pressure
Shut off the cold water inlet valve located above the tank. Open a hot water faucet at a kitchen sink to allow air into the system. This airflow speeds up the draining process significantly.
Empty the Tank Completely
Attach a garden hose to the drain valve at the bottom of the unit. Route the other end outside or to a floor drain. Open the drain valve using a flathead screwdriver and let the water flow until empty. Residual drips may continue for several minutes so place a towel underneath.
Disconnect Plumbing and Remove Old Unit
Once drained, you can safely disconnect all lines and extract the heavy tank from its location.
Detach Water and Relief Lines
Shut off hot and cold shutoff valves if present. Disconnect supply lines using pipe wrenches carefully. Cut corroded lines if necessary but leave enough pipe length for reconnection. Remove the discharge pipe from the temperature and pressure relief valve.
Remove Venting on Gas Models
Wait for the exhaust pipe to cool completely before touching it. Unscrew or unclamp the flue pipe from the draft hood gently. Never force connections as damaged venting causes deadly backdrafting later.
Extract Tank Using Proper Technique
Place a metal drain pan under the unit to catch final drips. Use an appliance dolly to lift and roll the tank out carefully. Water heaters are top-heavy so keep the center of gravity low during movement. Dispose of the old unit at a recycling center that accepts scrap metal.
Position New Tank and Install Safety Devices
Proper placement and bracing ensure stability and protect your home from water damage.
Set Tank on Approved Drain Pan
Place a new metal drain pan under the unit extending at least 2 inches beyond the base. The pan depth must not exceed 1.75 inches to fit under standard units. Connect the pan drain port to rigid CPVC pipe routed to a floor drain.
Level the Unit and Install Bracing
Use a bubble level on top of the tank to check alignment. Shim the base with plastic wedges if the floor is uneven to prevent stress on connections. In seismic zones, bolt 20-gauge metal straps to wall studs 4 to 6 inches from the top.
Install Temperature and Pressure Relief Valve
Screw the T&P relief valve into the designated port on the new tank. Apply 2 to 3 wraps of Teflon tape and a dab of pipe dope to the threads. Hand-tighten only because overtightening damages the valve mechanism.
Route Discharge Pipe Correctly
Attach a ¾-inch copper or CPVC pipe to the T&P valve outlet. Run the pipe downward with a continuous slope terminating 1 to 6 inches above a floor drain. Do not install valves or reducers on this critical safety line.
Connect Water Lines and Expansion Components
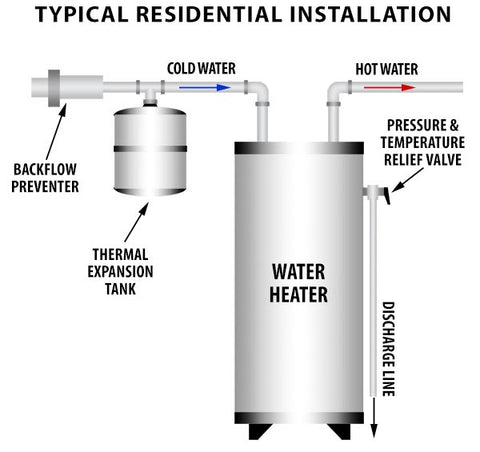
Plumbing connections must be tight and use correct fittings to prevent corrosion and leaks.
Join Hot and Cold Water Lines
Use flexible dielectric connectors when joining copper to steel pipes to prevent galvanic corrosion. For PEX systems, cut the pipe cleanly and de-burr the end by spinning the tool 10 times. Push fittings on until they click to ensure a secure seal. Connect cold water to the inlet marked “COLD” and hot to “HOT.”
Add Thermal Expansion Tank
Install a thermal expansion tank on the cold water line if your home has a closed plumbing system. Use a T-fitting before the shutoff valve for easy installation. Pre-charge the tank to match your home water pressure using a hand pump before threading it on.
Install Optional Leak Detection Valves
Automatic shut-off valves screw onto supply lines to stop water flow if a leak occurs. Apply Teflon tape to threads and tighten with pliers after hand-tightening. These devices provide excellent protection for upstairs installations or basements.
Wire Electric Models and Connect Gas Lines
Fuel-specific connections require strict adherence to safety protocols to prevent fire or explosion.
Wire Electric Heating Elements
Remove old conduit and replace it with new matching gauge wiring. Connect black and red wires to their respective terminals and secure the ground wire to the green screw. Form a candy cane loop with the ground wire to ensure the screw passes through the bend effectively. Replace the access panel but do not power on yet.
Connect Flexible Gas Line
Use a new stainless steel flexible connector from the gas supply to the control valve. Wrap threads with yellow gas-rated Teflon tape and tighten flare nuts with two wrenches. Turn on gas slowly and apply soapy water to all joints looking for bubbles.
Reattach and Seal Venting System
Secure the flue pipe to the draft hood with sheet metal screws. Seal joints with high-temperature foil tape to prevent exhaust leaks. Ensure the vent slopes upward at least ¼ inch per foot to promote proper draft.
Verify Draft Before Ignition
Close windows and turn on exhaust fans to test airflow. Hold a lit match near the draft hood while the thermostat is set to high. Smoke should be sucked into the vent rather than blowing back into the room.
Fill System and Test for Leaks
The final phase ensures the tank is full of water before applying heat to prevent element damage.
Purge Air and Fill Tank Slowly
Remove the aerator from the nearest hot water faucet. Open the cold water supply valve gradually to fill the tank. Let water run from the open faucet for 3 minutes to purge all air from the lines. Listen for gurgling sounds which indicate air escaping the system.
Inspect All Connections for Leaks
Check supply lines, T&P valve, expansion tank, and gas fittings carefully. Tighten any drips slightly but avoid over-tightening which strips threads. Ensure the drain pan is dry before proceeding to the next step.
Ignite Pilot or Restore Power
Gas: Turn control knob to “Pilot” and hold while igniting. Hold for 30 to 60 seconds after flame lights then turn to “On.”
Electric: Flip the circuit breaker on only after confirming the tank is full. Running power on an empty tank destroys heating elements instantly. Set thermostat to 120°F for safety and efficiency.
Perform Final Safety Checks and Maintenance

Completing these verification steps ensures long-term reliability and safe operation of your new system.
Confirm Carbon Monoxide Safety
Install a CO detector within 10 feet of the water heater location. Test the detector monthly to ensure it functions properly. Never block airflow around the unit to prevent dangerous gas buildup.
Recheck T&P Valve After Heating
After the tank reaches operating temperature, inspect the discharge pipe again. Dripping indicates water pressure is too high above 80 PSI. Install a pressure-reducing valve at the main supply if this occurs.
Flush Sediment Annually
Extend the lifespan of your unit by flushing the tank once a year. Shut off power and water, attach a hose, and drain until water runs clear. This removes sediment buildup that reduces efficiency over time.
Validate Warranty Requirements
Keep your installation manual and receipts for future reference. Manufacturers often require code-compliant installation for warranty validity. Professional proof of installation may be required for gas models to maintain coverage.
Frequently Asked Questions About Water Heater Installation
Can I switch from electric to gas water heater myself?
No, switching fuel sources requires installing new gas lines and venting systems. This work involves significant safety risks and usually requires a licensed professional by law.
How long does it take to install a water heater tank?
A straightforward replacement typically takes 3 to 4 hours for a skilled DIYer. Complex installations involving code upgrades or fuel switching may take a full day.
Why is my T&P valve dripping after installation?
Dripping often indicates water pressure exceeding 80 PSI. You likely need to install or adjust a pressure-reducing valve on your main water supply line.
Do I need a thermal expansion tank for my water heater?
Yes, closed plumbing systems with check valves require an expansion tank. This device absorbs pressure spikes caused by heated water to prevent system damage.
What temperature should I set my new water heater?
Set the thermostat to 120°F (49°C) for optimal safety and energy efficiency. This temperature prevents scalding while inhibiting bacterial growth inside the tank.
Key Takeaways for Installing Your Water Heater Tank

Successful installation depends on careful planning, proper tool use, and strict adherence to safety codes. Always verify your system requirements, secure all connections tightly, and test for leaks before powering up the unit.
Remember that gas installations carry higher risks and often require professional licensing. Follow these steps diligently to ensure your new water heater provides safe and reliable hot water for years to come.