Lukewarm showers and rising energy bills often signal that your water heater tank needs immediate attention. Neglecting simple maintenance can lead to costly leaks or premature failure within a decade.
This guide explains exactly how to maintain water heater tank systems through flushing, part inspections, and safety checks. You will learn actionable steps to extend your unit’s life by up to ten years while ensuring safe operation.
Set the Optimal Temperature for Safety and Efficiency
Adjusting your thermostat is the fastest way to balance comfort with energy savings. Manufacturers recommend setting your water heater to 120°F (49°C) as the standard operating temperature.
Why 120°F Is the Sweet Spot
This specific temperature prevents scalding accidents while inhibiting most bacterial growth. It also reduces mineral buildup inside the tank compared to higher settings. Turn your dial to the mark labeled “A” or use a thermometer at a faucet to verify the output.
When to Increase Temperature Settings
Households with immunocompromised members may need temperatures between 135°F and 140°F to kill Legionella bacteria. You must install anti-scalding devices on all faucets if you choose this higher range to prevent severe burns.
Utilize Vacation Mode Correctly
Lower the thermostat to “Vacation” mode or the lowest setting when leaving home for several days. This reduces internal pressure and energy consumption without shutting down the system completely. Gas units should keep the pilot light lit unless you plan to drain the tank entirely.
Flush Sediment From the Tank Annually
Mineral deposits from hard water settle at the bottom of your tank and insulate the heating element. This buildup forces your system to work harder and can increase energy costs by up to 30 percent.
Adjust Flushing Frequency for Hard Water
Residents in hard water areas should flush their tanks every 3 to 6 months instead of once a year. Listen for popping or gurgling noises which indicate that sediment is already boiling at the tank bottom.
Step-by-Step Draining Procedure
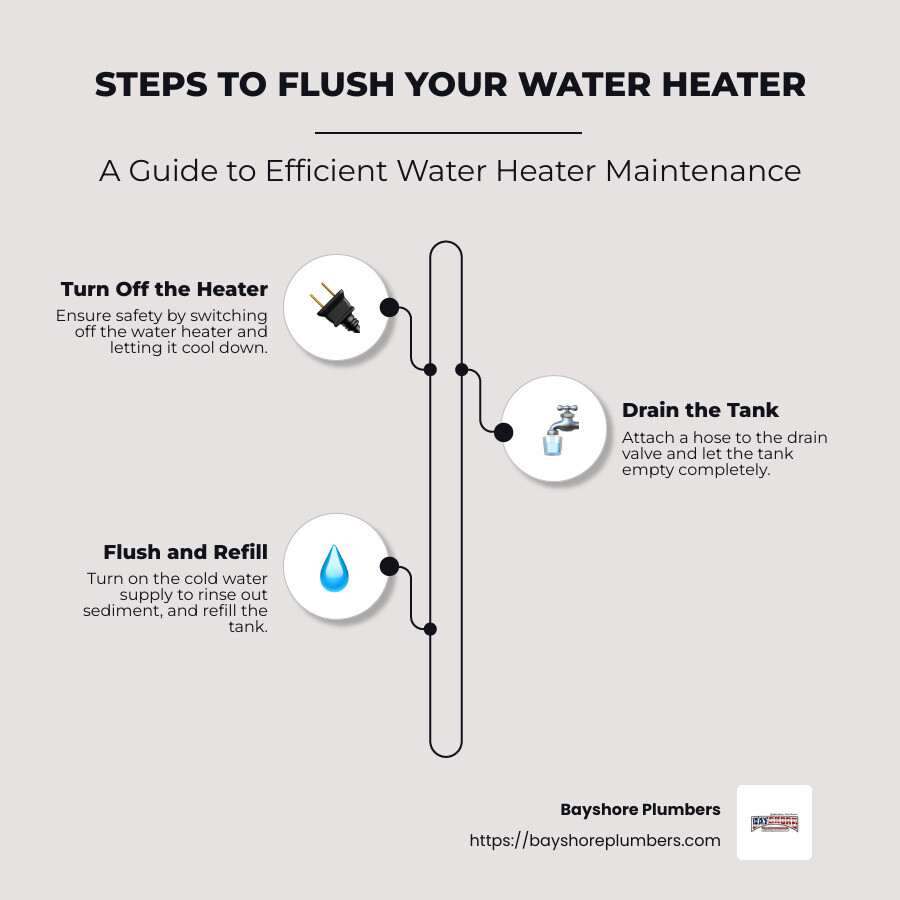
- Turn off power and water supply
Switch off the electric breaker or set the gas control to “Pilot.” Close the cold water shutoff valve located on the pipe with the blue label. - Attach a hose to the drain valve
Connect a garden hose to the valve at the tank base. Run the other end to a floor drain or into large buckets. - Break the vacuum with the T&P valve
Open the drain valve. If water flow stops prematurely lift the lever on the Temperature and Pressure relief valve to let air in. - Drain until water runs clear
Allow water to flow for 5 to 10 minutes. Drain a full tank for heavy sediment or just one bucket for light maintenance. - Refill and restart the system
Close the drain valve and remove the hose. Open the cold water inlet and run a hot water faucet upstairs until air bubbles disappear. Restore power or relight the burner.
Monitor the relief valve for 48 hours after this process. Replace it immediately if you notice continuous dripping.
Inspect and Replace the Anode Rod Every Three Years
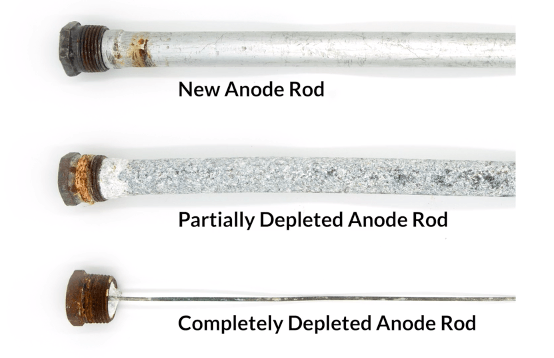
The anode rod acts as a sacrificial component that attracts corrosive minerals to protect your steel tank. Checking this part regularly is the single most effective way to prevent tank corrosion.
How to Check Rod Condition
Shut off your water supply and drain a few gallons before attempting removal. Locate the hex-head cap on top of the tank and unscrew the rod using a wrench.
Replace the rod if you observe any of the following conditions:
* More than 50 percent of the core wire is exposed
* The rod is coated in thick calcium deposits
* The metal appears thin crumbling or visibly worn
A new rod costs between $20 and $50 but can add over five years to your heater’s lifespan. Skipping this inspection is the leading cause of early tank failure and often voids manufacturer warranties.
Test the Pressure Relief Valve Monthly
The Temperature and Pressure (T&P) relief valve prevents dangerous explosions by releasing excess internal pressure. A malfunctioning valve poses a severe safety risk to your home.
Perform the Lever Test Safely
Lift the lever on the valve briefly once a month to ensure it moves freely. Water should discharge into the drain pipe and stop immediately when you release the lever.
Take immediate action if you notice these failure signs:
* No water comes out during the test indicating a clog
* Water continues to drip after resetting the lever
Do not attempt to repair a faulty valve. Buy a new valve matching your tank specifications typically rated for 150°F and 210 psi. Turn off utilities and use a wrench to swap the old valve for the new one.
Clean the Burner Area on Gas Models

Dust and lint accumulation can block proper gas combustion in your heater. This blockage leads to inefficient heating and potential carbon monoxide hazards.
Clear Debris From the Base
- Shut off the gas supply and electrical power.
- Remove the access panel located at the base of the unit.
- Use a vacuum or soft brush to remove dust from the burner and flame sensor.
- Inspect the vent pipe for cracks or disconnections.
Perform this cleaning annually or whenever you see soot buildup. A healthy gas flame should be blue rather than yellow.
Detect Leaks Before They Cause Damage
Small leaks can quickly escalate into thousands of dollars in water damage and mold remediation costs. Early detection is critical for protecting your home structure.
Conduct Monthly Visual Inspections
Check the area around your water heater for specific warning signs:
* Puddles forming around the base of the tank
* Moisture near the drain valve or T&P discharge pipe
* Rust stains appearing on the tank body
Pro Tip: Install an affordable water leak detector near the heater. These devices sound an alarm at the first sign of moisture giving you time to act.
Shut off the water supply and power immediately if you find a leak. Call a plumber right away as rust on the tank body usually means replacement is unavoidable.
Insulate Tank and Pipes to Reduce Heat Loss
Heat loss through the tank walls and distribution pipes wastes significant energy. Proper insulation keeps water hotter for longer periods.
Apply an Insulation Blanket
Wrap your tank with a pre-cut water heater insulation blanket rated at R-12. Ensure you do not cover the thermostat control panel or the burner access area. Secure the blanket with tape or straps to reduce standby heat loss by up to 45 percent.
Wrap the First Three Feet of Pipes
Slide foam pipe sleeves over the hot water pipes exiting the top of the tank. Seal all joints with duct tape to prevent heat escape during water transport.
Troubleshoot Common Water Heater Issues
Diagnosing problems early can save you from a complete system failure. Use these indicators to identify underlying issues with your unit.
Fix Popping or Gurgling Noises
These sounds indicate sediment boiling at the tank bottom. Flush the tank immediately to resolve the issue. Contact a professional if the noise persists after flushing.
Eliminate Rotten Egg Smells
This odor often results from bacteria reacting with a magnesium anode rod. Replace the rod with an aluminum-zinc alloy and sanitize the tank with hydrogen peroxide.
Address Inconsistent Heating
Fluctuating temperatures may stem from sediment blocking heat transfer or a failing heating element. Flush the tank first then test electrical elements if the problem continues.
Handle Rust on the Tank
Surface rust on fittings might be fixable but rust on the tank body signals internal corrosion. Replacement is imminent if the glass lining has breached.
Gather Essential Tools for Maintenance
Having the right equipment makes maintenance tasks safer and easier to complete. Keep these items ready for your annual service routine.
- Garden hose or washing machine hose for draining
- Channellock pliers or wrench for valves and rods
- Screwdriver for removing access panels
- Two large buckets if no floor drain is available
- Insulation blanket and foam sleeves for efficiency
- Replacement anode rod and T&P valve as needed
Purchase OEM or compatible parts for your specific model. Never reuse old washers or seals during reassembly.
Know When to Call a Professional Plumber
While many tasks are DIY-friendly some situations require expert intervention. Recognizing these limits protects your safety and warranty.
Contact a licensed professional for:
* Replacing gas lines or venting systems
* Electrical repairs involving 240V circuits
* Full tank replacement or persistent leaks
* Carbon monoxide concerns or strange odors
Call a pro immediately if your unit is over 10 years old and showing multiple symptoms. Replacement may be more cost-effective than repeated repairs.
Maximize Lifespan and Efficiency of Your Unit

A standard tank lasts about 10 years but proper care can extend this to 15 years or more. Consistent maintenance is the key to avoiding emergency replacements.
Follow this routine to ensure longevity:
* Flush annually or every 6 months in hard water
* Inspect the anode rod every 3 years
* Test the T&P valve monthly
* Set temperature to 120°F
* Insulate tank and pipes
* Install a leak detector
These steps delay costly replacements and keep your energy bills low.
Frequently Asked Questions About Water Heater Maintenance
How often should I flush my water heater tank?
You should flush your tank annually under normal conditions. If you live in a hard water area or hear popping noises flush it every 3 to 6 months to remove sediment buildup.
What temperature should I set my water heater?
Set your water heater to 120°F for the best balance of safety and efficiency. Raise it to 135°F only if necessary for bacterial control and install anti-scald devices.
How do I know if my anode rod needs replacing?
Inspect the rod every 1 to 3 years. Replace it if more than 50 percent of the core wire is exposed or if it looks thin and crumbling.
Why is my water heater making popping noises?
Popping noises usually mean sediment is building up at the bottom of the tank. Flush the tank immediately to remove the minerals causing the sound.
Can I fix a leaking T&P valve myself?
You can replace a leaking T&P valve yourself if you are comfortable with basic plumbing. However you must replace it immediately and never attempt to repair the old valve.
Key Takeaways for Maintaining Your Water Heater Tank
Regular maintenance prevents 90 percent of common water heater failures and extends unit life significantly. Focus on annual flushing triennial anode rod checks and monthly valve tests to ensure safety.
Start your routine today by testing the T&P valve and scheduling your next tank flush. Your proactive efforts will save money on energy bills and prevent costly emergency replacements.