Your engine idles rough, hesitates on acceleration, or throws a P0011 code that won’t quit. The likely culprit is a failing oil control valve (OCV), a small but critical solenoid that manages variable valve timing. When sludge, electrical faults, or mechanical wear disrupt its operation, your engine loses performance, fuel economy suffers, and warning lights appear. This guide shows you exactly how to check the oil control valve using basic tools, interpret every test result, and decide between cleaning and replacement. You’ll save hundreds in diagnostic fees and avoid replacing parts you don’t actually need.
Locate the Oil Control Valve on Your Engine
Find the OCV Position
The oil control valve sits on the cylinder head or valve cover, close to the camshaft. Most VVT-equipped engines use one OCV per camshaft, often labeled for intake and exhaust sides. Inline-4 engines typically place it on the front or side of the head. V6 and V8 layouts may tuck it under the intake manifold or near the timing cover.
Look for a small metal cylinder with an electrical connector and one or two mounting bolts. Always confirm the exact spot using your vehicle’s service manual before starting work.
Prepare for Safe Access
Disconnect the negative battery terminal first to prevent electrical shorts. Remove any engine covers, air intake ducts, or hoses that block access to the valve. Keep a lint-free rag nearby because removing the OCV often releases a small amount of oil.
Inspect Oil Condition Before Testing
Check for Sludge and Varnish
Dirty oil is the number one cause of OCV failure. Pull the dipstick and examine the oil closely. Dark, gritty, or sludgy oil signals poor maintenance. Low oil levels reduce pressure and prevent proper solenoid function.
If contamination is visible, stop the diagnostic process. Change the oil and filter first, and consider a system flush if sludge is severe. Testing a clean OCV in a dirty system wastes time and risks repeat failure.
Verify Correct Oil Viscosity
Using the wrong oil weight creates symptoms that mimic OCV failure. Thick oil restricts flow to the camshaft phasers. Thin oil cannot build adequate pressure to hold timing adjustments.
Check your owner’s manual for the exact viscosity grade your engine requires. Switching back to the correct oil often resolves P0011 codes without any solenoid replacement.
Perform Visual and Electrical Inspections
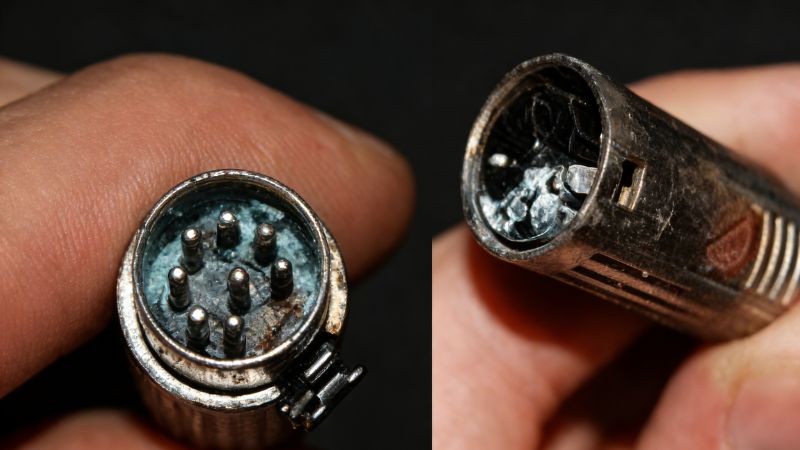
Examine the Connector and Wiring
With the OCV still installed, unplug the electrical connector and inspect it carefully. Look for corrosion, moisture intrusion, bent pins, or oil seepage inside the housing. Any of these issues interrupt the ECU signal and create intermittent faults.
Follow the wiring harness back toward the ECU. Check for chafing, heat damage, or loose connections that could disrupt power delivery.
Test OCV Voltage Supply
This test confirms the ECU and wiring are sending power to the solenoid.
- Turn the ignition to ON with the engine off.
- Set your multimeter to DC Voltage on the 20V range.
- Probe both terminals inside the harness connector.
A healthy reading falls between 8V and 14V, typically around 12V. No voltage indicates a blown fuse, broken wire, or ECU output failure. Do not replace the OCV until you fix the supply issue first.
Some systems only energize the OCV during cranking. Consult a wiring diagram if you see zero voltage with the key on.
Remove and Bench-Test the OCV
Unbolt and Extract the Valve
Remove the mounting bolt, usually 8mm or 10mm, and pull the OCV straight out without twisting. Place it on a clean surface and inspect the O-ring seal. Replace the seal if it shows cracks or deformation.
Measure Coil Resistance
Set your multimeter to Ohms on the 200Ω range. Touch the probes to the two electrical terminals on the solenoid body. Perform this test at room temperature, around 68°F or 20°C, because resistance varies with heat.
Acceptable readings fall into two common ranges:
– 6.9 to 7.9 Ohms (common in many Asian and domestic engines)
– 8.0 to 12.0 Ohms (alternate specification)
An infinite reading (OL) means the coil is open and the unit must be replaced. Near-zero resistance indicates an internal short. Readings outside either range signal a degraded coil that needs replacement.
Check for Ground Shorts
Keep the multimeter on the Ohms setting. Place one probe on a solenoid terminal and the other on the metal housing. Repeat for the second terminal.
You should see infinite resistance (OL) on both checks. Any reading means the coil is shorted to ground and the OCV must be replaced immediately.
Perform the 12V Click Test
This verifies mechanical movement inside the solenoid.
Connect the OCV terminals directly to a 12V battery source. Polarity usually does not matter for this test. Listen carefully for a sharp, rapid clicking sound as power pulses through the coil.
You should also feel the plunger vibrating or see it moving slightly. Silence means the plunger is stuck from sludge or the coil is dead. Cleaning often restores function when sludge is the cause.
Clean the Filter Screen and Oil Passages
Inspect the Mesh Screen
Many OCVs contain a fine mesh filter under a hex cap or plug on top of the unit. Remove the cap with a small wrench or hex key and pull out the screen.
Examine it for metal shavings, sludge, varnish, or debris clogging the mesh. Even a partially blocked screen restricts oil flow and triggers timing error codes.
Clean or Replace the Screen
Soak the screen in brake cleaner or dedicated VVT solenoid cleaner. Use a soft brush to dislodge stubborn buildup. Rinse thoroughly and dry with low-pressure compressed air.
Never reinstall a torn or damaged screen. If the mesh cannot be cleaned completely, replace the entire OCV assembly.
Flush the Engine Oil Passages
Sludge in the engine port can re-clog a brand-new OCV within miles. With the solenoid removed, spray brake cleaner into the mounting hole on the cylinder head. Use a lint-free swab or small brush to remove buildup.
Avoid blasting high-pressure air into the passages. Debris forced deeper into the camshaft phasers causes far more expensive damage.
Analyze OCV Duty Cycle (Advanced Testing)

Use a Multimeter or Oscilloscope
The ECU controls the OCV using pulse width modulation, not constant voltage. A standard multimeter with duty cycle capability can verify signal quality.
- Reconnect the OCV to the harness.
- Back-probe the signal wire.
- Start the engine and compare the reading to the commanded duty cycle shown on a scan tool.
Readings should match within 5 to 10 percent. An oscilloscope reveals even more detail. A healthy waveform shows a clean 0 to 12V square wave with sharp transitions. Noise, rounded edges, or erratic frequency points to ECU or wiring problems rather than a bad solenoid.
Troubleshoot Common Failure Scenarios
OCV Tests Good but Symptoms Persist
If resistance, voltage, and click tests all pass but drivability issues continue, look beyond the solenoid itself.
- Check oil pressure with a mechanical gauge. Low pressure prevents VVT function regardless of solenoid health.
- Inspect the camshaft phaser for worn vanes or a stuck locking pin.
- Test for timing chain stretch by comparing cam and crank sensor waveforms.
- Confirm oil type and age match manufacturer specifications.
P0011 Returns After a New OCV
A new solenoid should fix the code, but several issues can cause repeat failures.
- Reset the ECU by disconnecting the battery for 15 minutes.
- Verify oil viscosity matches the manual exactly.
- Inspect the harness for intermittent breaks or high resistance.
- Check the phaser oil seals for leaks that prevent timing from holding.
Engine Swap or Modified Applications
Swapping engines or modifying timing requires extra verification.
- Filter location may differ between model years.
- Signal type must match (high-impedance versus low-impedance solenoids are not interchangeable).
- In non-VVT setups, ensure the locking pin moves freely or has been removed correctly.
Decide Between Cleaning and Replacement
When Cleaning Solves the Problem
Cleaning works when resistance stays in spec, no electrical shorts exist, and sludge caused the failure. Soak the entire unit in solenoid cleaner, blow it dry with low-pressure air, and reinstall with a fresh O-ring.
Many DIYers resolve P0011 codes by simply cleaning the screen and passages. This five-dollar fix often prevents a four-hundred-dollar part purchase.
When Replacement Is Required
Replace the OCV if resistance falls outside spec, no click occurs under 12V power, the internal screen is damaged, or the plunger feels gritty and stuck. Choose OEM or high-quality aftermarket units because cheap solenoids fail much faster.
Replace the Oil Control Valve

Step-by-Step Installation
- Apply a thin coat of clean oil to the new O-ring.
- Insert the OCV straight into the port without cross-threading.
- Tighten the mounting bolt to factory spec, usually 8 to 10 ft-lbs.
- Reconnect the electrical connector.
- Reconnect the battery.
- Clear stored DTCs with an OBD2 scanner.
- Start the engine and test drive under load.
Smooth idle, no hesitation, and no returning check engine light confirm success. Some Ford models require ECM reprogramming after OCV replacement.
Prevent Future OCV Failures
Follow Smart Maintenance Habits
- Change oil every 5,000 to 7,500 miles or per the manual schedule.
- Use synthetic oil because it resists sludge formation much better than conventional blends.
- Replace the oil filter at every change using a quality brand.
- Avoid off-brand additives that can gum up solenoid passages.
A clean oil system keeps the OCV working reliably past 100,000 miles. Neglect shortens its life dramatically.
Cost and Time Estimates
DIY Versus Shop Pricing
| Item | DIY Cost | Shop Cost |
|---|---|---|
| OCV Part | $150 to $400 | $150 to $400 |
| Tools | $0 if owned | Included |
| Labor | $0 | $300 to $800 |
| Total | $150 to $400 | $500 to $1,200 |
DIY diagnostic and replacement takes 30 to 60 minutes depending on engine access. Even just performing the tests yourself can save hundreds by avoiding unnecessary parts replacement.
Final Checks and Road Test
Confirm the Repair Worked
After clearing codes, drive the vehicle under load. Accelerate up a hill or merge onto a highway while monitoring cam timing PIDs on a scan tool if possible.
Smooth, responsive numbers that shift with RPM confirm proper timing control. Stuck or erratic readings suggest you should recheck oil pressure or phaser function before assuming the OCV solved the problem.
Frequently Asked Questions About Oil Control Valves
What Are the Symptoms of a Bad Oil Control Valve?
Common symptoms include rough idle, reduced acceleration, poor fuel economy, and an illuminated check engine light. A P0011 code is the most frequent indicator. Severe failures can trigger limp mode or produce startup knocking from a sheared locking pin.
Can You Clean an Oil Control Valve Instead of Replacing It?
Yes, cleaning works when sludge is the root cause and electrical tests pass. Soak the unit in solenoid cleaner, scrub the mesh screen, and flush the oil passages. If resistance is out of spec or the coil is shorted, replacement becomes mandatory.
How Much Does It Cost to Replace an Oil Control Valve?
Parts alone cost $150 to $400 depending on vehicle and brand. Professional labor adds $300 to $800, bringing total shop costs to $500 to $1,200. DIY replacement saves the labor portion and typically takes under one hour.
What Causes Oil Control Valve Failure?
Oil sludge and contamination cause the majority of failures. Incorrect oil viscosity, carbon buildup, electrical corrosion, and normal mechanical wear also contribute. Most OCVs last between 80,000 and 150,000 miles with proper maintenance.
Will a Bad Oil Control Valve Throw a Code?
Yes, faulty OCVs trigger several diagnostic trouble codes. P0011 (timing over-advanced) is most common, followed by P0012 (timing over-retarded) and P0013 or P0014 for the exhaust camshaft. Circuit codes can also appear when wiring faults exist.
Is It Safe to Drive With a Failing Oil Control Valve?
Short-term driving is possible but not recommended. Continued operation causes poor fuel economy, accelerated timing chain wear, and potential engine damage if timing becomes severely misaligned. Diagnose and repair promptly to preserve engine longevity.
Key Takeaways for Checking Your Oil Control Valve
Oil condition drives most OCV problems, so always inspect oil level, color, and viscosity before testing the solenoid itself. Run resistance, voltage, ground short, and click tests in sequence to verify electrical and mechanical integrity without guessing. Clean the filter screen and oil passages first because a five-dollar fix often prevents a four-hundred-dollar replacement. Remember that P0011 codes do not always mean a bad OCV, so check oil pressure, phaser function, and timing chain health when symptoms persist. Use the correct oil and change it regularly to keep your new or cleaned OCV working reliably for years to come.