You turn on the shower expecting warmth only to face a sudden blast of cold water minutes later. When your hot water tank not staying hot becomes a daily frustration, the cause is often a specific mechanical failure rather than a dead unit. Most homeowners immediately assume the heater is broken beyond repair, yet the real culprit is frequently a faulty mixing valve or a broken dip tube.
This guide helps you identify whether the issue lies in your plumbing fixtures or inside the tank itself. You will learn how to test each component quickly and determine if you can fix the problem yourself or need a professional. By following these steps, you can restore reliable hot water in hours instead of waiting days for a replacement.
Test All Hot Water Fixtures to Isolate the Issue

Before blaming the water heater, you must confirm exactly where the temperature drop occurs. This simple step separates plumbing fixture issues from tank failures.
Check the hot water flow at multiple locations throughout your home:
* Kitchen sink
* Bathroom sink
* Bathtub or laundry faucet
Only the Shower Loses Heat Quickly
If every other faucet produces steady hot water while the shower fails, you likely have a leaking shower mixing valve. Modern single-handle showers use a mixing valve to blend hot and cold water for your desired temperature. Over time, internal seals wear out or corrode, allowing cold water to leak into the hot line even when you are not using the cold handle.
Even a tiny leak under standard 60 PSI city pressure can dilute your hot water supply rapidly. This happens especially during high-flow use like showering, making it feel like your tank ran out when it actually did not.
All Fixtures Run Out of Hot Water
If every tap in your house delivers only a few minutes of heat, the issue is likely inside the water heater. This points to internal problems such as a broken dip tube, heavy sediment buildup, or heating element failure in electric models. You must now investigate the tank components directly.
Check the Hot Water Outlet Pipe Temperature
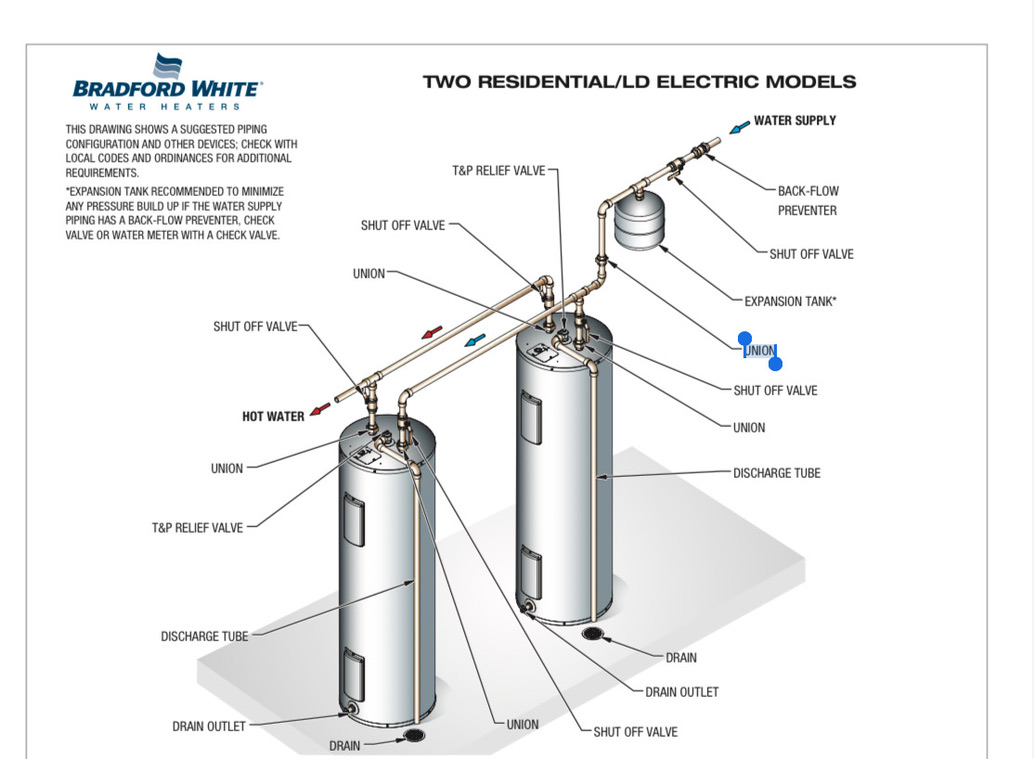
This quick test takes less than one minute and helps narrow down the cause significantly. Wait until the hot water runs out in your shower, then immediately go to your water heater location.
Carefully feel the hot water outlet pipe. This is usually located on top of the tank and connected to a copper or flexible line leading into your walls.
Pipe Feels Hot to the Touch
If the pipe remains hot, your tank is producing heat effectively. The problem is that cold water is sneaking into the system downstream, most likely at the shower valve. The mixing valve is not sealing properly, letting cold water backflow into the hot side. This means your hot water gets diluted before it ever reaches your showerhead.
Pro Tip: A valve leak may not drip visibly on the floor. This is an internal failure you will only detect by feeling the temperature difference in your pipes.
Pipe Feels Lukewarm or Cold
If the outlet pipe is not hot, the heater is not maintaining or delivering hot water effectively. This indicates an internal tank issue like a broken dip tube, sediment blockage, or failed heating components. You need to dig deeper into the tank mechanics to find the solution.
Diagnose a Broken Dip Tube Inside the Tank

The dip tube is a plastic pipe inside the cold water inlet that sends incoming cold water to the bottom of the tank for proper heating. When this tube breaks or detaches, cold water enters near the top where hot water is drawn from. This creates premature mixing, giving you a short burst of hot water followed by rapid cooling.
Signs of a Failed Dip Tube
- Hot water lasts only 2 to 5 minutes
- Tank feels hot, but faucets deliver lukewarm flow
- You can hold your hand on the hot outlet pipe because hot water is not being displaced correctly
How to Confirm the Diagnosis
- Shut off the cold water supply and power or gas to the unit.
- Drain a few gallons from the tank using the drain valve at the bottom.
- Remove the cold water inlet fitting on top of the tank.
- Shine a flashlight down the opening to inspect the tube.
If you cannot see the tube extending down or see loose plastic pieces, it has degraded. Replace the dip tube with a new one available online for a low cost. Be aware that some older dip tubes disintegrate completely, so flush the tank thoroughly if chunks have fallen inside.
Rule Out Sediment Buildup in the Tank
Sediment settles at the bottom of the tank over time, especially in areas with hard water. This layer insulates the burner in gas units or the heating element in electric models, reducing efficiency and causing the hot water tank not staying hot symptom.
Common Symptoms of Sediment
- Water heats slowly
- Strange popping or rumbling noises from the tank
- Reduced hot water capacity
- Shorter recovery time between uses
How to Flush the Tank
- Turn off power for electric units or set the gas valve to Pilot.
- Shut off the cold water supply to the tank.
- Attach a garden hose to the drain valve and run it to a floor drain.
- Open the pressure relief valve to allow airflow.
- Open the drain valve and let the tank empty completely.
- Briefly turn cold water back on to stir up remaining sediment.
- Close the drain, refill the tank, and restore power or gas.
Perform this maintenance once a year to maintain performance and extend the life of your water heater.
Electric Heater? Check the Heating Elements

If you own an electric water heater, two elements heat the water: an upper and a lower element. The lower element handles most daily heating duties. A failed lower element means only the top portion of water gets hot, resulting in very limited supply.
Test the Elements with a Multimeter
- Turn off power at the breaker panel.
- Remove access panels and insulation to expose the elements.
- Disconnect wires from each element terminal.
- Set your multimeter to ohms (Ω).
- Touch probes to the element terminals.
A good reading is between 10 and 16 ohms. A bad element shows OL (infinite resistance) or 0 ohms. Replace any faulty elements and consider replacing both since they are the same age.
Gas Heater? Verify Burner Operation
For gas units, ensure the burner is firing and staying lit throughout the heating cycle. If the burner fails to ignite or stays weak, your water will not stay hot.
Check for These Common Issues
- Pilot light is out and needs relighting
- Dirty thermocouple needs cleaning with steel wool
- Clogged burner assembly requires removal and cleaning
- Faulty gas valve or thermostat preventing ignition
Observe the flame through the inspection window after using hot water. A healthy flame is blue and steady. Yellow tips, flickering, or no ignition indicate a problem with the gas supply or control components.
Mixing Valve Replacement Steps

If your diagnostics point to a faulty shower mixing valve, you can fix it with basic tools. This repair stops cold water from diluting your hot supply.
Tools Needed
- Adjustable wrench
- Screwdrivers
- Replacement cartridge or valve matching your model
- Plumber’s tape
- Towels and bucket
Step-by-Step Replacement Guide
- Shut off the water supply at the main or fixture level.
- Relieve pressure by opening hot and cold faucets nearby.
- Remove the shower handle and trim to access the valve body.
- Unscrew the valve body or extract the cartridge according to your brand instructions.
- Compare the old part with the new one to ensure an exact match.
- Install the new valve or cartridge with fresh plumber’s tape.
- Reassemble the trim and restore water flow.
- Test for leaks and proper temperature control.
This process typically takes 1 to 2 hours for experienced DIYers. Always take a photo before disassembly to help with reassembly.
Prevent Future Hot Water Failures
Avoid recurring issues with these proactive maintenance steps. Regular care keeps your system running efficiently and prevents the hot water tank not staying hot problem from returning.
Annual Tank Flush
Removes sediment and improves heating efficiency. Do this every 12 months, or more often in hard water areas.
Inspect Dip Tube Every 5 to 7 Years
Plastic dip tubes degrade over time. Replace them preventively if your tank is over 10 years old.
Monitor Water Pressure
High pressure above 80 PSI strains valves and tanks. Install a pressure-reducing valve if your home pressure is too high.
Upgrade to a Thermostatic Mixing Valve
These valves maintain consistent output temperature and reduce strain on your entire plumbing system.
When to Call a Plumber
While many fixes are DIY-friendly, some situations require professional help. Call a licensed plumber if you suspect a leaking tank, have gas line issues, or experience repeated element failures. A professional can perform a full system evaluation and recommend upgrades like tankless heaters.
Frequently Asked Questions About Hot Water Tank Issues
Why does my hot water run out after only 5 minutes?
This usually indicates a broken dip tube allowing cold water to mix with hot water at the top of the tank. It can also signal a failed lower heating element in electric heaters or significant sediment buildup.
How do I tell if my mixing valve is bad?
Feel the hot water outlet pipe at the tank after the water runs out. If the pipe is still hot but your shower is cold, the mixing valve is likely leaking cold water into the hot line.
Can sediment cause my water heater to lose heat quickly?
Yes, sediment buildup insulates the heating source, making the heater less efficient. This reduces the amount of usable hot water and causes the tank to recover slowly.
Is it worth repairing an old water heater?
If the tank itself is not leaking and the issue is a component like a dip tube or element, repair is usually cost-effective. Replace the entire unit only if the tank is rusting or leaking water.
How often should I flush my water heater?
You should flush your water heater once a year to remove sediment. Homes with hard water may need to do this every six months to maintain efficiency.
Key Takeaways for Fixing Your Hot Water Tank
Restoring your hot water supply often requires only simple diagnostics rather than a full replacement. Remember that a hot water tank not staying hot is frequently caused by a broken dip tube or a leaking mixing valve, both of which are repairable. By checking your fixture flow and feeling the outlet pipe temperature, you can identify the root cause quickly.
Take action today by testing your pipes and inspecting your dip tube. Regular maintenance like annual flushing will keep your system running smoothly for years to come. If you are unsure about handling gas or electrical components, contact a licensed plumber for safe assistance.