Few household problems disrupt daily routines quite like a water heater that refuses to stay running. One moment you’re enjoying a hot shower; the next, the water turns ice cold because the system shut down again. When your hot water tank keeps turning off, it’s rarely a random malfunction. The unit’s safety systems are actively preventing a dangerous situation.
Understanding why this happens saves you time, money, and potential hazards. This guide walks you through systematic diagnostics for both gas and electric water heaters, helping you pinpoint the exact cause. You’ll learn which fixes you can handle yourself, when professional service becomes essential, and how to prevent future shutdowns.
Critical Safety Steps Before Troubleshooting
Before touching any water heater component, establish safety protocols. Gas and electric units pose fundamentally different hazards, and mishandling either can result in injury or property damage.
For gas water heaters:
– If you detect a rotten egg smell, evacuate immediately without flipping light switches or using phones
– Call your gas company from outside the building
– Never attempt repairs while smelling gas
For electric water heaters:
– These systems operate on 240V, enough to cause serious harm
– Burning smells, sparks, smoke, or blackened terminals require immediate professional intervention
– Always shut off power at the breaker before any inspection
Universal precautions:
– Set the temperature to 120°F for safe, efficient operation
– Never repeatedly reset safety devices without addressing the underlying cause
– If you’re uncertain at any point, stop and contact a licensed technician
Identify Your Water Heater Type
Diagnostic paths diverge completely based on your fuel source. Confirming which type you own is the essential first troubleshooting step.
Gas water heaters feature:
– A gas line connection entering the unit
– A burner assembly visible at the base
– A metal vent pipe extending from the top
Electric water heaters feature:
– A thick electrical cable entering through a junction box
– No vent pipe whatsoever
– Reset buttons typically behind access panels
Once you’ve confirmed the type, follow the appropriate diagnostic sections below.
Gas Heater Shutdown Causes
When a gas water heater lights but then shuts off, the timing of the failure reveals the problem. Two distinct scenarios point to different root causes.
Instant extinction: If the flame dies the moment you release the control knob, the thermocouple hasn’t generated enough voltage to keep the gas valve open. This is a sensor or timing issue.
Delayed extinction (1–3 minutes): If the burner runs briefly before shutting down, airflow restrictions, sensor degradation, or draft interference are likely culprits. The system is overheating or losing its safety signal.
Thermocouple and Thermopile Testing

The thermocouple is a safety sensor that generates DC voltage when heated by the pilot flame. This voltage tells the gas control valve to stay open. When this signal weakens, the valve closes and the burner shuts down.
Relight the Pilot Properly
A common mistake is releasing the control knob too early during relighting. Hold the knob down for a full 60 seconds after ignition. This delay allows the thermocouple tip to reach operating temperature and produce a stable signal.
Test Thermocouple Output
You’ll need a digital multimeter set to DC Millivolts (mV).
- Heat the thermocouple tip in the pilot flame
- Measure the output voltage
- Acceptable readings fall between 20–30 mV
- Readings below 20 mV indicate a worn component needing replacement
Physical inspection matters too. The connection nut must be tight and corrosion-free, and the tip must sit directly within the pilot flame. Gently bend the mounting bracket if misalignment is visible.
Thermopile Diagnostics for Newer Units
Modern Series 300 and 400 gas control valves use a thermopile instead of a standard thermocouple. This component generates significantly higher voltage, approximately 600 mV compared to the thermocouple’s 15–30 mV.
Testing procedure:
– Connect the multimeter leads and observe voltage climb over 30–60 seconds
– Minimum acceptable reading: 350 mV (some models require 500+ mV)
– Below 350 mV: replace the thermopile or suspect the control valve
Before replacing a thermopile showing low voltage, verify the thermal reset button is pressed in and the FVIR screen is clean. These simple checks resolve many apparent failures.
Airflow and Combustion Problems
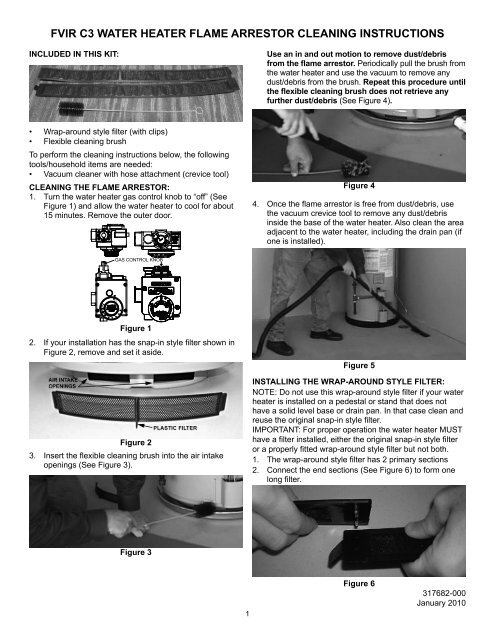
Combustion requires precise airflow. Restrictions force the system to overheat, triggering safety shutdowns.
Clean the Air Intake Screen
Modern gas heaters have a mesh screen at the base that accumulates dust, lint, pet hair, and debris. When this screen clogs, the flame starves. Vacuum the screen regularly and clear any items stored against the tank.
Clear the FVIR System
Flammable Vapor Ignition Resistant (FVIR) screens prevent external vapors from igniting inside the combustion chamber. When these screens clog with debris, they restrict airflow and cause overheating trips.
Use a soft brush or compressed air to clean the FVIR screen thoroughly. This single fix resolves many “won’t stay lit” complaints in newer units.
Unclog the Pilot Orifice
The tiny hole feeding the pilot flame can become blocked by dust, rust, or spider webs. Turn off the gas supply, clear the orifice with a thin wire, then blow it out with compressed air.
Evaluate Flame Quality
A healthy flame burns steady and blue, wrapping tightly around the thermocouple. Yellow, flickering, weak, or “floppy” flames indicate cleaning needs or thermocouple replacement.
Address Draft Hazards
Strong air currents from open garage doors or nearby furnace vents can physically blow out the pilot flame. Backdrafting, where exhaust gases flow back into living spaces, creates a lethal carbon monoxide risk requiring professional remediation.
Gas Control Valve Failure Signs
When the flame burns strong, thermocouple tests pass, and no drafts exist, the magnetic coil inside the gas control valve may be failing internally.
Replacement costs range from $150–$550. For units exceeding 10 years old, full replacement often makes better financial sense than valve repair. When ordering replacement valves, the model and serial number from the unit’s label are mandatory. Even identical-looking retail models have internal differences affecting compatibility.
Always replace the thermocouple when replacing the control valve to ensure system integrity.
Electric Heater Trip Causes

Electric water heaters fail differently, typically through the red reset button (high limit switch) popping out or the circuit breaker tripping repeatedly. Both indicate the system detected dangerous conditions.
High Limit Switch Troubleshooting
The high limit switch cuts power when water temperature exceeds approximately 180°F. When this button trips, the water is genuinely overheating. Continuous resetting without repair risks scalding injuries or fire.
Reset Procedure
Press the red button firmly until it clicks and stays depressed. If it pops back out within minutes, an active fault persists. Do not repeatedly reset. This masks dangerous conditions.
Common Triggers
The high limit activates when the thermostat fails to cut power to the heating element, when sediment insulates the element creating localized hot spots, or when loose wiring generates excessive resistance heat.
Element and Thermostat Replacement

Two components cause most electric heater failures: the heating element and the thermostat.
Test the Heating Element
With power OFF, use a multimeter to test resistance across the element terminals and check continuity to the tank (ground). A failed element may draw power continuously or short to ground, causing overheating or immediate breaker trips. Replacement elements cost $10–$50.
Replace a Stuck Thermostat
When the thermostat fails to cut power at the target temperature, the element continues heating until the high limit triggers. Test with a multimeter (power OFF) and replace if faulty. Thermostats run $10–$20.
Sediment and Wiring Issues
Mineral deposits and electrical connections create problems that mimic component failures.
Flush Sediment Buildup
Hard water deposits accumulate at the tank bottom, insulating the lower heating element. This creates a localized hot spot that trips the high limit even when bulk water temperature remains normal. Flush the tank every 1–2 years using a tank flush kit to prevent this insulating layer from forming.
Inspect Wiring Connections
Loose connections generate excessive heat through electrical resistance, triggering the high limit or tripping the breaker. Look for scorched terminals, melted insulation, or burning smells. Tighten accessible connections with power OFF, and replace any components showing heat damage.
Critical warning: This is a 240V system. If you notice burning smells, blackened terminals, or sparks, stop immediately and call a professional electrician.
Required Tools and Parts
Successful diagnostics require proper equipment.
Essential Tools
Digital multimeter: Must measure DC Millivolts (mV) and Resistance (Ohms). Models like the UEI DL 3669 include amp clamp functionality for electric heaters. Budget $15–$30 for a reliable unit.
Compressed air: Necessary for clearing pilot orifices and FVIR screens.
Tank flush kit: Required for sediment removal on electric units.
Replacement Parts
- Universal thermocouple kit: $15–$20 (buy longer than needed since excess coils, but short can’t stretch)
- Heating elements: $10–$50
- Thermostats: $10–$20
- Gas control valves: $150–$550
DIY vs Professional Service
Knowing when to attempt repairs yourself versus calling a technician prevents costly mistakes and safety hazards.
Appropriate DIY Repairs
Gas heaters:
– Cleaning air intake screens
– Clearing pilot orifices
– Adjusting thermocouple positioning
– Holding the pilot knob for 60 seconds during relighting
– Cleaning FVIR screens
– Replacing thermocouples (if comfortable with gas connections)
Electric heaters:
– Flushing the tank
– Tightening accessible wiring (power OFF)
– Replacing thermostats or elements (if experienced with electrical testing)
Call a Professional When
Gas indicators:
– Unit continues shutting off after cleaning and thermocouple verification
– Suspected backdrafting or exhaust entering living spaces
– Unit age exceeds 10 years with major component needs
– Gas valve replacement is required
Electric indicators:
– Reset button pops within minutes of being reset
– Circuit breaker trips immediately upon resetting
– Burning smells, smoke, or visible terminal damage
– Uncertainty about 240V electrical diagnostics
Never ignore repeated safety device trips. These indicate active hazards, not nuisance glitches.
Prevent Recurring Shutoffs
Proactive maintenance dramatically reduces shutdown frequency and extends equipment lifespan.
Annual Maintenance Tasks
- Vacuum air intake and FVIR screens to maintain combustion airflow
- Flush the tank every 1–2 years to prevent sediment insulation
- Visually inspect flame color. Steady blue indicates proper combustion
- Listen for unusual noises during operation
Environmental Considerations
Never store flammable materials near the water heater. Gasoline, paint thinners, cleaning solvents, and aerosols trigger FVIR sensors that mimic mechanical failures. Users often mistake these chemical-triggered shutdowns for broken equipment.
In hard water areas, scale buildup on temperature probes acts as insulation, delaying sensor response and causing inefficient cycling. Regular flushing mitigates this insulating effect.
Temperature Settings
Maintain 120°F as your standard setting. This temperature provides adequate hot water for household needs while reducing thermal strain on system components. Higher settings accelerate sediment formation and increase scald risks.
Frequently Asked Questions About Hot Water Tank Shutdowns
Why does my hot water tank keep turning off after a few minutes?
A gas water heater that runs briefly before shutting off typically has airflow restrictions, a degrading thermocouple, or draft interference. The system is overheating or losing its safety signal. Clean the air intake and FVIR screens first, then test the thermocouple output with a multimeter.
How do I know if my thermocouple is bad?
Test the thermocouple by heating its tip in the pilot flame and measuring DC millivolts with a multimeter. Acceptable readings fall between 20–30 mV. Anything below 20 mV indicates a worn component that needs replacement. Physical signs include corrosion on the connection nut or a tip that sits outside the flame.
Is it safe to keep resetting the high limit switch?
No. Repeatedly resetting the high limit switch without fixing the underlying cause can lead to scalding injuries or fire. The switch trips because water temperature exceeded approximately 180°F. If it pops back out within minutes of being reset, an active fault persists and requires immediate diagnosis.
What causes the FVIR sensor to trigger a shutdown?
FVIR sensors detect hydrocarbons from gasoline, paint thinners, cleaning solvents, or aerosols stored near the water heater. When fumes enter the combustion chamber, the system shuts down as a safety measure. Remove the chemical source, ventilate the area, and reset per the manufacturer’s manual.
Should I repair or replace a 10-year-old water heater?
For gas units requiring major component replacement beyond the 10-year mark, full replacement often makes better financial sense. A new gas control valve costs $150–$550, and older units may have additional failing components. Compare repair costs against the price of a new unit before deciding.
Can sediment buildup really cause a water heater to shut off?
Yes. Mineral deposits accumulate at the tank bottom and insulate the lower heating element in electric units. This creates a localized hot spot that triggers the high limit switch even when bulk water temperature remains normal. Flushing the tank every 1–2 years prevents this insulating layer from forming.
Key Takeaways for Fixing Your Hot Water Tank
_page-0001.jpg)
When your hot water tank keeps turning off, the system is communicating a specific problem rather than failing randomly. Gas heaters typically shut down due to thermocouple failures, airflow restrictions, or control valve issues. Electric heaters trip because of high limit activation, faulty elements, stuck thermostats, or sediment insulation.
Start by identifying your fuel type, then follow the diagnostic path that matches. Most shutdowns trace back to simple issues like clogged screens, dirty pilot orifices, or sediment buildup. Address these first before assuming expensive component failure.
If basic troubleshooting doesn’t resolve the issue, or if you encounter gas leaks, burning smells, or repeated safety trips, contact a licensed technician immediately. Your water heater’s safety systems are protecting your home.