Does your well pump click on and off every few seconds, or does water pressure surge unpredictably? These frustrating symptoms often signal incorrect air pressure in your water tank, a critical issue that can burn out your pump motor. Maintaining the proper air charge acts as a cushion for your system, ensuring consistent flow and preventing rapid cycling damage.
You can fix this common problem in under 30 minutes using basic tools like a tire gauge and air compressor. This guide details exactly how to check air pressure in water tank systems safely, adjust the charge to match your specific cut-in settings, and diagnose internal bladder failures before they cause costly water damage.
Identify Your System’s Cut-In Pressure Settings
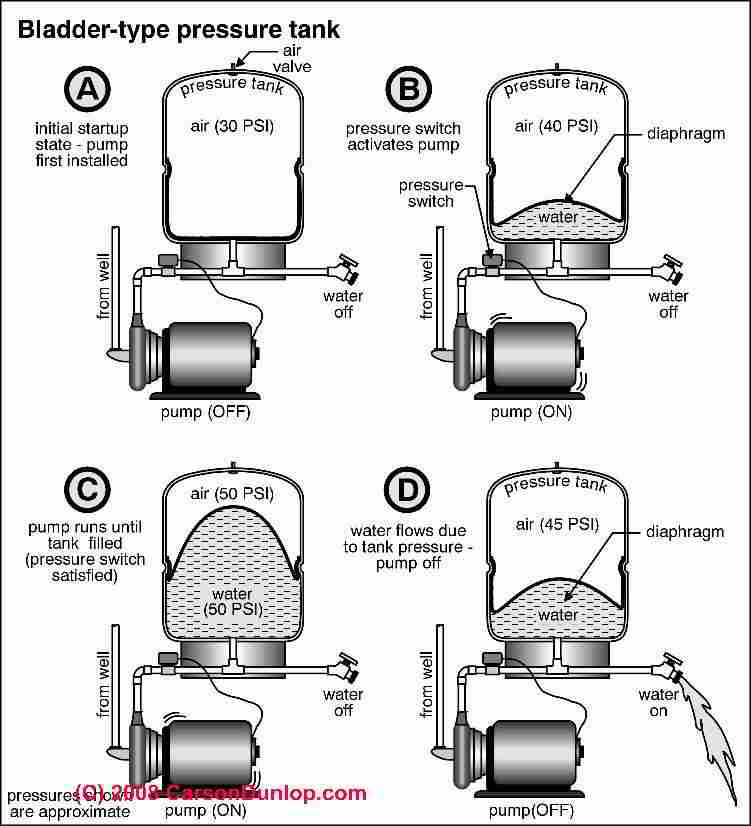
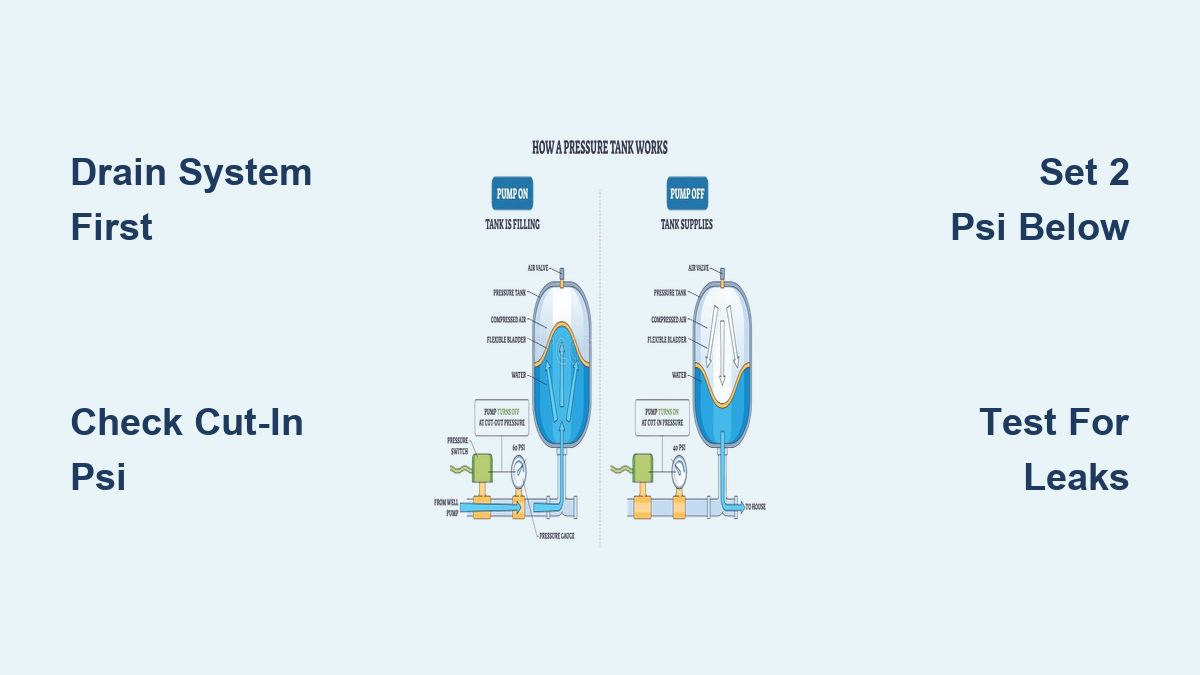
Accurate adjustment begins with knowing your target number, which depends entirely on your pump’s electrical cut-in pressure. The universal rule for how to check air pressure in water tank maintenance is to set the air charge exactly 2 PSI below the point where your pump turns on.
Locate Pressure Switch Specifications
Find the small metal or plastic box near your tank labeled as the pressure switch. Remove the cover to find a sticker or stamp indicating the pressure range.
* 30/50 PSI systems: Set tank air to 28 PSI.
* 40/60 PSI systems: Set tank air to 38 PSI.
* 50/70 PSI systems: Set tank air to 48 PSI.
Write down the first number (cut-in) as this determines your final target. Most residential homes utilize the 40/60 configuration.
Verify Cut-In Pressure Using the Gauge
If the switch lacks a label, you must observe the system in action to find the cut-in point. Turn on a faucet and watch the pressure gauge drop until the pump motor clicks on.
* Note the exact PSI reading when the pump activates.
* This specific number is your cut-in pressure.
* Subtract 2 from this number to get your target air pressure.
Never guess this value, as an incorrect target leads to inefficient pumping or bladder damage.
Depressurize the Water System Completely
You cannot learn how to check air pressure in water tank systems accurately while water remains inside. Water pressure compresses the air bladder, creating a false high reading on your gauge. You must drain the system to zero PSI before proceeding.
Cut Power and Open Drains
Locate the circuit breaker for your well pump and switch it to the OFF position immediately. This prevents the pump from restarting automatically while you work, which could cause dangerous pressure spikes.
* Open a faucet at the lowest point in your home, such as a basement sink or outdoor spigot.
* Open a second faucet on the highest floor to break any vacuum lock.
* Allow water to flow until it stops completely.
Confirm Zero PSI Reading
Watch your system pressure gauge closely as the water drains. The needle must drop to 0 PSI before you attempt to measure air pressure.
* If the gauge shows any pressure, water is still trapped inside.
* Wait longer for the tank to empty fully.
* Proceeding with water in the tank renders your air pressure reading useless.
Measure Current Air Charge at the Schrader Valve
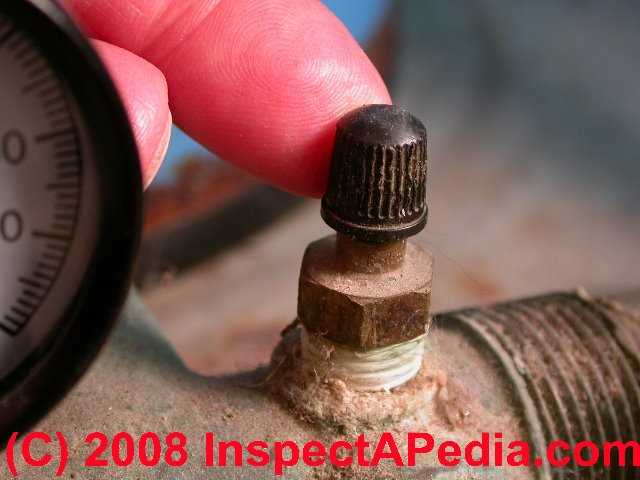
The air charge valve, known as a Schrader valve, looks identical to those found on car tires. It is typically located on the top dome of the pressure tank under a black plastic cap, though some models place it on the side.
Locate and Prepare the Valve
Remove the black plastic cap by hand without using excessive force. Inspect the valve stem for any visible debris or corrosion before attaching your gauge.
* Use a high-quality digital or dial tire gauge for best accuracy.
* Cheap analog gauges often have significant variance.
* Ensure the gauge head is clean to prevent air leaks during measurement.
Take the Pressure Reading
Press the tire gauge firmly onto the valve stem to get a reading. Compare this number to your target calculated earlier (cut-in minus 2 PSI).
* If the reading matches your target, your air charge is correct.
* If the reading is lower, you need to add air.
* If the reading is higher, you must release excess air.
Pro Tip: If water sprays out when you press the gauge onto the valve, the internal bladder has ruptured. Stop immediately and replace the tank.
Adjust Air Pressure to Match Target Settings
Once you know the current pressure, you can easily adjust it to the correct level. This step is the core of learning how to check air pressure in water tank maintenance effectively.
Inflate Low Pressure with a Compressor
If your reading is below the target, connect an air compressor hose to the valve. Add air in short bursts of one or two seconds to avoid overshooting.
* Recheck the pressure after every burst.
* Stop adding air once you reach the target number.
* Wait 15 minutes before taking a final reading to let the air temperature stabilize.
Compressed air heats up during inflation, causing a temporary high reading. Waiting ensures your final measurement is accurate.
Release Excess Air Carefully
If the pressure is too high, use a small screwdriver or the tip of your inflator tool to gently press the center pin of the valve.
* Release air in tiny increments.
* Measure frequently to ensure you do not drop below the target.
* Replace the black plastic cap tightly after finishing.
Diagnose Bladder Failures and Sediment Buildup

Checking air pressure serves as a vital diagnostic test for the internal health of your tank. Specific symptoms during this process indicate whether your tank needs repair or total replacement.
Detect Ruptured Bladders
Water leaking from the air valve is the definitive sign of a failed bladder. This condition, called waterlogging, means the tank can no longer separate air from water.
* The tank must be replaced immediately.
* Do not attempt to recharge a tank leaking water.
* Continuing to run the system will destroy your well pump.
Identify Iron and Sediment Issues
If air pressure holds but water volume between pump cycles is low, sediment may be clogging the tank. This is common in areas with high iron content in the water.
* Perform a drawdown test by measuring water output between cut-out and cut-in pressures.
* A 44-gallon tank should yield about 12 gallons of water.
* Significantly less volume indicates buildup or bladder damage.
Iron buildup physically reduces tank capacity and cannot be cleaned. Replacement is the only solution.
Prevent Short Cycling and Pump Damage
Short cycling occurs when the pump turns on and off every few seconds, a issue directly linked to improper air pressure. Understanding how to check air pressure in water tank systems prevents this destructive cycle.
Recognize Short Cycling Symptoms
Listen for rapid clicking sounds from the pump or feel for surging water pressure at your faucets. These signs indicate the air cushion is gone, causing the pump to work too hard.
* Low air charge allows the bladder to fill completely with water.
* The pump activates with every drop of water usage.
* This rapid cycling burns out pump motors quickly.
Execute the Fix
Correcting short cycling often requires nothing more than proper inflation.
1. Depressurize the system completely.
2. Check current air pressure.
3. Inflate to exactly 2 PSI below the cut-in setting.
4. Restore power and monitor the cycle.
This simple adjustment restores the air cushion and stops the rapid cycling immediately.
Follow a Smart Maintenance Schedule
Regular checks extend the life of your entire well system. Knowing how to check air pressure in water tank units should be part of your routine home maintenance plan.
Establish Check Intervals
Inspect your tank air pressure at least once every 6 to 12 months. Systems with no issues might go 2 to 5 years, but annual checks catch slow leaks early.
* Check immediately upon new tank installation.
* Inspect right away if you hear unusual pump noises.
* Test after any power outage or plumbing work.
Address Iron-Rich Water Challenges
Homes with high iron content face unique challenges regarding tank longevity. Precipitated iron builds up between the bladder and tank wall over time.
* Install pre-filtration systems to reduce sediment entry.
* Consider tanks designed specifically for iron removal.
* Monitor drawdown volume closely for early detection of buildup.
Frequently Asked Questions About Water Tank Air Pressure
How often should I check the air pressure in my water tank?
You should check air pressure every 6 to 12 months for optimal performance. Immediate checks are necessary if you notice pump short cycling, fluctuating pressure, or after installing a new tank.
What happens if the air pressure is too high in the tank?
Excessive air pressure reduces the amount of water the tank can hold, leading to frequent pump cycling. It can also cause the bladder to over-expand and fatigue prematurely, shortening the tank’s lifespan.
Can I check the air pressure without draining the water system?
No, you cannot get an accurate reading with water in the tank. Water pressure compresses the air bladder, giving a false high reading. You must drain the system to 0 PSI first.
Why is water spraying out of the air valve when I check it?
Water spraying from the Schrader valve indicates a ruptured internal bladder. The tank is waterlogged and cannot function correctly, requiring immediate replacement of the entire unit.
What is the ideal air pressure for a 40/60 PSI pressure switch?
For a standard 40/60 PSI system, the ideal air pressure is 38 PSI. This follows the rule of setting the tank pressure 2 PSI below the pump’s cut-in pressure of 40 PSI.
Key Takeaways for Checking Air Pressure in Water Tank Systems
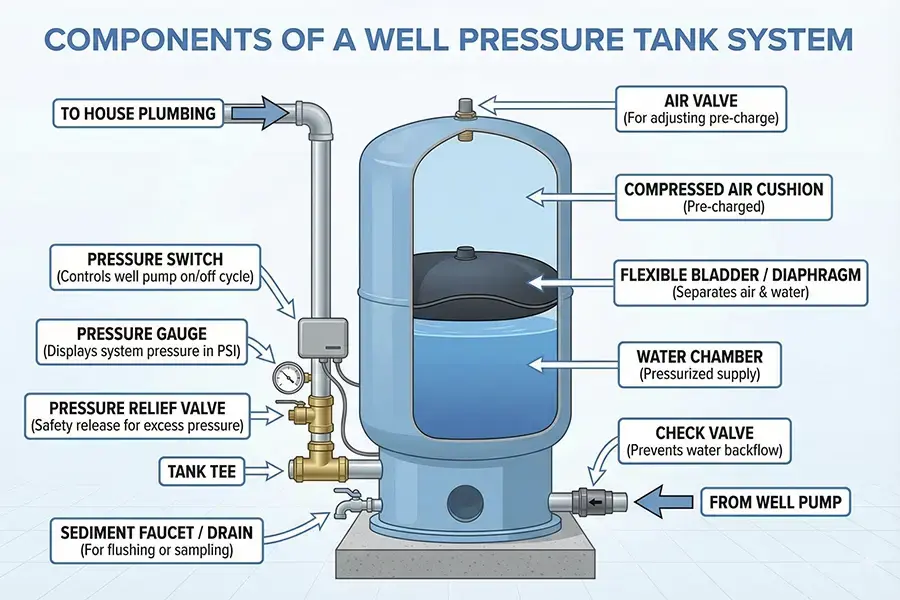
Maintaining the correct air charge is the single most effective way to protect your well pump and ensure steady water pressure. Remember to always drain the system to zero PSI before measuring, set the air to 2 PSI below your cut-in pressure, and wait 15 minutes after inflating for an accurate reading.
Regular maintenance prevents catastrophic pump failure and extends the life of your pressure tank. If you discover water in the air valve or significantly reduced water volume, replace the tank immediately to avoid expensive repairs. Start your maintenance routine today by locating your pressure switch and verifying your target settings.