
If your household taps deliver weak pressure or no flow at all, installing a pump on your water storage tank can restore reliable water access. Whether you rely on a rainwater tank, IBC tote, or underground cistern, a properly configured pumping system delivers pressurized water for household use, garden irrigation, or emergency preparedness. This guide covers everything from selecting the right pump type and power source to installation best practices, maintenance procedures, and troubleshooting techniques.
You will learn how to choose a pump that matches your flow requirements, avoid common installation mistakes, extend equipment lifespan, and even use your pump to refill tanks when needed.
Choose the Right Pump Type for Your Tank
Selecting the correct pump determines system efficiency, noise levels, maintenance needs, and overall longevity. Your choice depends on tank location, water usage patterns, and available power.
Use Demand Pumps for Intermittent Use
Demand pumps activate only when water flows and shut off automatically when flow stops. These are ideal for outdoor sinks, RVs, off-grid cabins, and temporary garden setups. They are typically 12V DC or 110V AC, self-priming, compact, and often include built-in pressure switches. RV-style 12V models can run dry without damage, making them durable for irregular use.
Install Submersible Pumps for Quiet Operation
Submersible pumps sit inside the tank and push water upward. Benefits include silent performance, no priming required, space-saving design, and high efficiency for continuous use. Position the pump slightly above the tank bottom to avoid sediment and ensure float switches move freely if equipped.
Opt for External Pumps for Easy Maintenance
External above-ground pumps mount outside the tank and require priming before first use. Advantages include simple access for repairs, easier winterization, and compatibility with filters and valves. Best for household plumbing and pressure boosting. Must be installed close to the tank to minimize suction lift. Use flexible hose on tanks over 1,000 L to absorb vibration.
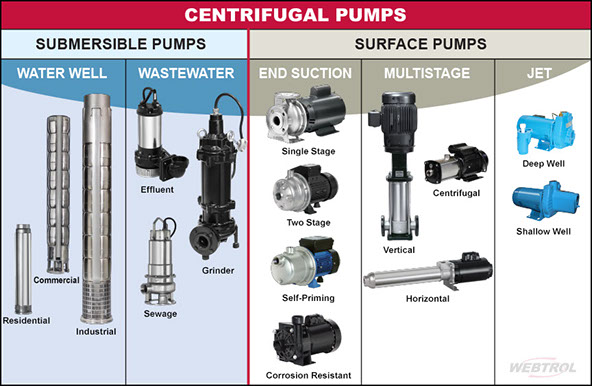
Select Centrifugal Pumps for High-Volume Transfer
Gas-powered or electric centrifugal pumps deliver 150 to 290+ GPM, perfect for agricultural irrigation, dewatering flooded areas, or transferring water between large tanks. Self-priming models eliminate manual re-priming. Available in 2″ or 3″ inlet and outlet sizes. Six to eleven HP gas engines work without electricity, ideal for remote locations or emergencies.
Boost Pressure with In-Line Pumps
Booster pumps increase existing pressure in low-flow systems. The Grundfos SCALA1, for example, delivers up to 15 GPM and stabilizes pressure across multiple fixtures. Use when adding a tank to an existing home system or upgrading weak municipal pressure.
Match Pump Size to Your Water Needs
An oversized pump short cycles, causing premature wear. An undersized pump struggles to meet demand. Match capacity to your specific application.
Determine Required Flow Rate
Low demand for cabins and outdoor sinks requires 3 to 5 GPM. Household use with shower and sink needs approximately 11.6 GPM or 44 L/min. Irrigation or pressure washing demands 15 to 30+ GPM. Large-scale transfer uses 150 to 290+ GPM via gas centrifugal pumps.
Estimate peak usage by adding fixture demands. For example, a shower at 6 GPM plus a kitchen sink at 2 GPM equals 8 GPM minimum.
Calculate Total Dynamic Head
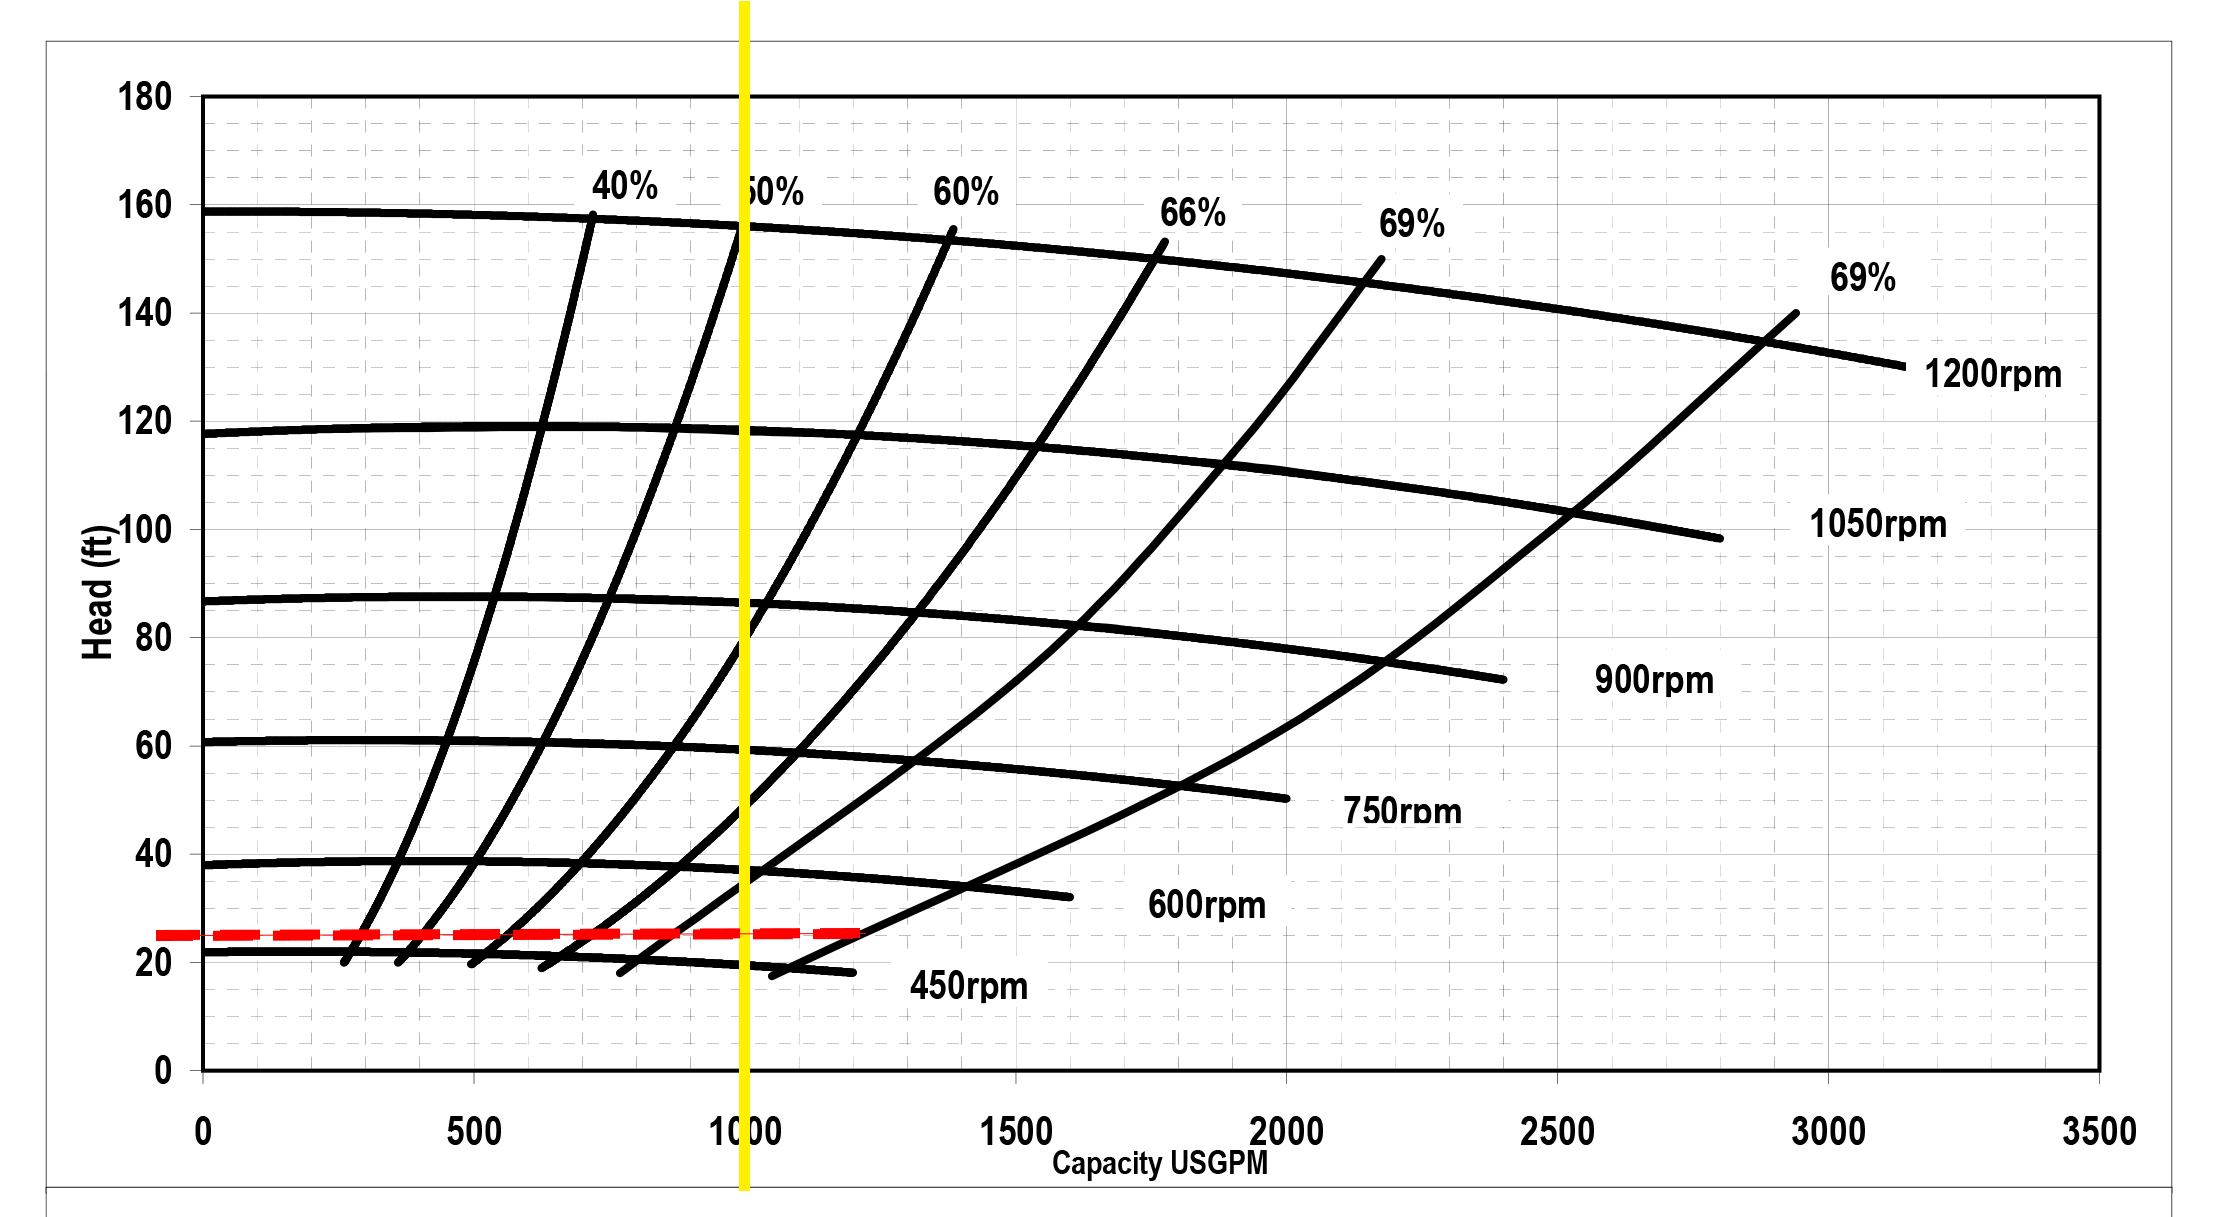
Total head equals static head plus friction head. Static head is the vertical distance from water surface to the highest outlet. Friction head is the resistance from pipe length, diameter, bends, and fittings. Use manufacturer performance curves to confirm the pump can deliver required flow at your total head.
Select Your Power Source: Grid, Solar, or Gas
Your power options shape system design, cost, and reliability. Choose based on your location and available infrastructure.
Use 110V AC for Standard Home Installations
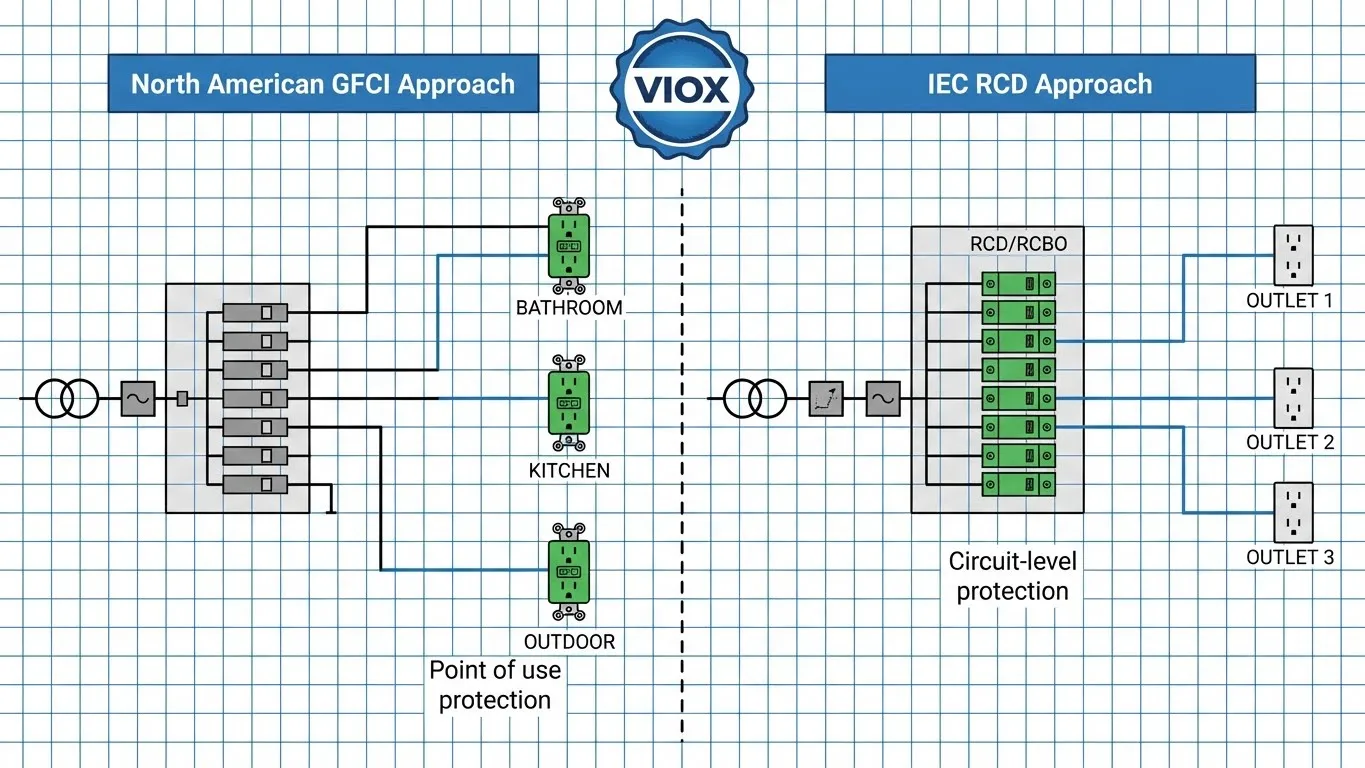
Most electric pumps run on 110V or 120V AC. Requirements include a dedicated outdoor outlet, GFCI or RCD protection, and no extension cords. Plug directly into the outlet. Hire a licensed electrician for hardwired submersible systems.
Example: A 1 HP Walrus pump delivers 34.8 GPM and costs approximately $770. Requires proper circuit load planning.
Run 12V DC Pumps Off Solar or Battery
Perfect for off-grid cabins, RVs, or emergency setups. Powered by a 12V battery bank. Can integrate with solar panels and a charge controller. Dry-run tolerant models will not burn out if the tank runs empty.
A typical RV 12V demand pump operates quietly and starts only when needed. Total system cost includes battery, inverter, and solar array.
Choose Gas Engines for Off-Grid High Output
Gas-powered centrifugal pumps require no electricity and transfer 150 to 293 GPM. Ideal for field irrigation or emergency dewatering. Portable and fast to deploy.
Example: A 6 HP pump delivers 280 GPM through a 2″ outlet. Some models include electric start.
Install Your Pump Correctly: Step-by-Step
Proper installation prevents leaks, loss of prime, and premature failure. Follow these steps carefully.
Mount External Pumps on Solid Ground
- Install a screw-in valve at the tank outlet to allow isolation for maintenance without draining.
- Dry-fit all components first, testing fit of pipes, flexible hose, and fittings. Confirm alignment.
- Seal threads with Teflon tape, wrapping clockwise on male threads after dry-fitting.
- Connect the intake line to the tank valve. Use flexible hose for tanks over 1,000 L to reduce vibration stress.
- Install a Y-strainer before the pump to filter debris. This is mandatory for warranty on most brands. Clean monthly.
- Add a check valve on the suction line if the pump is above water level to prevent backflow and maintain prime.
- Connect the discharge line to a garden hose or irrigation pipe.
- Prime the pump by filling the priming chamber with water per the manual. Failure risks seal damage.
- Secure the pump on a level surface using concrete slab or pavers. Install protective housing to reduce noise and weather exposure.
- Test the system by plugging into an RCD outlet, opening valves, and checking for leaks, noise, or pressure drop.
Install Submersible Pumps Safely
- Drill a hole with a bulkhead fitting to prevent leaks and mosquito entry. Do not route the power cable through the inlet strainer.
- Position the pump above the tank floor, elevating slightly to avoid sucking sediment.
- Ensure the float switch moves freely if equipped. Test movement before submerging.
- Install a check valve on the discharge line to stop water from flowing back into the tank when off.
- Use waterproof cable entry to protect the electrical connection.
- Connect to an RCD-protected circuit. Hardwiring requires a licensed electrician.
Essential Components for Reliable Operation
Every reliable system includes these core parts that you cannot skip.
Install Y-Strainer for Debris Protection
The Y-strainer prevents clogs and pump damage. Located on the suction side before the pump. Must be cleaned regularly, especially after heavy rain or initial setup.
Use Check Valves to Maintain Prime
Critical when the pump is above water level. Prevents water from draining back into the tank after shutdown, eliminating the need to re-prime each time.
Add a Pressure Tank for Stability
Not mandatory but highly recommended. Benefits include reduced pump cycling, smoothed pressure fluctuations, extended pump life, and water reserve during power outages. Ideal for homes with multiple fixtures or variable demand.
Seal All Openings Against Pests
All entry points must be sealed using bulkhead fittings for pipes. Cap unused ports and screen vents to prevent mosquito breeding. Required by many standards and essential for water quality.
Optimize Your Water Tank System Design
Smart design improves reliability and scalability for future expansion.
Elevate Tank for Gravity-Assisted Flow
Place the IBC tote or tank on cinder blocks or pavers. Even slight elevation improves gravity feed to demand pumps, reduces pump workload, and helps maintain prime. Use a spirit level to ensure even placement on all corners.
Link Multiple Tanks for Greater Capacity
Connect two or more tanks to act as one reservoir using flexible hose and PVC ball valves. Install bulkhead fittings at connection points. Isolate each tank for maintenance.
Example: Two 500 L tanks provide 1,000 L total, enough for a week of garden irrigation.
Integrate Rainwater Harvesting
Refill tanks automatically from roof gutters by installing an inlet filter to catch leaves and debris. Add an overflow pipe to divert excess and use a split pipe to feed multiple tanks during rain.
Electrical Safety Requirements
Electricity and water are dangerous together. Follow these rules without exception.
Always Use RCD/GFCI Protection
RCD protection prevents electrocution if a fault occurs. Required for all outdoor outlets. Test monthly using the test button. Never use extension cords. Plug the pump directly into the outlet.
Hire a Licensed Electrician for Hardwiring
Submersible pumps with permanent wiring must be installed by a professional. DIY connections risk electric shock, fire hazard, and voided warranty.
Avoid Illegal Mains Water Connections
Connecting your tank system to municipal supply via a rain-to-mains valve must be done by a licensed plumber. DIY attempts are illegal, pose contamination risk, and likely void insurance and warranties.
Operate and Maintain Your Pump System
Proper use and care ensure long-term performance and reliability.
Prime After Downtime
External pumps lose prime if idle. Re-prime by closing the outlet valve, opening the priming plug, filling the chamber with water, replacing the plug, and restarting. Self-priming pumps do this automatically.
Reverse Pump to Refill Tank
Use the same pump to transfer water into the tank. Close the tank ball valve, open the fill line, insert the suction hose into the source, and run the pump to push water upward.
Tested: It took 22 minutes to move 55 gallons into a 300-gallon tote.
Clean Filter Regularly
A clogged Y-strainer causes low pressure. Inspect and clean monthly for rainwater systems, after storms or debris events, and whenever flow drops unexpectedly.
Winterize in Cold Climates
Prevent freeze damage by draining the pump, pipes, and valves. Store portable pumps indoors. Insulate or heat-wrap active systems. Use RV antifreeze in lines if needed.
Troubleshoot Common Pump Problems
Fix issues fast with this guide to typical problems.
Pump Loses Prime
Cause: Air leak in the suction line. Fix by checking all fittings and hose clamps, reapplying Teflon tape on threaded joints, and ensuring the strainer lid is sealed tightly.
Low Water Pressure
Causes include a clogged Y-strainer, undersized pipe less than 1 inch, or long or bent pipe runs. Solutions: clean the filter, upgrade to 25 mm pipe, and minimize bends and shorten lines.
Noisy Pump Operation
Causes include loose mounting, vibration from rigid connections, or cavitation from low water level or air in the line. Fixes: secure the pump to a solid base, use flexible hose on intake, and check water level and re-prime.
Overheating
Causes include poor ventilation, continuous operation beyond duty cycle, or blocked cooling fins. Prevention: install in shaded ventilated housing, allow rest periods for high-duty tasks, and keep the exterior clean.
Extend Pump Life with Smart Habits
Maximize durability with proactive care and proper operation.
Avoid Short Cycling
Do not oversize the pump. Use a pressure tank to buffer demand and reduce on and off cycles.
Prevent Dry Running
While some 12V pumps tolerate dry operation, most centrifugal and AC pumps overheat. Install a float switch to shut off the pump when water is low.
Use Proper Pipe Sacing
Use minimum 25 mm or 1 inch pipe from tank to pump. Smaller pipes restrict flow and increase strain.
Keep Suction Lines Short and Straight
Each bend and extra foot of pipe reduces efficiency. Route intake as directly as possible.
Key Takeaways for Successful Water Tank Pumping
Choosing the right pump type based on your specific needs and usage patterns is the foundation of a reliable system. Whether you select a demand pump for intermittent use, a submersible pump for quiet operation, or a centrifugal pump for high-volume transfer, matching the pump size to your flow requirements and total dynamic head prevents premature wear and ensures adequate pressure.
Proper installation with essential components like Y-strainers, check valves, and pressure tanks creates a system that operates efficiently for years. Electrical safety cannot be neglected. Always use RCD protection, hire professionals for hardwiring, and never attempt illegal mains connections.
Regular maintenance including filter cleaning, re-priming after downtime, and winterization in cold climates extends pump life significantly. Address troubleshooting issues promptly to prevent minor problems from becoming major repairs.
With the right pump, correct installation, and regular upkeep, your water tank system will deliver strong, reliable pressure for household use, garden irrigation, or emergency preparedness. Start with a simple setup, build smart, and scale as your needs grow.
Frequently Asked Questions About Pumping Water from Tanks
What type of pump is best for a residential water tank?
The best pump depends on your specific needs. For quiet operation and continuous use, submersible pumps work well. For easy maintenance and accessibility, external pumps are preferable. For intermittent use like outdoor sinks or RVs, demand pumps activate only when needed.
How do I calculate the right pump size for my tank?
Calculate your required flow rate by adding the GPM demands of all fixtures you might use simultaneously. Then determine total dynamic head by measuring vertical distance from water surface to the highest outlet plus friction losses from pipe length and fittings. Match these numbers to manufacturer performance curves.
Can I use solar power to run a water tank pump?
Yes, 12V DC pumps run efficiently on solar power with a battery bank. This setup is ideal for off-grid cabins, RVs, or emergency backup systems. RV-style 12V demand pumps are particularly suitable because they tolerate dry running.
How often should I clean the Y-strainer on my pump?
Clean the Y-strainer monthly for rainwater systems. Clean more frequently after heavy storms, during initial setup, or whenever you notice decreased water pressure. Regular cleaning prevents strain and maintains optimal flow.
What causes a pump to lose prime, and how do I fix it?
Air leaks in the suction line cause loss of prime. Check all fittings and hose clamps for tightness. Reapply Teflon tape on threaded joints. Ensure the strainer lid is sealed properly. For external pumps, refill the priming chamber with water before restarting.