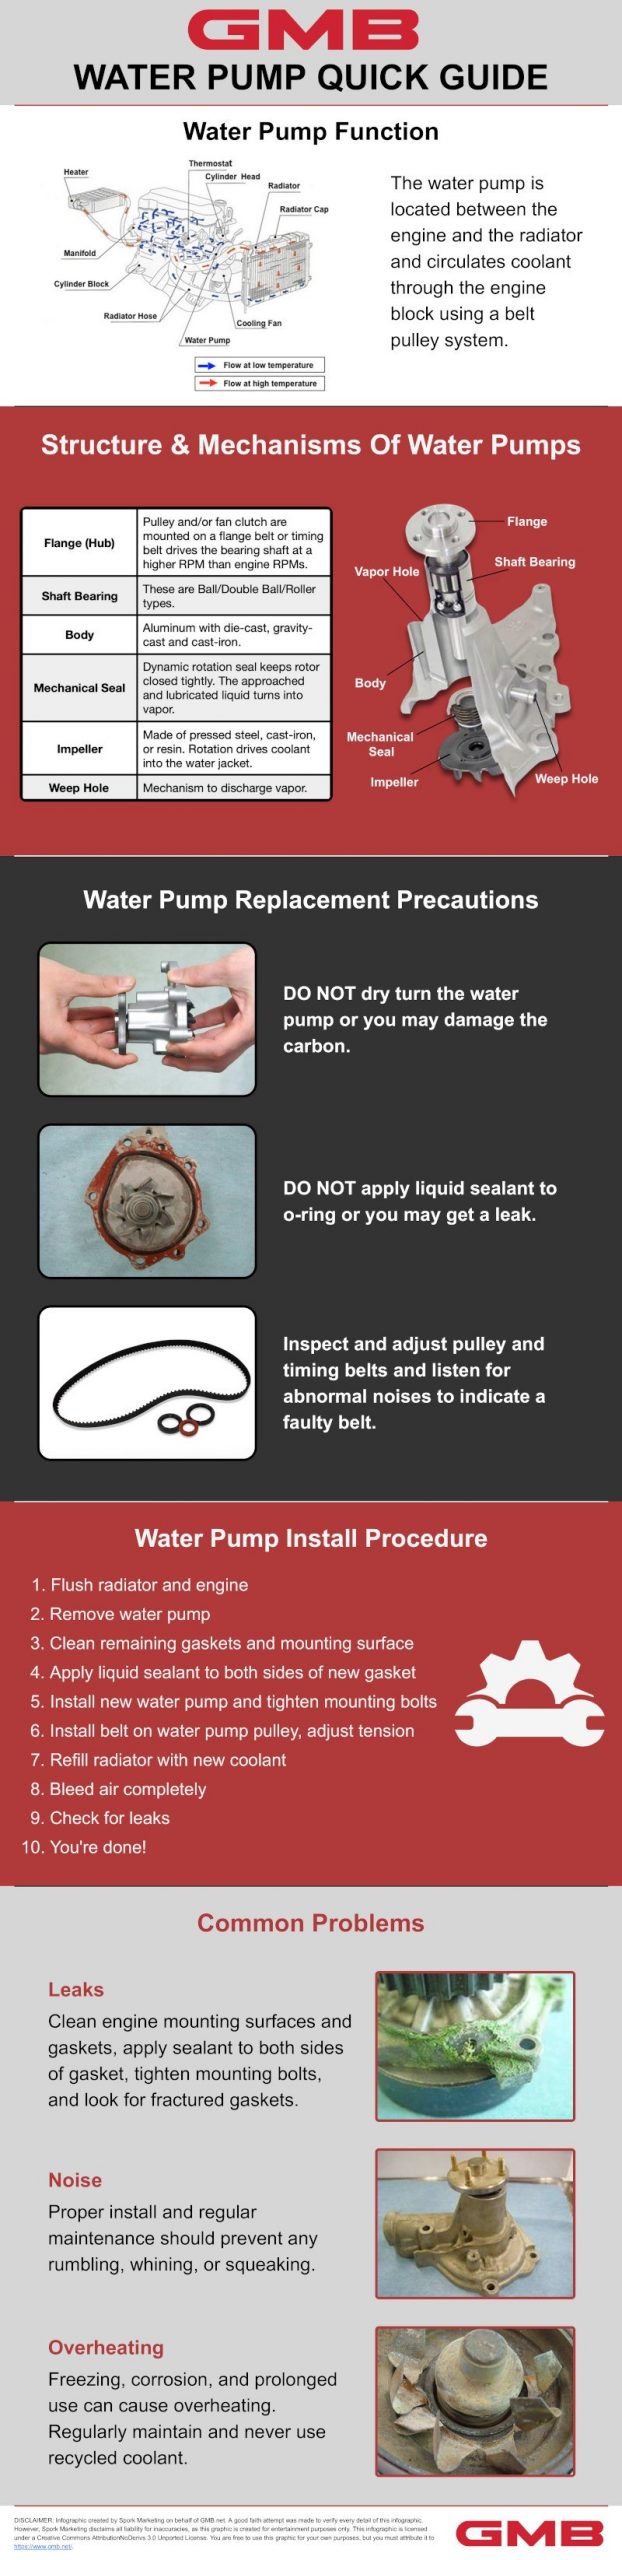
A failing water pump can quickly spiral into a major problem. In vehicles, it circulates coolant to prevent your engine from overheating and seizing. In homes with wells, it delivers water under pressure to every tap. When either pump fails, you face either a destroyed engine or dry taps. This guide walks you through step-by-step diagnostic methods to determine if your water pump is truly the culprit, so you can fix it before disaster strikes.
You’ll learn how to identify warning signs in both automotive and residential systems, perform hands-on tests to confirm failure, and know exactly when replacement is necessary. No guesswork, just clear diagnostics backed by practical procedures.
Signs Your Automotive Water Pump Is Failing
Engine Overheating Despite Full Coolant
The most critical warning sign is your temperature gauge climbing into the red zone, especially during idling or low-speed driving. This happens even when your coolant reservoir is full because the pump has stopped circulating fluid through the engine and radiator. Left untreated, overheating leads to warped cylinder heads, blown head gaskets, or complete engine seizure.
However, overheating alone does not guarantee a bad pump. A stuck thermostat, clogged radiator, or failed cooling fan can cause identical symptoms. Use this sign as a strong clue, then confirm with additional tests.
Coolant Leaking from the Weep Hole
Look for green, orange, pink, or yellow puddles beneath the front-center of your engine. This leak likely originates from the weep hole, a small vent built into the pump that allows controlled leakage when internal seals fail. You might also notice white chalky deposits or sticky residue around the pump housing.
Place a white cardboard sheet under your vehicle overnight to catch subtle seeps. Any leak from this area means the mechanical seal is compromised and replacement is necessary.
Unusual Noises from the Front of the Engine
Listen for whining, grinding, squealing, or churning sounds that change with engine speed. A high-pitched whine typically indicates worn bearings. A low grinding noise signals advanced bearing failure or the impeller contacting the housing.
Use a mechanic’s stethoscope or press a long screwdriver against the pump body while the engine idles. If the noise intensifies with RPM, the pump is failing. Be careful not to confuse this with alternator or AC compressor sounds.
No Heat from Cabin Vents
Weak or cold air from your heater, even when the engine is fully warmed up, can indicate poor coolant flow. The heater core relies on hot fluid pushed by the water pump. If flow is restricted due to a damaged impeller, heating suffers.
This symptom alone is not definitive, as a clogged heater core or air in the system can cause identical results. Use it as one piece of evidence among several.
Check Engine Light with Overheat Codes
Your vehicle’s computer monitors temperature and can trigger codes when overheating occurs. Common trouble codes include P0217 (engine overtemperature), P0128 (thermostat rationality issue), and P0116 (coolant temperature sensor performance).
Scan these codes using an OBD2 tool available free at auto parts stores. If you find P0217 with no other explanation, suspect the water pump. Remember that absence of codes does not rule out pump failure.
Wobbly Pulley or Excessive Shaft Play
With the engine off and completely cool, remove the drive belt and grab the water pump pulley. Check for in-and-out movement (axial play) or side-to-side wobble (radial play). Any detectable looseness indicates the internal bearings have failed.
This test is highly reliable even when there is no noise or visible leak. Replace immediately if you feel movement.
How to Test an Automotive Water Pump
Observe Coolant Flow with Radiator Cap Removed
This test confirms actual circulation. Perform only on cold engines with accessible radiator caps, not sealed systems.
Remove the radiator cap safely, start the engine, and let it warm up. Once the thermostat opens around 90°C, rev to 1,500-2,000 RPM and look into the radiator neck. You should see swirling or rising coolant. No movement indicates a broken impeller, snapped shaft, or air lock.
Never remove the cap on a hot engine due to risk of scalding from pressurized steam.
Feel the Upper Radiator Hose for Pressure Pulse
A working pump creates measurable pressure. Warm the engine (without overheating), then squeeze the upper radiator hose while an assistant revs the engine to 2,000-2,500 RPM. Feel for a surge or stiffening in the hose.
A strong pulse means coolant is moving. No change suggests pump failure, belt slippage, or impeller damage. This quick check takes about 30 seconds and often reveals flow problems.
Perform a Cold Start Flow Test
Start with a cold engine, remove the radiator cap, and rev to 1,500 RPM. Watch the filler neck for coolant rising or flowing out slightly. Nothing moving suggests pump failure or blockage.
Field mechanics confirm this method works well on older vehicles with open radiator systems.
Bleed Air from the Cooling System
Air pockets mimic pump failure and cause overheating after coolant refills, cold heater despite hot engine, or bubbling in the overflow tank. To burp the system, park on a slight incline with front higher, remove the cap (cold engine), fill the radiator to the top with 50/50 antifreeze mix, run the engine with heater on max, and gently rev in intervals. Top off coolant as the level drops.
Some vehicles have dedicated bleeder valves. Check your service manual for specific procedures.
Test for Exhaust Gases in the Radiator
A blown head gasket can cause overheating that looks like pump failure. Use a combustion leak tester with blue fluid placed over the radiator neck (cold engine). Run the engine at idle and watch the fluid color.
Blue staying blue means the test passes. Turning yellow or green indicates exhaust gases are present, signaling a head gasket or cracked block, not a pump problem.
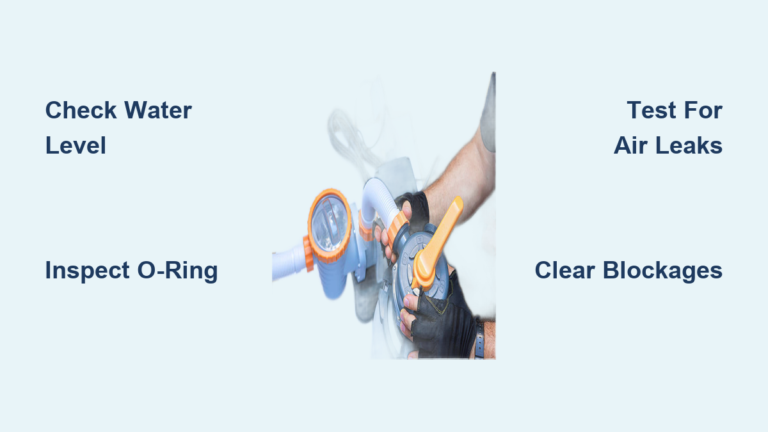
Pressure Test the Cooling System
Attach a hand-pump pressure tester to the radiator or surge tank. Pump to 13-18 psi (check your vehicle specifications) and watch the gauge for 10-15 minutes. Inspect for seepage at the weep hole, hoses, or joints.
Pressure holding steady means the system is sealed. Pressure dropping indicates a leak somewhere in the system, including potentially the water pump area.
Signs of a Failing Residential Water Pump
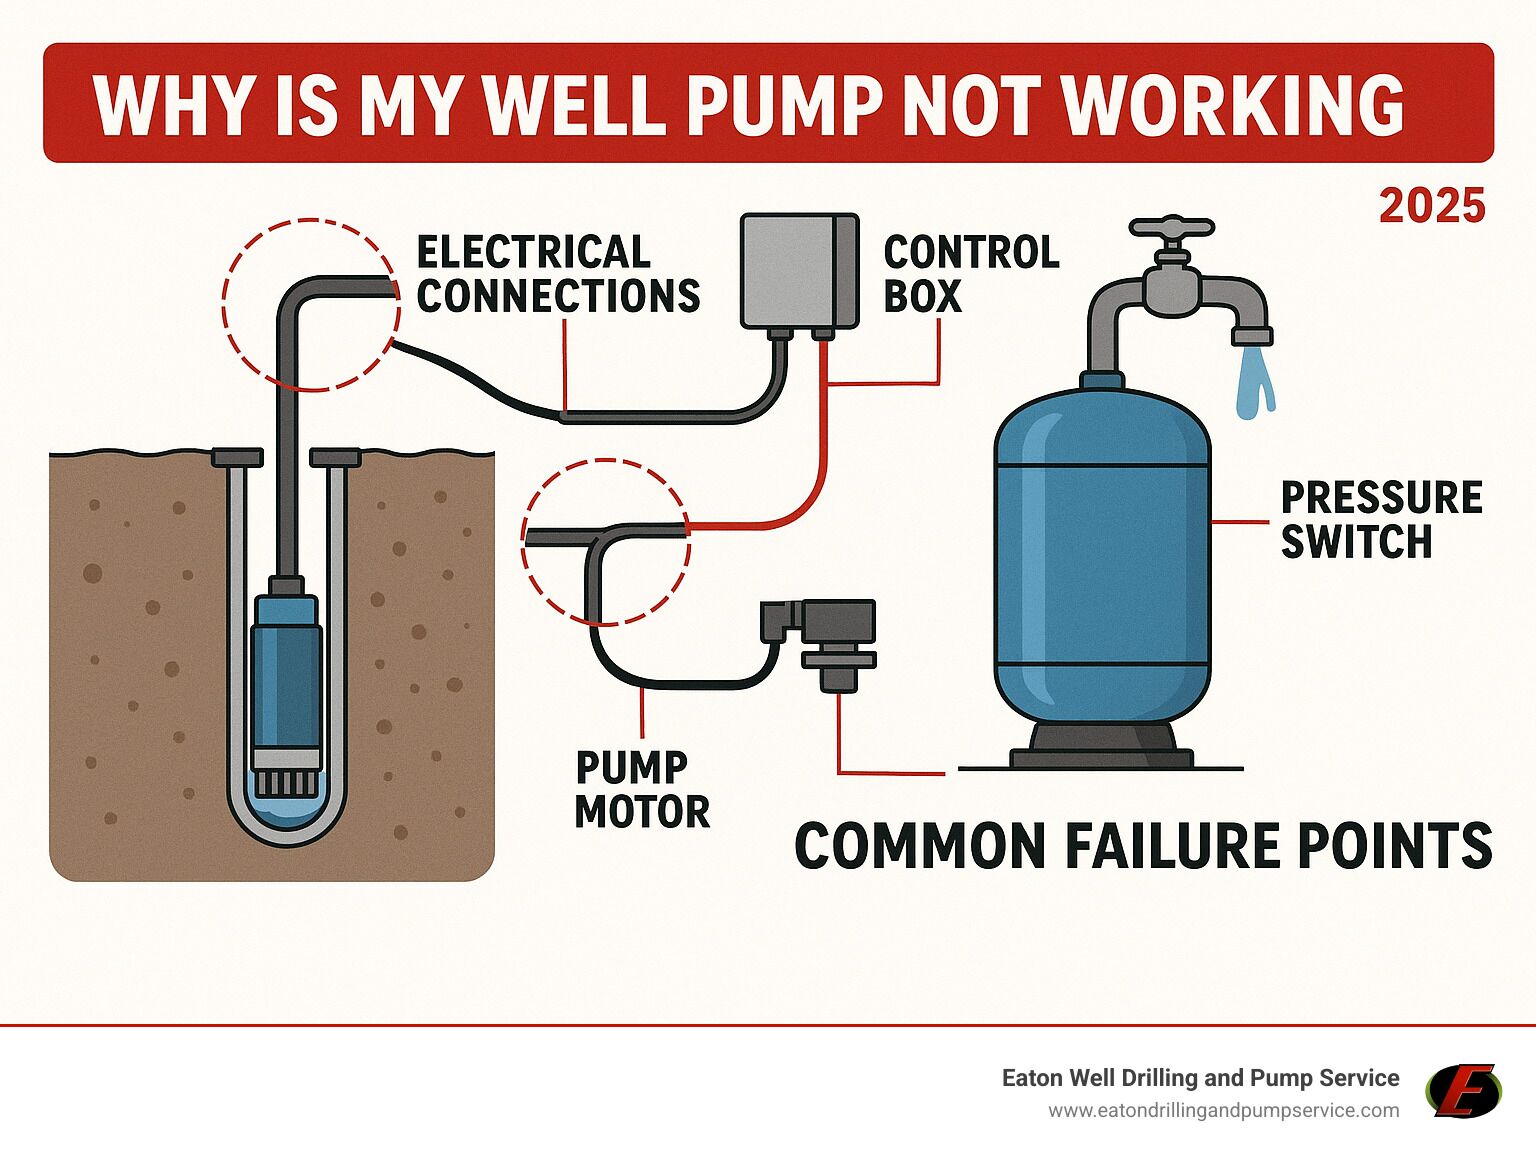
No Water Pressure at Taps
If faucets sputter or produce no water, the pump may not be running. Check the pressure gauge. If it reads zero, the system is not pressurizing. First rule out a dry well or closed valve. If those are fine, the issue lies in the pump system itself.
Silent Pump When You Open a Tap
When you open a tap, you should hear the pump kick on immediately. Silence means no power reaching the pump, a tripped breaker, a burned-out motor, or a dry-run shutdown. Go to the pressure switch and listen. No click or hum is a red flag.
Pump Cycles On and Off Rapidly
Short-cycling, where the pump turns on and off every few seconds, means it cannot build pressure. Common causes include a waterlogged pressure tank (no air cushion), a faulty pressure switch, or a leak in the drop pipe.
This pattern wears out the motor quickly. Address it immediately.
Tripped Breaker or Blown Fuse
Check your electrical panel. If the pump breaker trips or fuse blows, it indicates motor overload, a short circuit, or a ground fault. Reset once if it trips again, but do not keep resetting. There is a serious underlying issue that needs investigation before restoring power.
How to Diagnose a Submersible Well Pump
Verify Power Reaches the Pump
Safety first. Turn off power at the disconnect. Use a multimeter to confirm less than 1 volt at the terminals. Turn power back on and test voltage at the control box and pump leads. You should see 230V (or 115V for smaller systems).
No voltage means the problem is in the wiring, breaker, or switch, not the pump itself.
Inspect and Clean the Pressure Switch
The pressure switch turns the pump on and off based on system pressure. Shut off power, open the housing, and look for pitted or burned contacts, carbon buildup, or oxidation. Clean contacts with 220-400 grit sandpaper. Replace the switch if contacts are fused or severely eroded.
The large adjustment nut raises both cut-in and cut-out pressures. The small nut changes the differential. Typical settings are 40 psi on, 60 psi off.
Test the Capacitor
Capacitor failure is one of the top reasons pumps stop suddenly. Visually check for bulging, cracking, leaking fluid, or an exploded casing. If any of these exist, replace immediately.
For a functional test, discharge the capacitor with an insulated screwdriver, then set your multimeter to capacitance (µF). Compare the reading to the rated value. Within 10% passes. Out of spec, open, or shorted means replacement is needed.
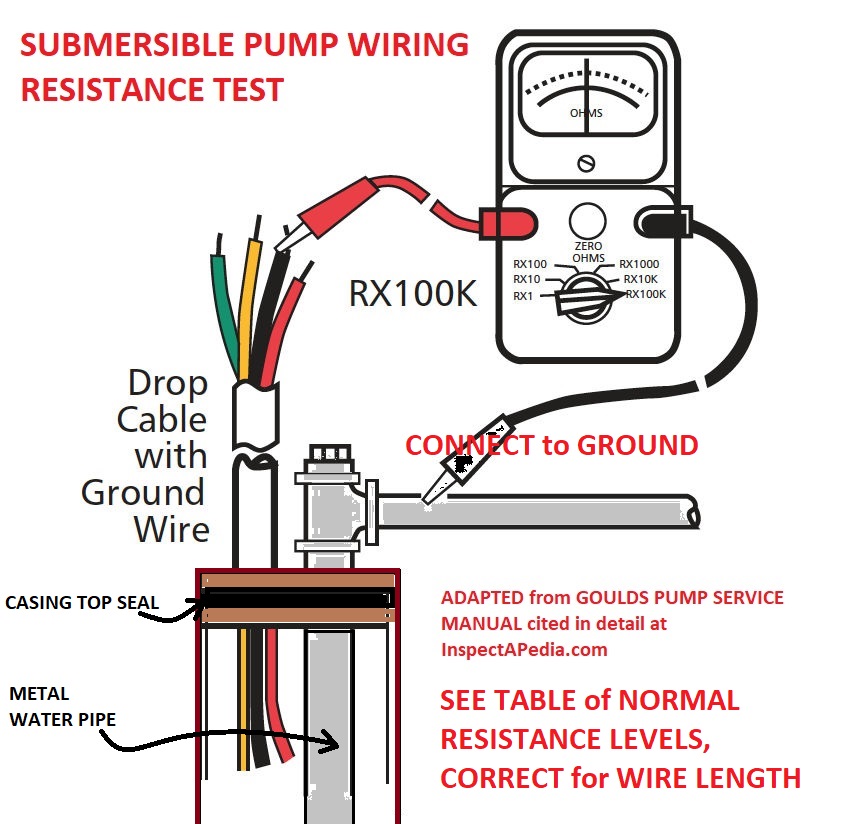
Check Motor Winding Resistance
Disconnect leads from the control box and measure resistance with an ohmmeter. For a 1/2 HP, 230V motor, black-yellow should read 4.6-5.2 ohms and red-yellow should read 16.7-20.5 ohms.
Infinite (OL) means an open winding (motor failed). Zero ohms means a shorted winding. Either result requires pump replacement.
Install Dry-Run Protection
Running a submersible pump dry destroys it. Without water to cool it, the motor overheats within minutes. A dry-run protector monitors current draw and cuts power within seconds when the well runs dry.
Install one if your system lacks this protection. It is cheap insurance against catastrophic pump failure.
Common Mistakes When Diagnosing Water Pump Problems
Assuming Overheating Always Means a Bad Pump
Many jump to conclusions when the engine runs hot. Other causes include a stuck thermostat, clogged radiator, failed cooling fan, blown head gasket, or air in the system. Always rule these out before replacing the pump.
Assuming No Water Flow Means Pump Failure
In residential systems, no pressure could stem from a tripped breaker, faulty pressure switch, waterlogged tank, dry well, or a leak in the drop pipe. Test electrical components and tank air charge before pulling the pump.
Confusing Pump Noises with Other Components
Whining or grinding might come from the alternator, AC compressor, idler pulley, or tensioner. Use a stethoscope or screwdriver to isolate the source. Do not condemn the water pump without confirmation.
Maintenance Tips to Prevent Water Pump Failure
Replace Coolant on Schedule
Old coolant turns acidic and eats away seals and impellers. Replace every 30,000-60,000 miles or 3-7 years, depending on type. Always use a 50/50 antifreeze-water mix.
Flush the System If Sludge Is Present
Rusty or gel-like coolant clogs passages and wears pumps quickly. Drain and flush the system if you see sludge. Replace the radiator if it is heavily clogged.
Replace the Pump with the Timing Belt
On interference engines, the water pump is often driven by the timing belt. If the pump seizes, it can break the belt and destroy the engine. Replace both at the same time, typically at 90,000-105,000 miles.
Use High-Quality Replacement Pumps
Avoid cheap aftermarket pumps with plastic impellers, weak seals, or poor bearings. They often fail within 20,000-30,000 miles. Choose OEM or premium brands like Aisin, Gates, or Bosch.
Inspect Residential Pump Components Annually
For well systems, check pressure switch contacts, test or replace the capacitor every 5-7 years, inspect wiring for corrosion, and consider installing a sediment filter to protect the pump.
When to Replace Your Water Pump
Automotive: Replace If You Observe These Signs
Replace the pump if you see coolant leaking from the weep hole, pulley wobble, consistent overheating with full coolant, bearing noise, or a known plastic impeller. Even if the pump is not yet dead, replace it proactively during timing belt service.
Residential: Replace If Testing Reveals These Results
Replace the submersible pump if windings test open or shorted, the motor hums but produces no pressure, the pump runs but delivers no water, or you experience repeated capacitor failures. Most submersible pumps last 8-15 years.
Final Checklist: Is Your Water Pump Working?
| Test | What to Do | Failure Signs |
|---|---|---|
| Leak inspection | Look under car or at weep hole | Green, orange, or pink fluid |
| Pulley play test | Wiggle pulley with belt off | Any in/out or side-to-side movement |
| Noise check | Listen at idle and while revving | Whining or grinding that changes with RPM |
| Flow test | Watch radiator with cap off after warmup | No coolant movement |
| Hose pulse test | Squeeze upper hose while someone revs | No pressure surge |
| Overheat check | Monitor temperature gauge | Consistently climbs into red |
| Heater test | Run max heat after engine warms | Blows cold or lukewarm air |
| OBD2 scan | Read codes with scanner | P0217 or related overheat codes |
| Capacitor test (residential) | Check µF and visual appearance | Bulging, leaking, or out of spec |
| Winding test (residential) | Measure resistance between wires | Infinite, zero, or out-of-range ohms |
Frequently Asked Questions About Water Pump Diagnostics
How do I know if my water pump is bad without removing it?
Look for visible leaks near the pump, unusual noises, engine overheating, and check for pulley wobble. You can also perform the upper hose pressure pulse test or observe coolant flow with the radiator cap off.
Can a water pump fail without leaking?
Yes. The impeller can break, the shaft can snap, or bearings can fail without external leaks. Overheating and poor heater performance often appear before visible leaks develop.
What happens if I keep driving with a bad water pump?
Continuing to drive risks severe engine damage. Overheating leads to warped cylinder heads, blown head gaskets, and ultimately complete engine seizure. Repair it immediately.
How long does a water pump typically last?
Automotive water pumps usually last 60,000-100,000 miles. Submersible residential pumps last 8-15 years with proper maintenance.
Can I test my water pump with the engine running?
Yes, but only for specific tests like the hose pulse test or observing coolant flow. Never remove the radiator cap on a hot engine. Always prioritize safety.
Key Takeaways for Checking Your Water Pump
Diagnosing a failing water pump requires systematic testing. In vehicles, watch for overheating, coolant leaks from the weep hole, unusual noises, and pulley wobble. Perform the flow test and hose pulse test to confirm circulation. In residential systems, check for no pressure, silent operation, rapid cycling, and tripped breakers. Test the capacitor and motor windings to pinpoint electrical failures.
Replace automotive pumps proactively during timing belt service and use quality replacement parts. For wells, install dry-run protection and perform annual inspections. A failing pump left unchecked leads to catastrophic engine damage or total water loss. Use these diagnostic methods to act early and avoid expensive repairs.