
Is your well pump turning on every few minutes or failing to build adequate pressure? An improperly adjusted pressure switch is likely the culprit. The water pump pressure switch controls when your pump activates (cut-in) and deactivates (cut-out), maintaining consistent water pressure while protecting your motor from wear. Most residential systems run at standard settings like 30/50 or 40/60 PSI, but household needs and system changes may require adjustment over time. This guide walks you through safely adjusting your pressure switch, diagnosing common problems, and optimizing performance without risking damage to your pump or plumbing.
Know Your Pressure Settings
Understand Cut-In and Cut-Out Points
The cut-in pressure marks when your pump turns on, typically set at 30 or 40 PSI. The cut-out pressure is when the pump shuts off, usually 20 PSI higher. A 30/50 system means the pump starts at 30 PSI and stops at 50 PSI. This 20 PSI difference is called the differential, and it prevents short cycling while ensuring efficient operation. If your pump kicks on every few minutes, the differential may be too narrow. If it struggles to reach the cut-out point and run continuously, the setting may be too high for your pump’s capacity.
Standard Factory Presets
Most switches arrive with factory presets clearly labeled inside the switch cover:
• 30/50 PSI: Standard for jet pumps and small homes
• 40/60 PSI: Ideal for two-story homes requiring stronger pressure
• 20/40 PSI: Used in irrigation or low-demand systems
Always verify your current settings with a pressure gauge rather than assuming they match the label.
Identify the Adjustment Nuts
Locate the Two Spring Nuts
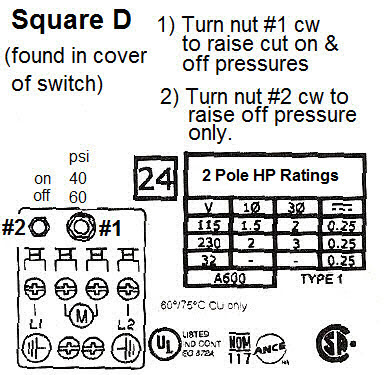
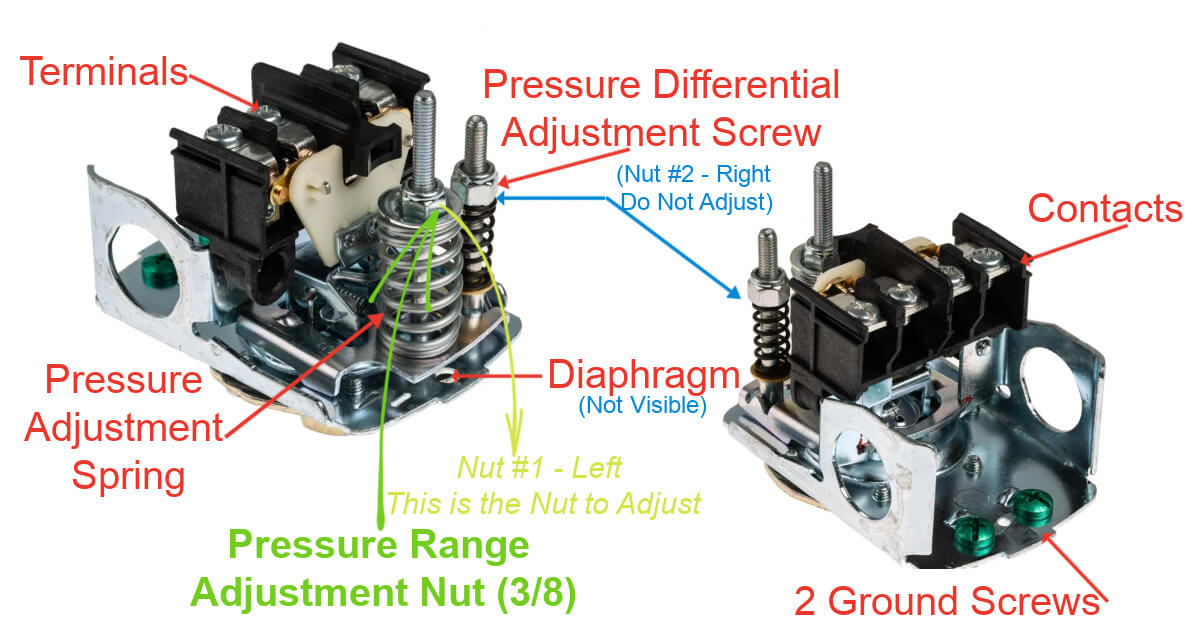
Your pressure switch contains two internal springs with adjustment nuts that control operation:
• Large center nut (Nut #1): Adjusts both cut-in and cut-out pressures simultaneously
• Small side nut (Nut #2): Changes only the cut-out pressure, altering the differential
On Square D and similar models, both nuts are accessible using a 3/8-inch deep socket. Turning clockwise increases pressure, while counter-clockwise decreases it.
How Each Nut Functions
Large Nut Controls Pressure Range
Turning the large center nut shifts the entire pressure window up or down. For example, three to four clockwise turns can change a 30/50 system to 40/60. Each full turn adjusts pressure by 2 to 3 PSI. This nut sets your system’s baseline performance.
Small Nut Controls Differential
Turning the small side nut fine-tunes how long the pump runs. Clockwise turns raise the cut-out pressure only, widening the differential. Two turns might shift 30/50 to 30/55, increasing the differential from 20 to 25 PSI. Keep the differential between 10 and 30 PSI for optimal cycling.
Pro Tip: Always adjust in ½ to 1-turn increments and test after each change. Small tweaks produce big results.
Step-by-Step Adjustment Process
Power Off and Prepare
Turn off electricity at the breaker before touching the switch. The terminals carry 240V and can cause serious shock. Use a voltage tester to confirm power is off. Never work on a live switch.
Remove the Switch Cover
Unscrew or unclip the grey outer cover to expose the internal springs and nuts. Some models have a lever or clip that must be removed carefully to access adjustment points. Set the cover aside safely.
Measure Current Pressure
Reconnect power and install a 0 to 100 PSI pressure gauge on a tank valve or faucet. Let the pump cycle two to three times and record:
• Cut-in pressure (when pump starts)
• Cut-out pressure (when pump stops)
This baseline tells you where you are starting. Never adjust blindly.
Adjust the Pressure Range (Nut #1)
To increase both pressures:
• Turn the large center nut clockwise in ½-turn increments
• Example: three to four turns can raise 30/50 to 40/60
To decrease both pressures:
• Turn counter-clockwise
Wait for the pump to cycle after each adjustment. Check the gauge to confirm changes.
Adjust the Differential (Nut #2)
To widen the differential (longer pump run time):
• Turn the small side nut clockwise
To narrow it:
• Turn counter-clockwise
For a 30/50 system needing longer runtime, turn Nut #2 clockwise to reach 30/60. Avoid going below 10 PSI differential, as this causes short cycling and pump wear.
Recheck and Secure Settings
Once you reach your target (for example, 40/60), let the pump cycle two to three times. Confirm the cut-in and cut-out match your gauge readings. Then:
• Tighten both nuts securely to prevent vibration drift
• Replace the cover
• Restore full power
Optimize for Your Application
Choose the Right Pressure Setting
| Application | Recommended Setting | Why It Works |
|---|---|---|
| Single-story home | 30/50 or 40/60 PSI | Balances flow and system safety |
| Two+ story home | 40/60 or 50/70 PSI | Compensates for elevation loss |
| Irrigation system | 20/40 or 30/50 PSI | Reduces pump wear, adequate flow |
| Large pressure tank | 25/60 PSI | Minimizes cycling frequency |
Warning: Never set cut-out pressure above your pump’s maximum head capacity. If the pump cannot reach the set pressure, it will run continuously, a condition called deadhead that leads to motor burnout.
Match Tank Air Pressure
Your pressure tank’s air charge must support the switch settings:
- Drain the tank completely by opening a faucet
- Check air pressure at the tank’s air valve with a gauge
- Set pressure to 2 PSI below cut-in (30 PSI cut-in requires 28 PSI tank charge)
- Recharge with an air compressor if needed
- Close the faucet and restore power
This 2 PSI buffer prevents short cycling and ensures smooth pump starts.
Fix Common Problems
Pump Runs Continuously
Cause: Cut-out pressure too high (deadhead), waterlogged tank, or ruptured bladder
Fix:
• Turn Nut #2 counter-clockwise to lower cut-out pressure
• Check tank air charge and repressurize if low
• Drain tank and retest air pressure; if water sprays from the valve, the bladder is ruptured and the tank must be replaced
Pump Cycles Too Frequently
Cause: Narrow differential, low tank air, or waterlogged tank
Fix:
• Adjust Nut #2 to widen differential to 20 PSI
• Drain tank and set air charge to 2 PSI below cut-in
• Clean the switch’s inlet nipple, as sediment can block pressure sensing
Low Water Pressure
Cause: Low cut-in setting, clogged switch, or failing pump
Fix:
• Increase range using Nut #1
• Remove and clean the switch nipple, as mineral buildup restricts pressure transmission
• Inspect pump output; if weak, the pump may need service
No Pump Activation
Cause: Power failure, tripped breaker, or faulty switch
Fix:
• Confirm power at the breaker and switch terminals
• Test switch continuity with a multimeter
• Check for debris in the diaphragm; clean or replace switch if needed
Erratic Pressure Behavior
Cause: Sediment in switch, worn springs, or temperature effects
Fix:
• Remove and clean the inlet screen on the diaphragm
• Replace the switch if springs feel loose or settings drift constantly
• Older switches lose tension, making replacement often better than repair
Maintenance and Safety Tips
Inspect the Switch Nipple Regularly
The small pipe connecting the switch to the water line can clog with sediment. Remove it and flush out debris. A clogged nipple causes false pressure readings and erratic cycling.
Test for Spring Fatigue
Over time, springs weaken and settings drift. If your switch has never been adjusted but performance is poor, the springs may be worn. Replacement switches like Square D cost under $30 and restore reliable control.
Use Proper Tools
You will need:
• 3/8-inch deep socket or nut driver
• 0 to 100 PSI water pressure gauge
• Air pressure gauge and compressor for tank adjustment
Never guess. Always measure.
Real-World Adjustment Example
Problem: 42/50 PSI Setting Causes Short Cycling
Pump starts at 42 PSI and stops at 50 PSI, creating only an 8 PSI differential. This narrow gap causes frequent cycling that stresses the motor.
Solution:
- Power off the system
- Turn Nut #1 (large nut) counter-clockwise three to four turns to lower cut-in to 30 PSI
- Restore power; pump should now start at 30 PSI
- If cut-out is below 50, turn Nut #2 (small nut) clockwise slightly to raise it to 50
- Final setting: 30/50 PSI with 20 PSI differential
- Adjust tank air to 28 PSI
Result: longer pump runs, fewer cycles, and extended equipment life.
Expert Insight: Some users successfully adjust only the large nut, especially with large tanks. When differential is too narrow, adjusting both nuts is essential.
When to Replace Instead of Adjust
Signs the Switch Needs Replacement
• Corrosion or pitting on terminals
• Burn marks or melted plastic
• Loose or wobbly springs
• Settings won’t hold after adjustment
• Frequent tripping despite correct settings
A new switch costs less than a new pump. If your switch is over 10 years old or shows any of these signs, replace it.
Final Best Practices
Always Use a Pressure Gauge
Never rely on factory labels or assumptions. A calibrated gauge is the only way to know your true cut-in and cut-out pressures.
Adjust in Small Increments
Large turns cause overshoot. Use ½ to 1-turn adjustments and test after each cycle.
Prioritize System Balance
Match your:
• Switch settings
• Tank size
• Air charge
An unbalanced system leads to premature failure.
Upgrade for Protection
Consider a switch with low-pressure cut-off to prevent dry-running if the well runs low.
Inspect the Well Pit
Ensure it is dry, clean, and code-compliant. A flooded pit risks electrical hazards and contamination. Modern codes require the well casing to extend above ground.
Frequently Asked Questions About Adjusting Water Pump Pressure Switch
What do the two nuts on a pressure switch do?
The large center nut adjusts both cut-in and cut-out pressures together, shifting the entire operating range. The small side nut adjusts only the cut-out pressure, changing the differential between start and stop points.
How do I know if my pressure switch needs adjustment?
Common signs include short cycling (pump starts and stops frequently), continuously running pump, or low water pressure. Check your actual pressures with a gauge to confirm the settings differ from your target.
What happens if the differential is too narrow?
A differential below 10 PSI causes short cycling, which strains the pump motor, increases wear, and wastes energy. The pump starts and stops too quickly to build proper pressure.
Can I damage my pump by adjusting the pressure switch?
Yes. Setting cut-out pressure higher than your pump’s maximum head capacity causes deadhead, where the pump runs continuously without reaching the shut-off point. This leads to overheating and motor burnout. Always verify your pump’s specifications before adjusting.
How often should I check my pressure tank air charge?
Check annually or whenever you experience cycling problems. The tank air charge should always be 2 PSI below the cut-in pressure to prevent short cycling and ensure smooth pump operation.
When should I replace rather than adjust my pressure switch?
Replace the switch if you see corrosion, burn marks, loose springs, or cannot maintain settings despite correct adjustments. Switches over 10 years old often lose spring tension and perform better with replacement.
Key Takeaways for Adjusting Your Water Pump Pressure Switch
Proper adjustment of your water pump pressure switch can restore strong water pressure, reduce cycling frequency, and extend the life of your entire well system. Always measure before adjusting using a calibrated pressure gauge, and make changes in small half-turn increments. The large nut controls the overall pressure range while the small nut fine-tunes the differential. Keep your differential between 10 and 30 PSI, and match your tank air charge to 2 PSI below cut-in for optimal performance.
If your switch shows signs of age, corrosion, or cannot hold settings, replacement is safer and more reliable than adjustment. A new switch costs under $30 and provides peace of mind along with consistent water pressure for years to come.


