
If your water pump float switch isn’t working, water levels can rise unchecked, risking basement flooding, pump burnout, or septic system failure. This small device controls when your sump or effluent pump turns on and off, and when it fails, the consequences are serious. Whether you’re dealing with a silent pump during heavy rain or an alarm that won’t shut off, the problem often lies with the float switch.
Most issues stem from simple causes: debris blocking the float, corrosion, or a waterlogged switch. The good news? Over 50% of float switch problems can be resolved with cleaning or adjustment, no replacement needed. But if ignored, a faulty float can lead to $5,000 or more in water damage. This guide gives you a step-by-step plan to diagnose, repair, or replace your float switch safely and effectively.
Identify the Float Switch Type
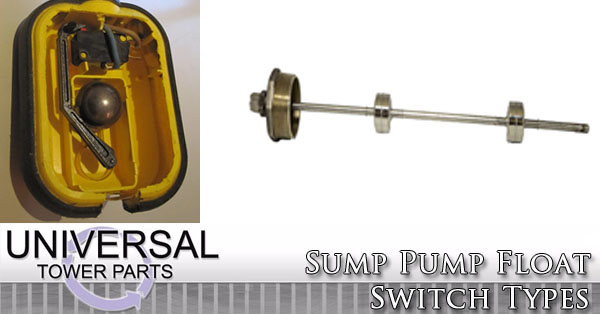
Knowing your float switch design is key to accurate troubleshooting. Different types fail in different ways and require specific fixes.
Tethered Float Switches
These floats dangle freely and swing up with rising water. They’re less likely to bind than vertical models and are common in modern sump pumps.
What to look for:
– A round or oblong plastic ball hanging on a cord
– Free swing path without touching walls or pipes
Common failure signs:
– Tangling on pipes or discharge lines
– Frayed wires near the float
– Slow or delayed response times
Pro tip: Ensure the tether has full swing range. Any contact with walls or discharge pipes can prevent proper activation.
Vertical Float Switches
Compact and guided by a rod, these fit in tight pits but are prone to sticking and seal failure.
What to look for:
– A cylindrical float sliding up and down a metal pole
– Guide rod mounted vertically alongside the pump
Common failure signs:
– Sludge buildup on the rod restricting movement
– Cracked seals letting water into the housing
– Jerky or incomplete movement
Watch out: Failed rubber gaskets allow water into the housing, causing electrical shorts and complete failure.
Lever-Arm Mechanical Switches
Older or industrial models use a rigid arm that lifts with water to trigger the switch.
What to look for:
– A hinged plastic arm attached to the pump body
– Visible pivot point with metal components
Common failure signs:
– Bent arms from impact or wear
– Corroded pivots causing stiffness
– Internal switch wear reducing reliability
Check this: Arm clearance. The lever must move freely without rubbing against the pump housing or pit walls.
Diagnose Common Failure Causes
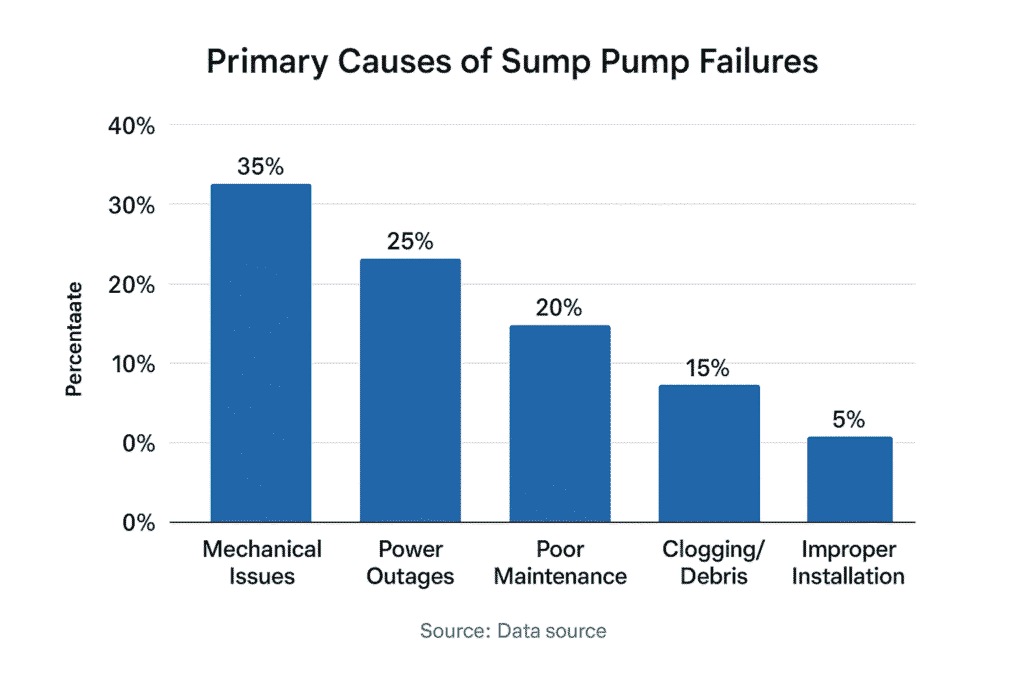
Start with the most likely issues. A systematic check prevents wasted time and unnecessary replacements.
Debris Blocking Float Movement
This is the number one cause of float switch failure. Sediment, sludge, or organic matter stops the float from rising properly.
How to check:
– Unplug the pump first
– Shine a flashlight into the pit
– Manually lift the float. Does it move smoothly?
– Look for muck on the guide rod or around the float base
Quick fix:
– Remove the pump from the sump
– Use a toothbrush and clean water to scrub the float and rod
– Flush the pit if sludge is thick
– Reinstall and test the system
Real-world result: Users report this fixes over half of dead pump cases without any part replacement.
Float Is Waterlogged or Cracked
A damaged float sinks instead of floating, so it never triggers the pump to start.
How to test:
– Take the float out of the water
– Shake it vigorously
– If you hear sloshing inside, the float is compromised
What to do:
– Replace the float immediately
– Use all-plastic or UV-resistant models if exposed to sunlight
– Avoid cheap PVC floats. They crack faster in cold conditions.
Corrosion or Seal Failure
Moisture and chemicals eat away at metal parts and rubber seals, especially in septic or high-mineral water systems.
Warning signs:
– Rust on hinges or terminals
– Cloudy or wet interior in the switch housing
– Stiff movement despite clean exterior
Action steps:
– Inspect all pivot points and wire connections
– Check for swollen or brittle rubber gaskets
– If corrosion is inside the housing, the switch is already failing. Replace it.
Manufacturer note: Some brands recommend replacing floats every 3 years due to inevitable seal degradation.
Electrical Faults in Wiring or Switch
Even if the float moves perfectly, electrical issues can block the signal from reaching the pump.
Common problems:
– Frayed or chewed wires near the float
– Loose terminals at the pump or control box
– Internal switch failure with no click sound
How to confirm:
– Plug the pump directly into power. Does it run?
– If yes, the pump motor is fine. The fault is in the float circuit.
Critical clue: Pump works manually but not automatically means the issue is in the float, wiring, or control board.
Test the Float Switch Step by Step
Use this checklist to isolate the problem safely and accurately.
Unplug Before Inspection
Always disconnect power before touching the pump or float.
Do this first:
– Turn off the circuit or unplug the pump
– Never work on live systems
– Use insulated tools if handling corroded parts
Perform Manual Lift Test
Simulate rising water to see if the switch activates properly.
What to do:
– Slowly lift the float by hand or with a stick
– Listen for a distinct click. That’s the internal switch closing
– If no click, the switch is dead
– If pump doesn’t start but you hear the click, the issue may be wiring or power
Red flags:
– Pump activates only after multiple lifts
– Float must be lifted higher than normal
– Delayed response indicates internal wear
Check for Free Movement
Binding prevents proper operation even if the switch is functional.
What to look for:
– Float rubbing against pit wall
– Tether caught on check valve or discharge pipe
– Bent guide rod in vertical models
Fix it:
– Reposition the pump so the float swings freely
– Secure discharge pipe with a strap to prevent shifting
– Straighten or replace damaged guide rods
Test Continuity with a Multimeter
This is the most reliable way to confirm switch function.
Step-by-step:
1. Set multimeter to continuity or ohms mode
2. Disconnect wires from the float switch
3. Touch probes to the two terminals
4. Move float to the up position. Should show continuity or low resistance
5. Move float to the down position. Should show open circuit or infinite resistance
6. No change means the switch is faulty
Bonus check: Test for voltage at the float terminals when powered. No voltage means the problem is upstream at the breaker, GFCI, or control panel.
Repair or Replace: Make the Right Call

Some issues can be fixed. Others demand replacement.
Clean and Reuse If Possible
When it works:
– Float is dirty but intact
– Movement is restored after cleaning
– Electrical test passes after cleaning
How to do it:
– Remove pump from sump
– Disassemble float if serviceable
– Clean pivot points, rod, and housing
– Reassemble and test
User success: Multiple homeowners fixed their system with just a toothbrush and 10 minutes.
Adjust Float Position for Proper Timing
Wrong height settings cause premature activation or dangerous delays.
Calibration guidelines:
– Pump turns on when water is 2 to 3 inches above pump intake
– Pump shuts off when water is 1 to 2 inches below float’s rest position
– Avoid setting too low. It causes short cycling and motor wear.
Adjustment methods:
– Vertical floats: Slide adjustable collars up or down
– Tethered floats: Shorten or lengthen the tether
– Lever-arm: Reposition mounting bracket
Pro tip: Test with a ruler after adjustment. Mark levels on the pit wall for consistency.
Replace the Float Switch Only
You don’t always need a new pump. Sometimes only the switch is faulty.
When to replace only:
– Pump motor runs fine when bypassed
– Float switch fails continuity test
– Housing is cracked or waterlogged
Options:
– Standalone float switch kits: wire in-line with existing pump
– Brand-specific replacements: Zoeller, Liberty, Wayne offer drop-in models
– Cost: around $30, and some manufacturers offer free replacements with model number
User insight: You can just buy a replacement float and plug your existing sump into that.
Replace Internal Switch in Vertical Models
Some vertical floats can be rebuilt instead of replaced.
Repair kit includes:
– New internal switch
– Rubber gasket
– Sealing components
Steps:
1. Unplug pump and remove from sump
2. Take off cover, typically three stainless screws
3. Disconnect wires. Note colors: green to ground, blacks to switch
4. Remove old switch and clean gasket groove
5. Install new switch with fresh gasket
6. Reconnect wires and reassemble
7. Tighten screws in criss-cross pattern. Don’t overtighten
8. Test before reinstalling
Best practice: Do this before spring snowmelt or storm season.
Full Pump Replacement: When It’s Time
Don’t repair what’s already dying.
Replace pump if:
– Over 7 years old
– Motor struggles to start or overheats
– Recurring float issues
– Check valve or discharge pipe is degraded
Top models:
– Wayne Cast Iron Sump Pumps: 3-year warranty, durable construction
– Zoeller M53: Reliable, serviceable parts
– Liberty 266: Robust vertical float with replaceable switch
Installation tips:
– Most use rubber couplings and clamps, no pipe cutting needed
– Take photos of wiring before disconnecting
– Consider battery backup if in flood-prone area
Wisdom from experience: Most in New Jersey got battery backup units after Sandy, and mine saved me more than once.
Handle Septic System Alarms Correctly
Dual-float systems add complexity. Don’t confuse pump and alarm floats.
Two Floats in Septic Pumps
Septic systems typically use two separate floats:
– Pump control float: turns on effluent pump
– High-water alarm float: triggers warning if water is too high
Alarm Stays On? Possible Causes
Check these:
– Faulty alarm float switch
– Defective control panel
– Wiring fault or stuck relay
– Alarm float not resetting after pumping
How to diagnose:
– Manually lift alarm float. Does alarm sound?
– Lower it. Does alarm stop?
– If not, test switch with multimeter
– Check control box for moisture or burn marks
Important: If unsure, call a licensed septic contractor. Electrical faults in control panels are dangerous.
Prevent Future Failures
Avoid emergency calls with simple, regular care.
Follow a Maintenance Schedule
| Task | Frequency |
|---|---|
| Visual inspection | Every 3 months |
| Manual float test | Every 3 months |
| Clean sump pit | Annually or after storms |
| Check wiring | Annually |
| Replace float switch | Every 3 years |
| Inspect check valve | Annually |
Pro tip: Looks like you don’t have a check valve. It helps prevent water from flowing back into the pit.
Upgrade for Reliability
Boost system resilience with smart additions.
Recommended upgrades:
– Durable float switches: all-plastic or stainless steel with sealed electronics
– Sump pump alarm: alerts you to failures early
– Battery backup pump: runs during power outages
– Smart monitors: send alerts to your phone
Expert advice: We always recommend supplementing with some kind of sump pump alarm.
Know When to DIY vs. Call a Pro
Not every fix is safe for homeowners.
DIY-Friendly Tasks
You can handle:
– Cleaning debris from sump pit
– Adjusting float position
– Replacing a float switch if comfortable with wiring
– Testing with a multimeter
Call a Professional If
Get expert help for:
– Electrical faults in control panel
– Short circuits or ground faults
– Septic system with alarm and dual floats
– Uncertainty about compatibility or wiring
Strong warning: Let a professional handle all sump pump repairs. Electrical mistakes can cause fire or electrocution.
Avoid Costly Consequences
Ignoring a bad float switch leads to disaster.
Risks of Failure
What happens:
– Basement flooding during storms
– Pump burnout from continuous running
– Mold and structural damage from prolonged moisture
– Septic overflow into yard or home
– Repair costs exceeding $5,000
Bottom line: A $30 float switch protects tens of thousands in property value.
Key Takeaways for Fixing Your Water Pump Float Switch
A working float switch is your first line of defense against water damage. Start by unplugging the pump and checking for debris, the most common cause of failure. Clean the float and pit thoroughly, then test movement manually. Use a multimeter to verify electrical continuity. Adjust float height if activation timing is off. Replace the float switch every three years as proactive maintenance. Consider installing a sump pump alarm for early warning and a battery backup pump if you live in a flood-prone area. For electrical issues, control panel problems, or septic system alarms, call a professional. Don’t wait for a flood to act. Inspect your float switch today, test it quarterly, and replace it on schedule. With the right care, your pump system will keep your home dry for years.
Frequently Asked Questions About Water Pump Float Switch Not Working
Why won’t my sump pump turn on even though the float moves?
The issue is likely electrical. Test the float switch with a multimeter for continuity. If the float moves but there’s no click sound, the internal switch is failed. Check wiring connections for corrosion or looseness. If the pump works when plugged directly into power, the problem is in the float circuit, not the motor.
How do I know if my float switch is bad?
Unplug the pump first. Manually lift the float and listen for a click. No click means the switch is dead. Remove the float and shake it. Sloshing water inside indicates a cracked or waterlogged float. Use a multimeter to test continuity in both up and down positions. No change in readings confirms failure.
Can I replace just the float switch without replacing the whole pump?
Yes. Standalone float switch kits are available for around $30 and wire in-line with existing pumps. This works if the pump motor runs fine when bypassed. Brand-specific replacements from Zoeller, Liberty, or Wayne offer drop-in compatibility. Some manufacturers provide free replacements with model number.
What causes a float switch to stick?
Debris accumulation is the number one cause. Sediment, sludge, or organic matter restricts float movement. Corrosion on pivot points and seals also causes sticking, especially in older systems or those with high-mineral water. Chemical exposure and temperature extremes accelerate material fatigue.
How often should I replace my water pump float switch?
Manufacturers recommend replacing float switches every 3 years due to inevitable seal degradation and wear. Even if the switch appears functional, proactive replacement prevents unexpected failures during heavy rain or snowmelt. Regular quarterly testing helps catch problems before they cause flooding.


