You turn on the faucet, expecting a steady stream, but instead you get a weak trickle. The shower sputters. The dishwasher won’t start. You check the pressure gauge, and it climbs to only 20 psi before stalling. Your well pump is running, yet it is not building pressure. This is a frustrating problem that leaves homeowners wondering whether the pump is dead, the tank is failed, or there’s a hidden leak somewhere in the system.
The truth is, a well pump that runs but fails to build pressure is usually not due to a catastrophic motor failure. More often, the issue lies in air intrusion, system imbalances, or failed components that disrupt the hydraulic cycle. This guide walks you through a step-by-step diagnostic process to identify whether the problem is loss of prime, a waterlogged tank, a corroded pressure switch, a failing foot valve, or a mismatched pump system, and shows you how to fix each issue.
Why Your Well Pump Runs But Won’t Build Pressure
When your pump runs but pressure stays low, the system is telling you something specific. Understanding what each symptom means narrows down the cause quickly and saves you from replacing parts that aren’t actually faulty.
The most common causes fall into a predictable hierarchy. Loss of prime ranks highest, happening when air enters the suction line and breaks the vacuum needed to lift water. Pressure tank failure comes second, where a ruptured bladder or incorrect pre-charge prevents the system from maintaining pressure between cycles. Pressure switch malfunction ranks third, as corrosion or clogging can prevent proper activation signals. System design mismatch, such as using a single-pipe pump on a deep well, also frequently causes this problem.
Diagnose and Fix Loss of Prime First
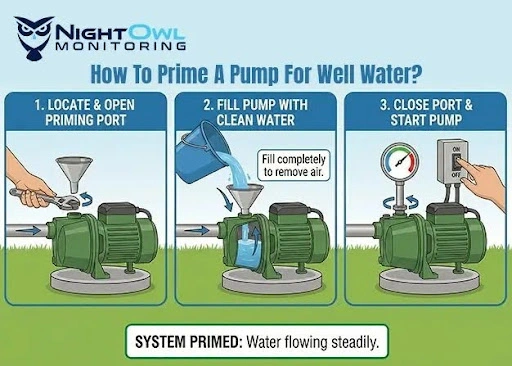
If your jet pump runs but won’t build pressure, loss of prime is the most likely culprit. Without a continuous water column in the suction line, the pump cannot create the vacuum needed to lift water from the well.
Check for Air in the System
Air breaks the siphon effect. Even a small leak in the suction line between the pump and foot valve can let air in and prevent pressure buildup.
Watch for these symptoms. The pump runs but delivers little or no water. Pressure stalls below 20 psi. You hear gurgling or sputtering sounds from pipes. You need to re-prime frequently.
Pro Tip: If you open the priming plug and find it dry minutes after starting the pump, air is entering the system faster than water can fill it.
Re-Prime the Pump Correctly
A failed priming attempt often leaves air pockets trapped. Follow this corrected procedure to ensure a solid prime.
- Turn off power at the breaker.
- Drain the pump casing completely via the priming plug.
- Remove the plug and fill the casing with clean water until it overflows.
- Replace the plug tightly.
- Restore power and observe.
Warning: Do not cycle the pump on and off rapidly. Let it run continuously for 2-3 minutes to clear air.
Use Pressurized Back-Flow to Seal the Line
Standard priming may not purge air trapped in the drop pipe. Use this advanced technique to force water backward into the line.
Close the valve to the house. Open the valve between the pressure tank and pump. Let pressurized water from the tank flow backward into the pump and suction line for 10-15 minutes. Start the pump, and the water column will already be intact.
Expert Insight: This method mimics a self-priming system and is especially useful after replacing the foot valve or pipe.
Test the Pressure Tank for Failure
Even if the pump runs perfectly, a failed pressure tank can prevent pressure from building or cause rapid cycling that mimics low-pressure symptoms.
Verify Pre-Charge Pressure
The tank must be pre-charged with air to support pressure between cycles. Follow these steps to check it correctly.
Drain the system by opening a faucet until no water flows. Use a tire gauge on the Schrader valve at the top of the tank. Check that pressure reads 2 psi below the cut-in setting. For a 40/60 psi system, this means 38 psi. For a 30/50 psi system, this means 28 psi.
Critical: Adjust pre-charge before turning water back on.
Detect a Waterlogged Bladder
A ruptured bladder fills the tank with water, eliminating the air cushion that stores pressure.
Watch for these signs. The tank feels heavy when drained. The pump cycles on and off rapidly. You hear a dull thud when tapping the tank instead of a hollow ping.
Fact: A 44-gallon tank weighs about 20 lbs empty. If it exceeds 40 lbs when drained, the bladder has failed.
Replace the Tank If Needed
Most residential tanks have non-replaceable bladders. If waterlogged, replace the entire unit with a model rated for 100 or more psi.
Inspect the Pressure Switch for Problems

The pressure switch tells the pump when to turn on and off. If it is corroded, clogged, or stuck, the system won’t reach or maintain pressure.
Look for Corrosion and Blockage
Galvanized pipe connected to a brass switch causes galvanic corrosion, especially in older systems. This buildup blocks the diaphragm and prevents proper response.
Check the switch nipple for rust or debris. Inspect the diaphragm to ensure it moves freely. Look for corrosion on electrical contacts that can prevent closure.
User Case: One homeowner found their pressure switch completely disintegrated due to corrosion, yet the pump appeared to work normally.
Test for Spark at the Contacts
Do this test with power on. Remove the switch cover. Gently flick the contacts with an insulated screwdriver. Look for a spark.
A spark means the pump is receiving power and trying to run, so the problem is mechanical, such as loss of prime or a leak. No spark indicates an electrical or switch failure.
Key Insight: A spark confirms the pump is getting electricity, so you can rule out wiring problems.
Check Suction Line and Foot Valve Integrity
A leaky suction line or failed foot valve allows water to drain back into the well, breaking prime and preventing pressure buildup.
Test Line Integrity
Turn off power. Disconnect the suction line at the pump. Pour water down the pipe toward the well. Observe whether the water level drops quickly.
If water drains quickly, you have a leak or faulty foot valve. If the level holds, the line maintains prime.
Expert Advice: If you lost prime, you probably lost the water in the line too. When you open it to re-prime, air rushes in immediately.
Confirm Foot Valve Submersion
The foot valve must remain below the water level at all times. If the water table drops below the valve, it cannot prevent backflow, and the pump cannot re-prime.
Critical Limitation: Single-pipe jet pumps can only lift water from under 25 feet. For deeper wells, a two-pipe system is required.
Rule Out Leaks in Delivery Lines
Even if the pump works perfectly, leaks in the pressure side of the system can prevent pressure from building.
Identify Above-Ground Leaks
Look for wet spots near the foundation, under the house, or in the crawl space. Listen for hissing or dripping when no water is in use. Check joints, unions, and hose bibs.
Perform a Pressure Hold Test
Pressurize the system by letting the pump run to cutoff. Close the main shut-off valve to the house. Monitor the gauge for 30 minutes.
Pressure drops indicate a leak in the pump-to-house line. Holding steady means the leak is inside the house plumbing.
Note: A small leak can bleed off enough pressure to keep the pump running constantly.
Match Pump Type to Well Depth
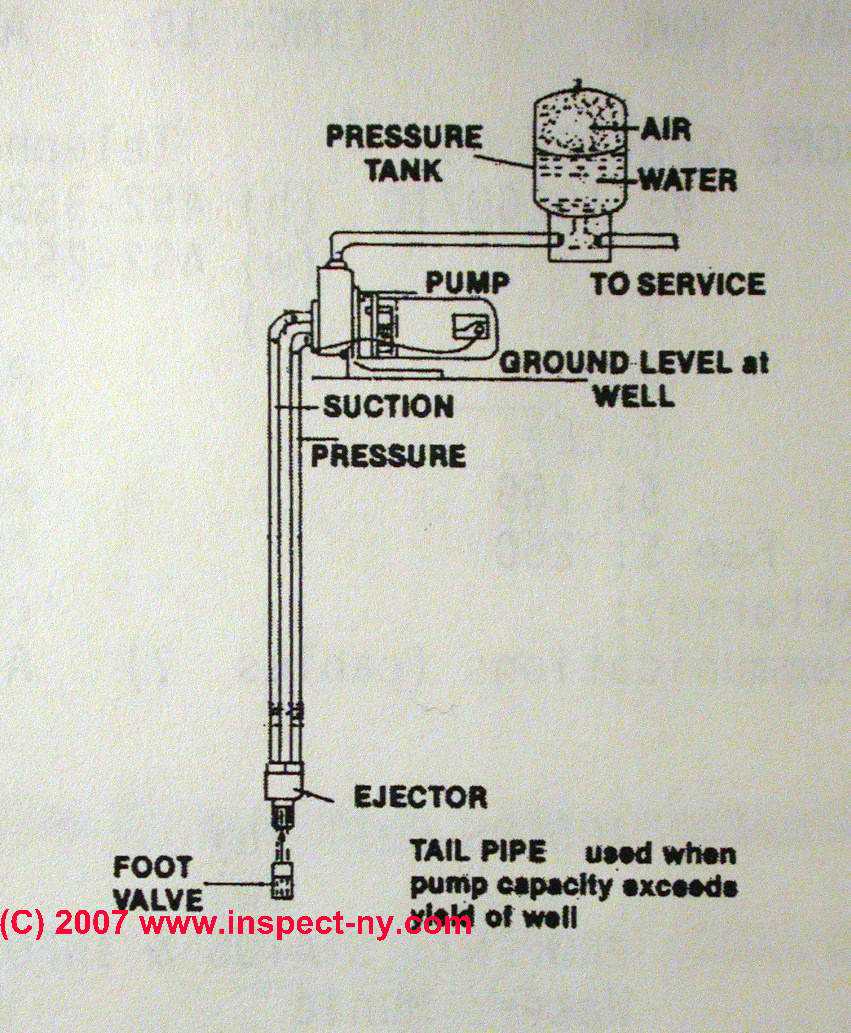
Using the wrong pump type for your well depth is a common cause of failure to build pressure.
Single-Pipe vs. Two-Pipe Jet Pumps
Single-pipe systems max out at about 26 feet of suction lift and work best for shallow wells under 25 feet. Two-pipe systems can lift water from up to 100 feet and suit deeper wells.
User Error: One homeowner with a 35-foot well replaced their two-pipe system with a single-pipe pump. It could not lift water reliably, no matter how many times they re-primed.
Verify Pump Model Capability
Not all pumps can reach 60 psi. Horsepower isn’t the only factor. Jet assembly design matters significantly.
A 3/4 HP pump like the Zoeller 1461-0006 maxes out at about 56 psi and cannot reach a 60 psi cutoff. It will run continuously if the switch is set too high.
Expert Advice: Post the model of the pump, and experts can tell you exactly how much pressure it will build.
Adjust Pressure Switch Settings
Never set the cut-out pressure higher than the pump can achieve. If your pump maxes at 56 psi, set the switch to 36/56. For standard systems, use 30/50. Always set tank pre-charge 2 psi below cut-in.
Danger: A pump that runs nonstop due to unreachable cutoff pressure will overheat and burn out.
Look for Flow Restrictions
A clogged filter or partially closed valve can restrict flow enough to mimic low-pressure symptoms.
Inspect Inline Filters and Softeners
Bypass the filter or softener. Run water and observe pressure. If pressure improves, clean or replace the filter.
Warning: A clogged sediment filter can reduce flow to a trickle, even with a healthy pump.
Verify Valve Positions
Ensure these valves are fully open. The well head shut-off. The house entry valve. The filter bypass if in use. Any isolation valves in the basement or crawl space.
Pro Tip: A slightly closed valve can cause surging, weak flow, and pump short cycling.
Monitor Water Table Levels
If your well is going dry, the pump may run but fail to deliver enough water to build pressure.
Signs of Low Water Table
The pump runs longer than usual. Pressure builds slowly or not at all. The pump cycles on and off rapidly when water is used. Neighbors report similar issues.
Fact: A drop in the water table may have killed the original pump and could be stressing the new one.
Mitigation Strategies
Reduce water usage during droughts. Install a Cycle Stop Valve to maintain constant pressure and protect the pump. Consider a deeper well or alternative water source.
When to Call a Professional
Some repairs require expertise that exceeds typical DIY capability.
Call a licensed well contractor if you need to replace a foot valve or drop pipe. Seek professional help for diagnosing underground leaks. Hire an expert for installing a submersible pump. Get professional assistance for rewiring electrical components.
Rule of Thumb: If you have re-primed multiple times, checked the tank and switch, and still have no pressure, call a licensed well contractor.
Frequently Asked Questions About Well Pump Not Building Pressure
Why does my well pump run but not build pressure?
The most common causes are loss of prime due to air in the suction line, a waterlogged pressure tank bladder, a corroded pressure switch, or a mismatch between pump type and well depth. Leaks in the delivery lines can also prevent pressure from building.
How do I re-prime my well pump correctly?
Turn off power and drain the pump casing completely. Remove the priming plug and fill the casing with clean water until it overflows. Replace the plug tightly, restore power, and let the pump run for 2-3 minutes to clear any remaining air.
What should my pressure tank pre-charge be?
The tank pre-charge should be 2 psi below the cut-in pressure. For a 40/60 psi system, set pre-charge to 38 psi. For a 30/50 psi system, set it to 28 psi.
Can a clogged filter cause low pressure?
Yes. A clogged sediment filter can restrict flow enough to mimic low-pressure symptoms. Bypass the filter temporarily and test pressure to rule this out.
How do I know if my pressure switch is failing?
Look for corrosion or debris on the switch nipple and diaphragm. With power on, gently flick the contacts. A spark means the pump is receiving power. No spark indicates switch or electrical failure.
When should I call a professional for well pump issues?
Call a professional if you have re-primed multiple times, checked the tank and switch, and still have no pressure. Also seek help for underground leak detection, foot valve replacement, or submersible pump installation.
Key Takeaways for Fixing Your Well Pump Pressure Issues
A well pump not building pressure is rarely about the pump itself. Most issues stem from air in the system, failed components, or mismatched settings that can be diagnosed and fixed without professional help.
Start troubleshooting by re-priming the pump correctly using the pressurized back-flow method if needed. Test the pressure tank pre-charge and replace it if the bladder is waterlogged. Inspect the pressure switch for corrosion and test the contacts for spark. Verify foot valve and suction line integrity by testing water retention. Match your pressure switch settings to what your pump can actually achieve, and rule out leaks and flow restrictions.
With the right diagnostic approach, most pressure issues resolve in a few hours without unnecessary part replacements or costly service calls. Keep your system tuned, and it will deliver reliable water for years.