Is your submersible water pump not working? This frustrating problem strikes suddenly, leaving you with a silent pump, strange humming sounds, or a unit that runs but delivers zero water. The good news is that most failures follow predictable patterns, and you can diagnose them yourself with the right approach. This guide walks you through every common failure mode, from simple air binding to complex electrical faults, using step-by-step diagnostics that get your pump back online fast.
Diagnose by Symptom First
Before you touch any tools, identify exactly how your pump is behaving. The sound, vibration, and pressure response tell you where to start looking. Different symptoms point to completely different root causes, so skipping this step wastes time on the wrong repairs.
No Power, No Sound, Won’t Start
Your pump shows zero signs of life. This points directly to a power supply issue rather than mechanical failure.
Check these items first:
- Circuit breaker tripped or fuse blown
- GFCI outlet needs reset
- Power cord damaged or unplugged
- Control box disconnected or faulty
Immediate action:
Check your breaker panel and GFCI outlet first. Use a multimeter to test voltage at the control box. If no power reaches the pump, trace the circuit backward. A faulty pressure switch or loose wire often interrupts power silently.
Pro tip: A loose wire in the pressure switch is a common silent killer. Turn off power at the breaker, then carefully open the switch housing to inspect for corrosion or burn marks.
Pump Humming But Not Running

Your motor is getting power but the impeller won’t spin. This classic symptom means the motor is energized but something is blocking rotation.
Likely causes:
- Failed start capacitor
- Seized impeller or shaft
- Low voltage from long cable runs
- Jammed relay in control box
Test the capacitor:
Use a multimeter with capacitance setting. Remove the wires and discharge the terminals first. The reading should match the label within 10%. Bulging, leaking, or readings far off spec mean immediate replacement.
Expert insight: If the breaker hasn’t tripped but the motor hums and stalls, the windings are likely intact. Focus on the capacitor, relay, or mechanical blockage.
Free a stuck impeller:
- Pull the pump safely from the water
- Remove the intake screen
- Manually rotate the impeller by hand
- Flush with clean water
If it spins freely after this, reassemble and test. Still humming? Replace the capacitor.
Fixing Air Binding in Submersible Pumps
Your pump runs normally but delivers zero water. The motor hums, pressure builds briefly, then nothing. This usually means trapped air in the impeller housing is blocking water movement.
Why Air Binding Happens
Unlike jet pumps, submersibles don’t require priming because they operate underwater. However, air can still become trapped in the impeller chamber after maintenance, storage, or pump removal and reinstallation. The air disrupts centrifugal force, preventing water from moving through the system.
User insight: vinnielavoie reported, “Tilt it to one side when plugging in. It will start pumping. Or it’s hooped.” Another user confirmed this works by tilting the pump during startup.
How to Purge Air Quickly
This fix works approximately 90% of the time for pumps that run but don’t pump.
Steps:
- Submerge the pump fully in water
- Tilt it 10 to 30 degrees to let air escape upward
- Wiggle gently while powering on
- Repeat up to three times if needed
This simple tilt technique allows trapped air to escape and water to fill the impeller chamber. No disassembly required.
Clearing Clogged Intake and Impellers

Even small debris can stop water flow entirely. Hair, sand, silt, or fibrous materials wrap around impellers, increasing motor load and eventually causing complete blockage.
Signs of Blockage
- Reduced or zero water output despite running
- Higher than normal amperage draw
- Unusual vibration or noise
Clean the Pump Properly
Steps:
- Disconnect power and pull the pump
- Inspect the intake screen and clean with a brush
- Disassemble the housing if necessary
- Flush the impeller chamber with a hose
- Verify free rotation before reinstalling
Warning: Never use pure vinegar unless your pump is chemical-rated. Dilute it 50/50 with water, limit exposure time, and rinse thoroughly. Pure vinegar damages seals and elastomers.
Solving Pressure Loss and Down-Well Leaks
Your pump builds pressure during operation, but it drops immediately after shutdown. The system cycles repeatedly trying to maintain pressure. This points to backflow somewhere in the system.
The Leak Test
- Close the main shutoff valve to the house
- Run the pump until it reaches cut-out pressure
- Watch the pressure gauge closely
- Pressure holds steady: The leak is in household plumbing
- Pressure drops fast: The leak is down-well in the pipe, foot valve, or pump seal
Real example: zoesdad fixed a 5-year mystery leak only after removing an above-ground check valve that was masking the real problem in the well.
Check These Components
- Drop pipe joints for cracks
- Foot valve for debris or failure
- Internal check valve orientation
Never use an above-ground check valve to hide a leak. It delays proper diagnosis and causes repeated failures.
Electrical Faults That Kill Your Pump
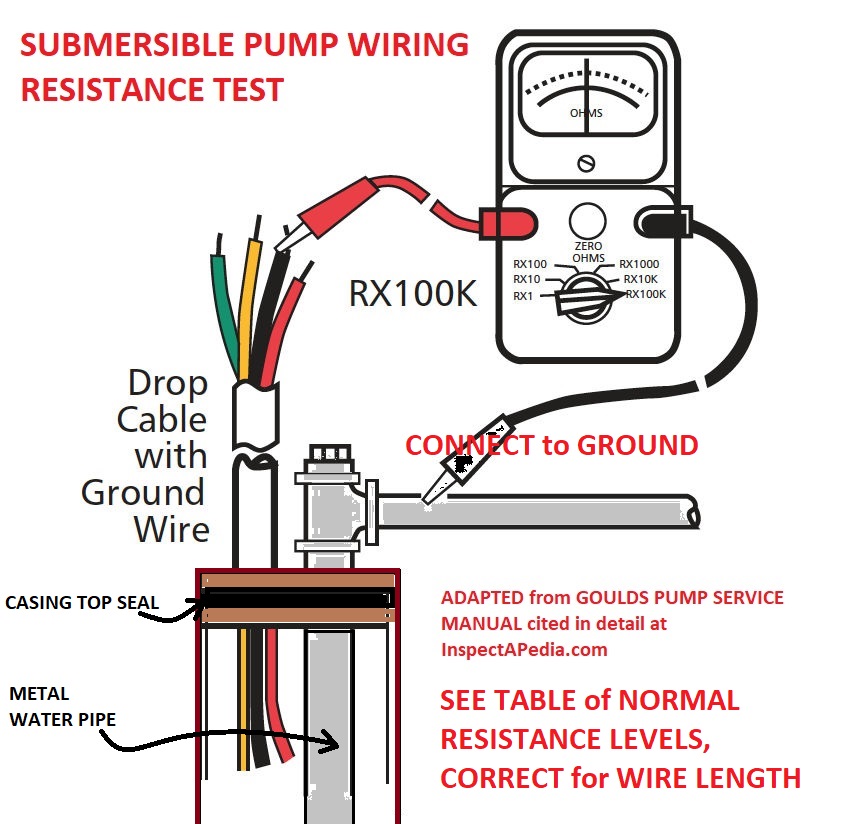
Many pump failures are electrical rather than mechanical. Test systematically to avoid replacing good parts.
Test Voltage at the Source
Use a multimeter at the control box:
- Single-phase pumps should read within 10% of rated voltage (207 to 253 volts for a 230-volt pump)
- Three-phase systems require all legs to balance within 5%
Example: A 230-volt system reading 220V, 230V, and 200V shows a 13% imbalance. This causes overheating and premature failure.
Fix voltage problems:
- Upgrade wire gauge for long cable runs
- Tighten loose connections
- Install a voltage monitor if utility fluctuations occur
Check Float and Pressure Switches
Test steps:
- Manually lift the float switch. The pump should start within 1 to 2 seconds.
- If not, test continuity with a multimeter
- Clean or replace the switch if faulty
For pressure switches, check the sensing tube for clogs and inspect contacts for wear or burn marks.
When Mechanical Seals Fail
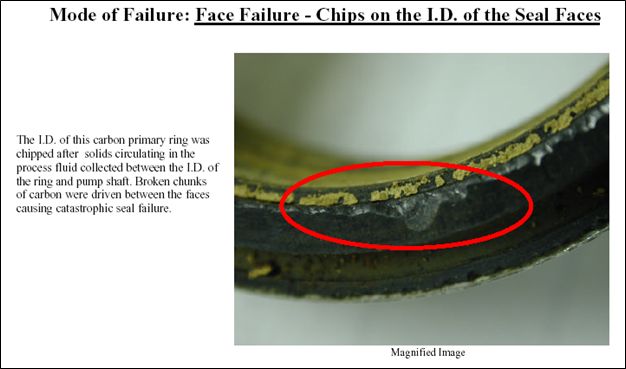
Seals keep water out of the motor. Once compromised, water ingress destroys the motor quickly.
Signs of Seal Failure
- Milky or discolored oil in the seal chamber
- Corrosion on terminals
- Burnt smell from windings
- Insulation resistance below 1 MΩ on testing
Test Motor Windings
| Test | Method | Good Result |
|---|---|---|
| Winding Resistance | Measure T1-T2, T2-T3, T1-T3 | Balanced per spec |
| Ground Fault | Lead to motor frame | No continuity |
| Insulation Resistance | Megohmmeter at 500V DC | Above 1 MΩ (ideally above 5 MΩ) |
Values below 1 MΩ mean moisture damage. Replace the motor or entire pump.
Replace the Seal
- Drain old seal oil
- Replace the double mechanical seal
- Refill with manufacturer-specified oil
- Lubricate O-rings with silicone grease
Prevention tip: Use pumps with double mechanical seals and thermal overload protection. Replace seals every 2 to 3 years in high-use applications.
Preventing Future Pump Failures
Regular maintenance prevents unexpected downtime and extends pump life.
Maintenance Schedule
Monthly tasks:
- Check power cord and plug for damage
- Verify float switch moves freely
Quarterly tasks:
- Clean intake screen
- Inspect discharge hose for kinks or blockages
Annual tasks:
- Test insulation resistance
- Check seal oil condition
- Replace seals every 2 to 3 years or 5,000 hours
Pro tip: Keep spare capacitors, float switches, and O-rings on hand. Downtime costs more than parts.
Essential Tools for Fast Diagnosis
Having the right tools makes diagnosis fast and accurate.
Must-have equipment:
- Multimeter (voltage, continuity, capacitance)
- Pipe wrench and screwdrivers
- Replacement seals, check valves, capacitors
- Silicone lubricant for O-rings
- Pressure gauge installed near the tank
Missing pressure gauge? You are flying blind. Install one to detect leaks and verify performance.
Repair or Replace: Making the Right Call
Repair If:
- Clogged impeller or faulty float switch
- Blown capacitor or bad relay
- Motor tests above 1 MΩ insulation
- Pump is under 5 years old and well-maintained
Replace If:
- Milky oil or burnt windings indicate water ingress
- Shaft is bent or bearings are seized
- Repeated failures despite proper repairs
- Pump is undersized or outdated
Recommended features in new pumps:
- Continuous-duty rating
- Vortex impeller for solids handling
- Double mechanical seals
- Thermal and dry-run protection
Final Thoughts on Fixing Your Submersible Pump
A submersible water pump not working is rarely a mystery. Start with the simplest fixes: power supply, air binding, and blockages. Move to electrical and mechanical diagnostics only after eliminating the basics. With systematic testing, most pumps restore quickly without professional help.
Always cut power before servicing. Test insulation resistance when troubleshooting mysterious failures. Listen for clues: humming means the motor is trying, no sound means power is interrupted, and clicking relays point to electrical control issues.
Follow this guide, work through the checklist methodically, and you will solve the problem faster than calling a plumber.
Frequently Asked Questions About Submersible Water Pump Not Working
Why does my submersible pump run but not deliver water?
This usually indicates air binding in the impeller chamber. Tilt the pump 10 to 30 degrees while submerged, then wiggle gently while powering on to release trapped air. If this fails, check for clogged intake or a stuck check valve.
How do I know if my pump capacitor is bad?
A bad capacitor causes humming but no rotation. Use a multimeter with capacitance setting. Readings outside 10% of the label, bulging, or leaking indicate failure. Replace with an identical capacitor.
Can a submersible pump lose its prime?
No. Unlike jet pumps, submersibles operate underwater and cannot lose prime in the traditional sense. However, they can suffer air binding after removal, storage, or improper installation, which mimics prime loss.
What causes a submersible pump to overheat and shut off?
Overheating occurs when the pump runs dry or is partially submerged, the discharge line is kinked or blocked, or voltage is out of range. Ensure minimum submersion depth of 12 to 24 inches and check all valves are open.
How do I test for a down-well leak?
Close the main shutoff valve to the house, run the pump to cut-out pressure, and watch the gauge. If pressure drops fast, the leak is in the well (pipe, foot valve, or pump seal). If pressure holds, the leak is in household plumbing.
When should I replace my submersible pump instead of repairing it?
Replace if motor windings test below 1 MΩ insulation, you see milky oil indicating water ingress, the shaft is bent, or the pump has failed repeatedly despite proper repairs. Outdated models lacking thermal protection should also be upgraded.