If your home’s water pressure has dropped to a trickle or you’re suddenly without water, the culprit might be a failed submersible well pump. This critical component, installed deep inside your well, can silently fail after years of service, leaving you scrambling for answers. Replacing a submersible water well pump is no small task, but with the right tools, safety precautions, and step-by-step guidance, many homeowners can handle the job themselves, especially for wells under 200 feet. This guide walks you through the complete process from diagnosis to final testing.
Diagnose Pump Failure Before Pulling
Many well issues mimic pump failure but stem from electrical or pressure system problems. Confirm the pump is actually dead before committing to a replacement.
Check Power and Pressure at the Switch
Start at the pressure switch near your pressure tank. Flip the lever to “on.” If you hear a click but no water flows, the issue may be downstream. Use a multimeter to test voltage across the two black wires leading to the pump. You should read 240 to 250 volts AC. If voltage is present, power is reaching the well, but the pump is not responding. No voltage at all means check the double-pole 20-amp breaker. If it trips and resets only to trip again, you may have a short in the wiring or motor.
Measure Amp Draw to Confirm Failure
Use a clamp-style amp meter on one of the pump wires at the pressure switch. With the system running, a normal draw for a 3/4 HP pump is 7 to 9 amps. A brief startup spike to 70 to 84 amps is normal. Sustained high draw above 84 amps indicates motor windings have swollen and seized, meaning the pump is dead. If the breaker does not trip but amps stay high, it is a mechanical failure, not electrical, and the pump must be replaced.
Inspect for Pests and Blockages
Remove the well cap with an 11mm socket. Listen carefully. Buzzing could be bees or rodents nesting in the foam insulation, not a failing pump. Inspect the pitless adapter and wiring for damage, nests, or corrosion before concluding the pump is faulty.
Shut Off Power and Prepare the Site
Working with 240 volts and deep wells demands strict safety. One mistake can lead to electrocution or equipment damage.
Turn Off and Lock Out Power
Flip the double-pole 20-amp breaker and verify no voltage with a multimeter. Use a lockout/tagout device to prevent accidental re-energizing. Never skip this critical step. Test the multimeter on a known live circuit first to confirm it works.
Clear and Access the Wellhead
Cut back grass and debris around the well casing. Remove the well cap carefully. Deburr the top edge of the casing to prevent cuts to wires or seals during reinstallation. Make a vertical cut on the discharge pipe so inline fittings slide back on easily during reassembly.
Remove the Old Pump
Pulling a submersible pump requires the right tools and technique, especially if it has been down for decades.
Engage the Pitless Adapter
Insert a 7-foot T-wrench, made from 3/4-inch pipe threaded into a 1¼-inch coupler, into the well. Rotate until it locks into the pitless adapter, typically 4 to 6 feet below grade. Apply steady upward pressure. For deeper wells over 50 feet, use a ratchet strap looped around a tire-less car rim or a small ATV for gentle assist. Avoid trucks, which can snap the drop pipe.
Cut and Retrieve Components
Once the pump clears the wellhead, cut the polyethylene drop pipe and 12-2 UF pump wire. Inspect for black manganese residue, worn insulation, or kinks. Thread a nylon safety rope through the pump eyelet before lowering any new unit as a backup retrieval line.
Verify Pump and System Specifications
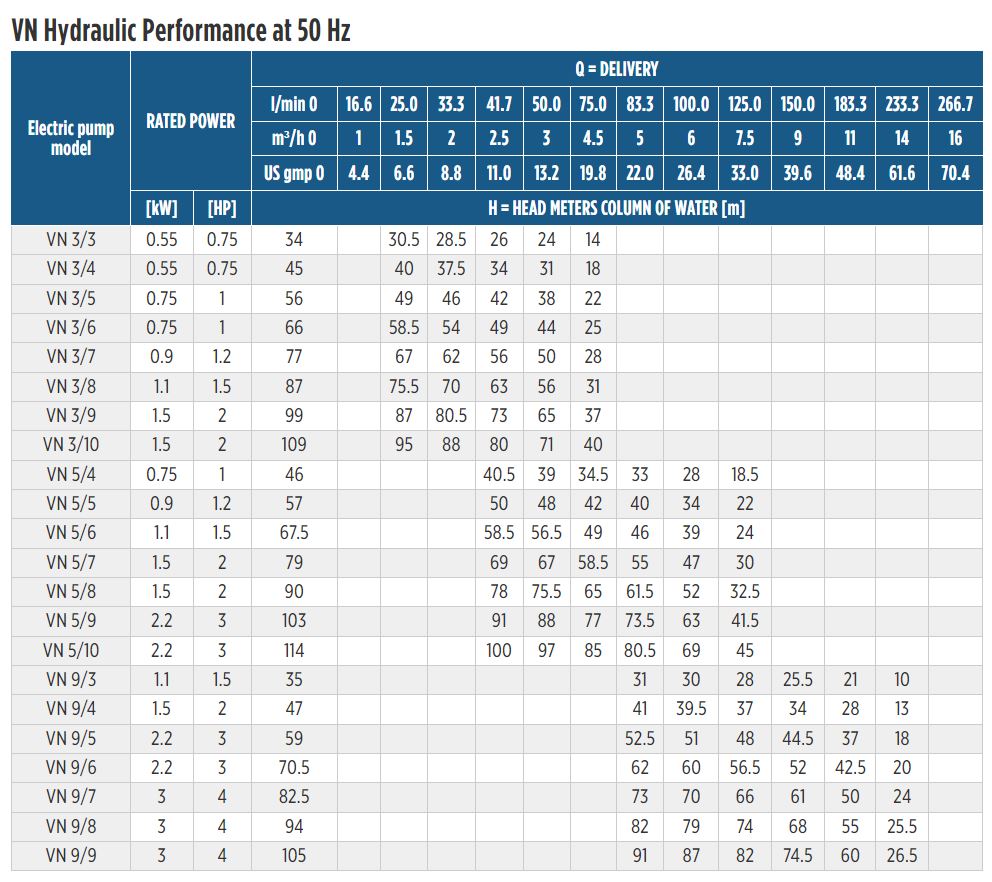
Do not assume the old pump specs are correct. Confirm all measurements before buying a replacement.
Gather Key Measurements
You need the well depth, static water level, required flow rate, pipe diameter, and voltage. Measure the well depth using a weighted tape or note records from installation. The static water level can be measured with a wet string or pebble-drop test. For household use, 5 to 10 gallons per minute is typically sufficient. Most residential systems use 1-inch NPT pipe and 230-volt two-wire or three-wire configurations.
Match the new pump to these specs. For reliability, choose Franklin Electric or other reputable brands. For depths over 100 feet, consider a stainless steel or brass pump head, as plastic can fail under stress.
Install the New Pump
Precision matters during installation. A single loose clamp or bad splice can doom the new pump immediately.
Attach Adapter and Hose
Warm the 1-inch NPT barbed adapter, preferably bronze, with a heat gun. Apply Teflon tape and pipe dope to the pump outlet threads. Insert the adapter and tighten securely. Slide two hose clamps onto the poly pipe. Briefly heat the pipe end with a torch to soften it. Push it fully onto the barb, about 1¼ inches deep. Position clamps one-half inch from each end and tighten. If it pulls off by hand, it is not secure.
Mount the Torque Arrester
Install a torque arrester 6 inches above the pump using stainless steel clamps. This device prevents rotational stress from damaging the drop pipe during motor startup and shutdown.
Splice Electrical Wires Waterproof

This is the most failure-prone step. A wet splice kills pumps fast.
Use Compression Splice Kit
Tie a knot in each wire end to prevent pull-through. Insert a rubber grommet for water sealing. Slide on a plastic sleeve sized for #12 AWG. Crimp the crimp ring tightly, giving yourself only one chance to do this correctly. Wrap the entire splice with electrical tape for added protection.
Or Use Heat-Shrink Crimps
Strip one-half inch of insulation from the 12-2 UF wire. Slide heat-shrink tubing over the wire before crimping. Crimp the connector to the pump lead. Apply heat with a torch to seal the connection. Never use Romex or duct tape. Only underground-rated UF cable survives long-term in well conditions.
Bundle and Secure Components
Prevent snags and abrasion during lowering by properly organizing all components.
Wrap Every 20 Feet
Attach nylon safety rope to the pump eyelet. Bundle the rope, wire, and poly pipe together. Wrap with electrical tape every 20 feet. Add self-clamping guards at each interval to prevent snagging on the well casing or pitless adapter.
Clip Wire Every 2 to 3 Feet
Use wire clips to secure the cable to the drop pipe. This prevents chafing and vibration damage during operation. Check that there is no slack or loops that could catch on the pitless adapter during installation.
Lower Pump Into the Well
Careful lowering prevents damage and ensures proper placement for optimal water flow.
Position Pump Correctly
Set the pump 5 to 15 feet above the well bottom to avoid sediment. For example, in a 74-foot well, place the pump at 59 to 69 feet depth. This positioning keeps the intake above the well floor while maximizing water column above the pump.
Guide Into Pitless Adapter
Thread the wire and rope through the well seal or pitless adapter. Use a T-bar to lower the assembly slowly. Guide the T-bar into the pitless adapter and hook it in place. Unthread and remove the T-bar. The pump is now anchored. Expect some gurgling as trapped air displaces. This is normal and will resolve as the system operates.
Reconnect Water and Power Lines
Final connections must be secure and code-compliant for safe, reliable operation.
Run Water Line to House
Use polyethylene pipe in a corrugated sleeve or PVC conduit from the pitless adapter to your home. Connect to the pressure tank. Ensure all fittings are tight and sealed with Teflon tape and pipe dope.
Wire the Electrical System
Pull 12-2 UF wire through three-quarter-inch conduit in the well cap using fish tape. At the house, connect the ground wire first. Attach hot wires to the pressure switch or control box. For three-wire systems, install a starter box with capacitors. Use wire nuts and wrap all connections with electrical tape. The standard pressure switch setting is 40/60 psi, cutting in at 40 and out at 60.
Sanitize the Well After Work
Any well intrusion risks bacterial contamination. This step is critical for health safety.
Chlorinate the Borehole
Mix 4 ounces of powdered chlorine per 100 feet of well depth. For a 400-foot well, use 16 ounces or 1 pound. Pour the solution into the well. Run an outdoor faucet until the chlorine smell is strong. Let the system sit for 12 to 24 hours. Flush the system until water is clear and odor-free. Skipping sanitization risks E. coli or sulfur bacteria growth.
Test System and Set Pressure
Final checks ensure long-term performance and prevent premature failure.
Charge the Pressure Tank
Use a tire gauge to check bladder air pressure. Set it 2 psi below the cut-in pressure. For a 40/60 psi switch, charge the tank to 38 psi. For a 30 psi cut-in, charge to 28 psi.
Perform Startup Test
Restore power at the breaker. Close the pressure switch lever manually and hold until pressure reaches cut-in. Watch for steady pressure rise and stable amp draw. A brief startup spike to 70 to 84 amps is normal, then it should drop to 7 to 9 amps for a 3/4 HP pump.
Flush and Maintain the System
New installation stirs up debris from the well and pipes.
Flush Out Sediment
Install a T-connector with a bypass valve. Run water outside for 5 to 10 minutes until it runs clear. Close the bypass and restore indoor flow.
Replace Filters
Change the whole-house filter element immediately after startup. It will trap dislodged particles and protect your plumbing and appliances.
Prevent Future Failures
Extend your pump life with smart maintenance and quality materials.
Annual Inspections
Check wire clips for tightness. Monitor pressure switch cycling. Test tank air charge. Look for signs of corrosion or leaks around all connections.
Upgrade Materials
For long-term durability, use epoxy-filled heat-shrink splices. Install a low-pressure cutout switch to prevent dry running. Record well depth, flow rate, and pump specs for future reference. For wells over 500 feet, always hire a professional with powered equipment.
Key Takeaways for Replacing Your Submersible Well Pump
Replacing a submersible water well pump is a major DIY project, but it is entirely feasible for depths under 200 feet with the right preparation. The most critical steps are proper electrical splicing with waterproof connections, correct pump positioning 5 to 15 feet above the well bottom, and thorough sanitization after any well intrusion. Always verify power is off with a multimeter before working on electrical components, and use only underground-rated UF cable, never Romex. With careful diagnosis, waterproof splicing, proper sanitization, and precise installation, you can restore water flow and save $1,000 or more. However, never compromise on safety, electrical integrity, or water quality. When in doubt, especially with deep or complex systems, call a licensed well technician.
Frequently Asked Questions About Replacing a Submersible Water Well Pump
How do I know if my submersible pump is bad?
Signs include no water or trickle at taps, frequent pressure switch cycling, tripped breakers, and humming without water flow. Use a clamp meter to check amp draw. Sustained high amperage above normal range indicates mechanical failure.
Can I replace a submersible pump myself?
Yes, for wells under 200 feet deep. You need basic electrical knowledge, mechanical aptitude, and proper tools. For deeper wells, hire a professional with powered pump pulling equipment.
What tools do I need to replace a submersible well pump?
Essential tools include a T-wrench, clamp-style amp meter, multimeter, heat gun, torch, wire strippers, and various wrenches. You also need plumbing supplies like polyethylene pipe, barbed adapters, hose clamps, and electrical supplies including UF wire and splice kits.
How deep can a submersible pump be placed?
Place the pump 5 to 15 feet above the well bottom to avoid sediment. Most residential pumps work at depths up to several hundred feet, but manual replacement becomes risky beyond 200 feet.
How often should I replace my submersible well pump?
Submersible pumps typically last 15 to 20 years under normal conditions. Annual inspections can help predict failure before it leaves you without water.
What happens if I skip sanitizing the well after replacement?
Skipping sanitization risks bacterial contamination including E. coli and sulfur bacteria. Always chlorinate the well after any intrusion to ensure safe drinking water.