A failing water tank can flood your home or leave you without hot water, creating an urgent need for repair. Knowing how to replace a water tank properly prevents costly damage and restores your supply quickly.
This guide details every step from shutting off utilities to testing your new unit for leaks. You will learn to select the right model, remove the old system safely, and install a replacement with confidence.
Essential Safety Steps Before Replacing a Water Tank
Safety is your top priority when working with high-pressure water and energy sources. Ignoring these steps can lead to electric shock, gas leaks, or severe burns.
Verify Power and Gas Are Off
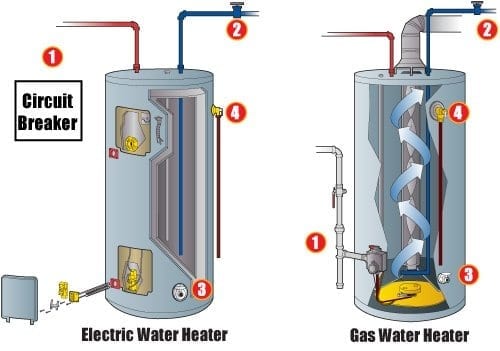
Turn off the circuit breaker for electric heaters or set the gas valve to “Pilot” for gas models. Always use a voltage tester to confirm the power is truly dead before touching any wires. Never assume the switch label is correct or that the system is safe without testing.
Drain the Tank to Prevent Flooding
Connect a garden hose to the drain valve and run it to a floor drain or outside area. Open the pressure relief valve to break the vacuum and allow water to flow freely. Wait until the water runs completely clear, which may take up to an hour depending on sediment levels.
Required Tools for Water Tank Replacement
Gathering the right equipment before you start ensures the job goes smoothly. Missing items can cause delays or force you to leave connections unfinished.
Essential Hand Tools and Equipment
- Adjustable wrench
- Pipe wrench
- Garden hose
- Flathead and Phillips screwdrivers
- Voltage tester
- Teflon tape
- Bucket or tray for residual water
Necessary Replacement Parts and Supplies
- New water tank matching your household needs
- Flexible water supply lines if not included
- Dielectric nipples to prevent corrosion on metal pipes
- Expansion tank if required by local building codes
- Pipe insulation to improve energy efficiency
Steps to Remove Your Old Water Tank
:max_bytes(150000):strip_icc()/replacing-a-water-heater-1824920-10-d50a4d3ce20b46c0996904b1f11f74c3.jpg)
Removing the existing unit requires careful disconnection of plumbing and venting systems. Rushing this process can damage surrounding pipes or cause injury.
Disconnect Water Inlet and Outlet Lines
Loosen the cold water inlet and hot water outlet connections using a wrench. Cut soldered pipes with a tubing cutter if they cannot be unscrewed easily. Support the remaining pipe sections to prevent stress on nearby fittings.
Detach the Vent Pipe on Gas Models
Remove the metal bands or clamps securing the flue vent to the top of the tank. Gently lower the vent pipe to avoid scattering soot and debris onto the floor. Place a drop cloth underneath to catch any falling residue.
Tip and Extract the Empty Unit
Tilt the drained tank slightly to remove any remaining water trapped in the base. Slide the unit out of its location while protecting your flooring with cardboard. Remember that even empty tanks are heavy and awkward to move alone.
Selecting the Correct Replacement Water Tank
Choosing the right model ensures your new system meets your household demand. An incorrect choice can lead to inadequate hot water or higher utility bills.
Match Capacity to Household Demand
Standard tanks range from 40 to 50 gallons for most average-sized homes. Select electric, gas, or hybrid heat pump models based on your available energy source and space constraints. Heat pump units save energy but require significant vertical clearance and warm ambient air.
Prioritize Energy Efficiency Ratings
Look for ENERGY STAR-rated models with high Uniform Energy Factor (UEF) numbers. Higher UEF ratings directly correlate to lower monthly operating costs for your home. Consider units with insulated jackets and smart controls for additional long-term savings.
How to Install Your New Water Tank
Proper installation is critical for the longevity and safety of your new system. Follow these steps to ensure a secure and efficient setup.
Position the Tank on a Level Surface
Place the new tank on a solid, flat surface capable of supporting its full weight. Maintain at least 18 inches of clearance from combustible materials for gas-powered models. Use a level to check alignment and add shims if the floor is uneven.
Connect Cold and Hot Water Lines
Attach the cold water supply line first by wrapping threads with Teflon tape to prevent leaks. Connect the hot water outlet next, using dielectric unions when joining copper pipes to steel nipples. These unions prevent galvanic corrosion that can ruin your new tank prematurely.
Restore Power or Gas Supply Safely
Fill the tank completely before restoring power to electric units to prevent element burnout. Set thermostats to the recommended 120°F and turn on the breaker. For gas models, relight the pilot according to manufacturer instructions and verify the flame is blue.
Testing Your New Water Tank for Leaks
:max_bytes(150000):strip_icc()/how-to-fix-leaking-water-heater-2719073-02-fd2459f999724f05b29374a7605097e1.jpg)
Final verification steps ensure your system operates safely before you return to normal use. Skipping these checks can result in undetected leaks or system failure.
Fill the System and Bleed Trapped Air
Open the cold water shut-off valve and allow the tank to fill completely. Open a hot water faucet elsewhere in the house to release trapped air pockets. Close the faucet once water flows steadily without sputtering.
Inspect All Joints and Fittings
Examine every connection, valve, and fitting for signs of dripping or moisture. Tighten connections slightly if needed, but avoid over-torquing which can strip threads. Wait 15 minutes and check again, as some leaks only appear after pressure stabilizes.
Verify Heating Function and Temperature
Listen for heating elements to engage on electric models or the burner to ignite on gas units. Monitor the temperature rise over the next few hours to ensure consistent performance. Confirm that exhaust gases are flowing upward and away from the unit.
Troubleshooting Common Water Tank Issues
Even careful installations can encounter minor problems that require attention. Addressing these quickly prevents long-term damage.
No Hot Water After Installation
Check that the power is on and breakers have not tripped since installation. For gas models, verify the pilot light is lit and the gas supply valve is open. Ensure both upper and lower thermostat settings are adjusted correctly for your model.
Persistent Leaking at Connections
Disassemble leaking fittings, reapply fresh Teflon tape, and reconnect them securely. Avoid using pipe dope on plastic threads as it can cause cracking over time. Tighten gently to avoid damaging the new components.
Popping or Rumbling Noises
Flush the tank immediately if you hear popping sounds caused by sediment buildup. Check the pressure relief valve to ensure it is not stuck or failing. Install a water softener if your area has hard water to prevent future accumulation.
Maintaining Your New Water Tank for Longevity

Regular maintenance extends the life of your investment and keeps energy costs low. Simple annual tasks can prevent catastrophic failures.
Schedule Annual Flushing Procedures
Drain three to four gallons from the tank once a year to remove sediment. This simple task improves heating efficiency and prevents internal corrosion.
Test the Pressure Relief Valve Monthly
Lift the lever on the temperature and pressure relief valve to ensure it moves freely. Replace the valve immediately if it leaks continuously or fails to discharge water.
Inspect the Anode Rod Periodically
Check the anode rod every two to three years for signs of heavy corrosion. Replace the rod if more than six inches of the core wire is exposed. This single component protects your tank lining and can double its lifespan.
Frequently Asked Questions About Water Tank Replacement
How long does it take to replace a water tank?
Most homeowners can complete the replacement in three to five hours if no major plumbing modifications are needed. Professional plumbers often finish the job in two to three hours depending on access and complexity.
Do I need a permit to replace my water tank?
Many local jurisdictions require a permit for water heater replacement to ensure code compliance. Check with your local building department before starting work to avoid fines or issues when selling your home.
Can I install a larger water tank than my current one?
You can install a larger tank if your plumbing connections and physical space allow for the increased size. Ensure your floor can support the extra weight and that your energy source can handle the higher demand.
Why is my new water tank making knocking noises?
Knocking noises usually indicate trapped air or sediment buildup at the bottom of the tank. Bleed the system by opening hot water faucets and flush the tank to remove any debris.
When should I call a professional plumber?
Call a professional if you smell gas, encounter complex piping issues, or feel unsure about electrical connections. Licensed experts ensure your installation meets all safety codes and warranty requirements.
Key Takeaways for Replacing Your Water Tank
Replacing a water tank requires careful attention to safety, proper tool usage, and methodical installation steps. By shutting off utilities, draining the system completely, and verifying all connections, you ensure a safe and effective replacement. Regular maintenance like annual flushing and anode rod checks will keep your new unit running efficiently for years.
Take action today by inspecting your current tank for signs of age or leakage. If you notice rust, noise, or inconsistent water temperature, plan your replacement immediately to avoid unexpected failure.