Is your engine overheating? Hearing a grinding noise from the front of the engine? These could be signs your water pump is failing. The water pump is a critical component of your car’s cooling system, circulating coolant to prevent the engine from overheating. When it fails, you risk serious engine damage. Replacing a water pump isn’t just about fixing a leak. It is about preserving your engine’s life.
The good news is that with the right tools, a little patience, and this step-by-step guide, you can replace a water pump yourself and save hundreds compared to a dealership repair. You will learn exactly how to remove the old pump, prepare the mounting surface, install the new unit correctly, and bleed the system like a pro.
Essential Safety Precautions Before Starting
Work Only on a Cool Engine
Never open the cooling system when the engine is hot. The coolant is under pressure and can spray out at scalding temperatures, causing serious burns. Wait at least 3 to 4 hours after the engine was last running. Confirm it is cool by touching the radiator cap. If it is warm, wait longer.
Disconnect the Battery
Always disconnect the negative battery terminal first, then the positive. This prevents accidental electrical shorts when working near wiring or metal components. If your battery or tray blocks access, remove them and set aside safely.
Use Proper Lifting Equipment
If you need to raise the front of the car for better access, use a jack with jack stands and wheel chocks. Never rely on a hydraulic jack alone. Your safety depends on stable support.
Protect Yourself and the Environment
Wear safety glasses and gloves. Coolant is toxic to pets and wildlife. Use a labeled waste coolant container and take it to an auto parts store or recycling center for free disposal. Never pour it down drains or onto the ground.
Tools and Parts You Will Need
Required Tools
You will need a socket set with 8mm sockets, a ratchet and extensions, and a torque wrench. The torque wrench is critical for proper bolt tightness. You also need a drain pan with at least one gallon capacity, a no-spill funnel with adapter, a plastic gasket scraper, and a scouring pad.
Have a flathead screwdriver or plastic pry bar ready, along with medium-strength threadlocker and lint-free towels. A drop light improves visibility in tight engine compartments. Keep a vehicle-specific repair manual on hand for reference.
Replacement Parts and Supplies
Purchase a new water pump. OEM or high-quality aftermarket units work best. You will need fresh coolant that matches your vehicle’s specification. Never mix coolant types.
Also get a new thermostat, a drive belt, and new gaskets or O-rings. Always replace these items rather than reusing old ones. A waste coolant container is essential for proper disposal.
Signs Your Water Pump Needs Replacing
Coolant Leaks Under the Car
Look for puddles under the front center of your vehicle. A leak near the timing cover often means the water pump’s weep hole is active. This is a sure sign of seal failure.
Weep Hole Is Dripping
The weep hole is a small hole at the bottom of the pump. It allows early detection of internal seal failure. A steady drip means replacement is urgent.
Engine Overheating
If your temperature gauge climbs into the red zone, especially during normal driving, a failing pump may not be circulating coolant properly.
Unusual Noises from the Front
Whining, grinding, or squealing sounds from the engine’s front often point to failing water pump bearings.
Impeller Corrosion or Wear
A damaged or corroded impeller reduces coolant flow, leading to poor circulation and potential cavitation. Cavitation creates tiny bubbles that implode and damage metal surfaces.
Step-by-Step: Remove the Old Water Pump
Drain the Coolant First
Place a drain pan under the radiator petcock or lower radiator hose. Open the petcock or disconnect the hose to drain about one gallon of coolant. If the coolant is clean and recently flushed, you may skip full draining, but expect minor spillage.
Remove the Drive Belt
Use a wrench on the tensioner pulley bolt and pull down to release belt tension. Slide the belt off the pulleys. Inspect it for cracks or wear. Replace if needed.
Take Off the Pulley Cover
Remove the three 8mm bolts holding the cover. Set them aside in a labeled container. This gives access to the pump pulley.
Unbolt the Water Pump
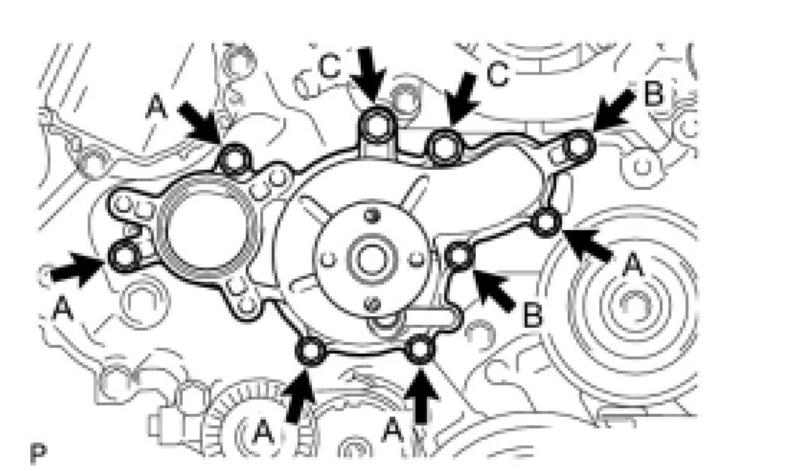
Remove the eight 8mm mounting bolts. The exact number varies by model. As you remove each bolt, insert it into the corresponding hole on the new pump to avoid mix-ups.
If bolts are wet with coolant, apply thread sealer before reuse. If they are dry, use medium-strength threadlocker.
Pry the Pump Loose
Gently insert a plastic pry bar or flathead screwdriver between the pump and engine block. Tap lightly to break the seal. Some coolant seepage is normal during this step.
Inspect the Weep Hole
Confirming a prior leak validates the replacement. Also check the old impeller for corrosion or damage.
Prepare the Mounting Surface

Scrape Off Old Gasket Material
Use a plastic gasket scraper. Never use metal tools, as they can gouge the aluminum engine block. Remove all traces of the old gasket material.
Clean the Surface Thoroughly
Use a scouring pad to smooth the surface. Wipe it clean with a lint-free towel. Any dirt, oil, or debris remaining can cause leaks.
Clean the New Pump
Remove any manufacturing residue or gasket fragments from inside the new pump. A clean pump lasts longer and functions properly.
Install the New Water Pump
Check for Alignment Features
Some pumps have an alignment tab that must match a notch on the engine block. If your old pump had a mark, transfer it to the new one with red paint or a marker.
Misalignment can throw off belt tension and cause premature wear.
Position the Gasket or O-Ring
If using a gasket, install it dry unless the manufacturer specifies sealant. If using an O-ring, do not apply sealant. Use a drop of coolant to hold it in place if it slips.
Never apply sealant to dry seals or O-rings. It can cause swelling or contamination.
Use Guide Bolts for Alignment
Insert two long bolts into the pump’s holes to act as guides. This ensures the pump slides on straight without damaging the seal.
Hand-Tighten All Bolts
Start all bolts by hand to ensure even seating. Cross-threading can ruin the housing and cause leaks.
Torque in a Star Pattern
Use a torque wrench to tighten bolts in a criss-cross star pattern. Common specs are 8 foot-pounds for many models. Some vehicles require 18 foot-pounds. Verify in your repair manual.
Mark each bolt as you torque it to avoid missing any.
Apply Threadlocker
Use medium-strength threadlocker on all bolt threads unless the manufacturer advises otherwise. This prevents loosening from vibration.
Only use sealant if specified. Apply a thin, even bead. Excess can break off and clog coolant passages.
Reassemble the Components
Reinstall the Pulley and Cover
If removed, reinstall the pulley and secure with three 8mm bolts. Torque to 8 foot-pounds with threadlocker.
Route the Drive Belt Correctly
Slide the belt back over all pulleys. Ensure it is centered and fully seated. Misalignment causes noise and wear.
Reconnect the Battery
Reconnect the positive terminal first, then the negative. Reinstall the battery tray if removed.
Replace All Shields and Covers
Reinstall any underhood components you removed for access.
Refill and Bleed the Cooling System
Use a No-Spill Funnel
Attach a no-spill funnel with the correct adapter to the coolant reservoir. Fill it to about three-quarters full. Leave room for air to escape.
Start the Engine
Let it idle. Watch the temperature gauge. It should rise normally.
Raise RPM to 2,000
Rev the engine to 2,000 RPM for a few seconds. This helps dislodge trapped air.
Wait for Bubbling to Stop
Air bubbles are normal. Let the engine run for 20 minutes until bubbling stops and the engine reaches operating temperature.
Remove the Funnel and Seal the Cap
Press the reservoir cap down, remove the funnel, and tighten the cap securely.
Some thermostats have a jiggle pin. Gently shake the top radiator hose to help release trapped air.
Manual Pump Rotation Before Starting
Before starting the engine, manually rotate the water pump pulley about 10 times by hand.
This ensures coolant reaches the mechanical seal. It prevents dry running, which can damage the seal and cause early failure.
This simple step dramatically improves pump longevity.
Final Checks and Testing
Inspect for Leaks
Check under the car, around the pump, hoses, and reservoir. Pay special attention to the weep hole. Slight seepage for the first 10 minutes is normal. Persistent dripping means the pump is defective or improperly installed.
Verify Temperature Gauge
Ensure the engine warms up and stabilizes at normal operating temperature.
Check Belt Tension and Alignment
Make sure the belt is not too loose or rubbing against anything.
Top Off Coolant
After the engine cools, check the reservoir level and top off if needed.
Dispose of Old Coolant Properly
Pour used coolant into a labeled container and take it to an auto parts store or recycling center.
Best Practices: Do’s and Don’ts
Do’s
Flush the cooling system to remove debris that can damage the new pump. Use fresh, manufacturer-specified coolant. Old coolant loses protection.
Replace the thermostat. It is easy to access during this job. Replace belt, tensioner, and idlers together because they wear as a set.
Manually rotate the pump to prevent dry seal damage. Bleed the system thoroughly to prevent overheating and false alarms. Torque bolts correctly to ensure a leak-free, secure installation.
Don’ts
Do not reuse old coolant. It lacks lubricants and corrosion inhibitors. Do not apply sealant to O-rings. It causes swelling and leaks.
Do not skip torque specs. Under-tightening causes leaks. Over-tightening cracks the housing.
Do not start the engine without bleeding air. It leads to overheating and pump damage. Do not reuse old bolts. They can be fatigued from thermal cycling.
Do not ignore visual differences. Compare old and new pump pulley height to prevent belt misalignment.
Long-Term Maintenance Tips
Replace Coolant Every 5 Years
Even if it looks clean, coolant becomes acidic over time. This increases the risk of cavitation. Cavitation creates tiny bubbles that implode and damage the impeller and housing.
Water Pump Lifespan
Most last 60,000 to 100,000 miles, depending on coolant condition, driving habits, and part quality. Timing belt-driven pumps are often replaced during timing belt service. This is a smart way to save labor.
Frequently Asked Questions About Replacing a Water Pump
How Long Does It Take to Replace a Water Pump Yourself?
Most replacements take 1 to 2 hours, depending on your vehicle’s access and your experience level. Simple jobs on easy-to-reach pumps may take less time. Complex setups with timing belt removal can take longer.
Can I Replace Just the Water Pump Without Replacing the Thermostat?
Yes, you can, but it is not recommended. The thermostat is easily accessible during this job. Replacing it now prevents future overheating issues. It is a small additional cost for peace of mind.
What Happens If I Do Not Bleed the Air From the Cooling System?
Air pockets cause overheating and inaccurate temperature readings. The water pump can run dry, damaging the mechanical seal. This leads to premature failure and leaks.
How Do I Know If My New Water Pump Is Defective?
Slight weep hole seepage for the first 10 minutes is normal break-in behavior. Persistent dripping beyond a few days indicates a defective pump or improper installation. Check torque specifications and gasket placement.
Is OEM or Aftermarket Better for Water Pumps?
OEM pumps typically last 80,000 to 100,000 miles with high-grade materials. Quality aftermarket pumps last 60,000 to 80,000 miles. Remanufactured pumps have the shortest lifespan. OEM is best for critical applications.
Can I Reuse My Old Coolant?
No. Old coolant lacks lubricants and anti-corrosion agents. It becomes acidic over time and can damage your new pump. Always use fresh, manufacturer-specified coolant.
Key Takeaways for Replacing Your Car’s Water Pump
Replacing a water pump is a straightforward DIY job that saves significant money compared to dealership repairs. The process involves draining coolant, removing the drive belt and pump assembly, cleaning the mounting surface, and installing the new pump with proper torque and threadlocker.
The most critical steps are bleeding air from the system and manually rotating the pump before starting the engine. These steps prevent dry running and premature seal failure. Always use new coolant and consider replacing the thermostat at the same time.
A properly installed water pump can last 100,000 miles or more. By following this guide, you have not only saved hundreds but also gained valuable mechanical knowledge. Stick to OEM-spec parts, maintain your coolant every five years, and your engine will thank you with years of reliable performance.